
There are more mysteries to be solved in 3D Escape Room Detective Story, and in this walkthrough for level 3 I’m going to give you all the clues you need to solve them.
You’re being informed about the detective’s former subordinate, Pete, being spotted in a fight at St. Catherine’s Dock.
Today’s level seems a bit personal for our detective, Michael Green, so he needs to find all the clues about where Pete vanished and what really happened there.
3D Escape Room – Detective Story Walkthrough – Looking for Pete

- You start at the boat’s helm, so look at the bottles on the floor on the right side.
- You can roll one out of the way to see a note written in blood ASMT.
- There’s a frame on the right wall with some wings, it’s a clue for later.

- Behind you, next to the closed door in the corner, there’s a box with a puzzle.
- Tap the arrows to remove the locks and open it up.
- Now rotate the circles to make the anchor whole.

- You can take the small handle.
- Next you need to move through the open door and check out the other room.

- Look to your left and check out the desk.
- Open the middle drawer under evidence note #2 and take the metal feather B.
- Look at the drawer on the right side of this and use the small handle.
- Move it around so that the mark reaches the green light.
- Now move the small nub from the new puzzle down to the green light again.
- Take the key and check out the books above the desk.
- You can open the case of the third book, from left to right, and insert your key there.
- Pick the letters ASMT and another puzzle will show up.
- Check out the bookshelf on the right, go to the vases, and turn them around until you see some numbers: 37579
- Put those numbers into the new puzzle and take the strange lock core.
- Open it by rotating the cap.
- Check out the box on the left side of the desk.
- Rotate the little wheels to make the handle pop out.

- Rotate the handle to open it and take the globe fragment B from inside.
- Look at the drawers next to the books on top of the desk.
- Open the drawers and see them from the side to notice the markings.
- The clue is on the black books next to it.
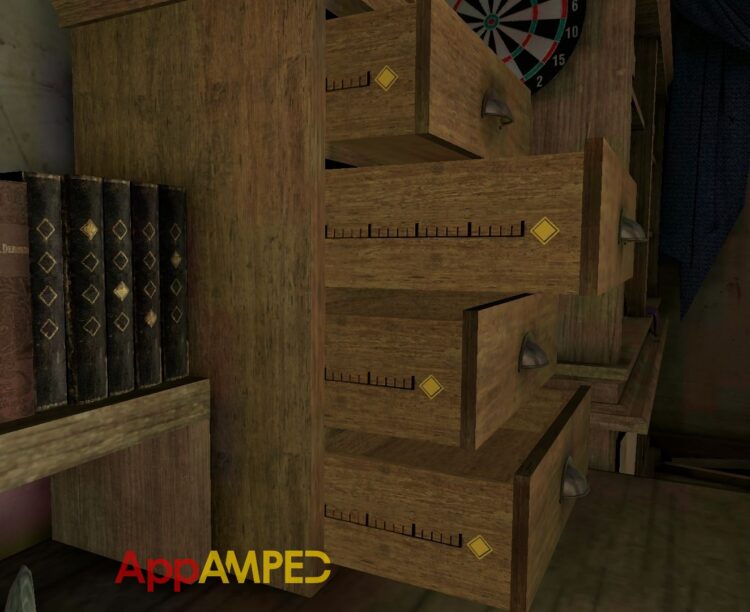
- Once the drawer under it opens you will find a double-layer gear inside.
- Look at the Globe and take the metal feather A.
- Look at the foot of the globe holder and rotate the metal part to match the green marks.
- You’ll find a globe fragment C.
- Go back to the helm and put the star-shaped lock core in the middle of it.
- Turn it once 360 degrees and take the circular badge.
- To open the circular badge press the buttons until only one triangle is out.
- Then press the button right next to it so two triangles are out, side by side.
- Then you press the ones that open 3 at a time:
- Go to the bird and put the feathers in their places.
- Now rotate the golden circle to the right, counterclockwise, until the feather turns, from 6 to 3 o’clock.
- Turn it left, clockwise, from 3 to 6 o’clock.
- And so on and so on until all the feathers are turned.
- Now turn its head to the left and right until all the pieces on the head get up.
- left – right – left – left – right – right
- Take the ruby from inside and enter the code 1025 (it’s the reverse number of what the clock under the bird is showing)
- You’ll find a bookend metal piece.
- Go back to the captain’s office and try that metal piece you just found in the closed drawer of the desk.
- Open it to get the globe fragment A and go at the globe.
- Put in all the fragments in the missing spots.
- Look at the map on the wall in front of you and press the fragments in that order.

- The new device that opens up has a tiny switch at the top, above the Roman numbers, that you need to turn and set in its place.
- Now look under it, take the key from there, and put the star-shaped badge in that spot.
- Go back to the helm, use the key there, and turn the helm around.
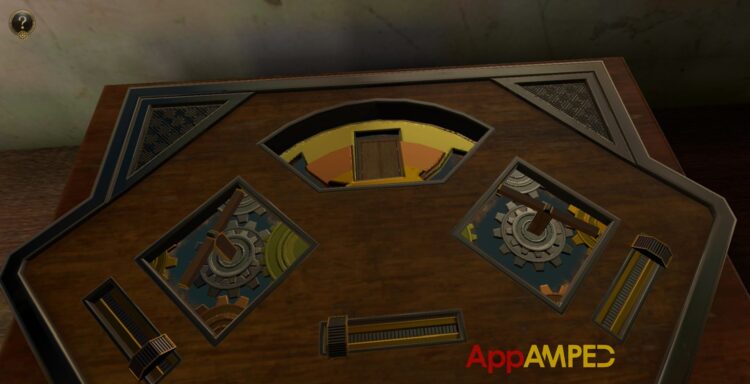
- Set the ruby in the middle of the device and turn the three wheels to put the ruby back together.

- Take the ruby back and clue paper A on the back of the compass that turns.
- Go to the device you found the last key and put the ruby there.
- The clue paper will help you move the ruby around to solve the puzzle.
- Find one side where you can drag the ruby all the way down.
- Then rotate the device twice until you have a path up, you need to go up twice.
- Then rotate the device again and you’ll get a spot to move the ruby down once.
- Rotate again and when you make the same pattern as it is on the clue, you’ll be given the coordinate N63.
- Move the Roman numbers to show through the front frame the numbers VI and III.
- Then as you see the W29, move them to II and to IX.
- Take the key and go at the bookshelf on the left.
- Look at the device above the vases.
- There’s a cap under it that you can move to the side, use the key, and turn it.
- Take the submarine model and pull on the top part towards the tail.
- Count the triangle on each drawing to find the number, on both sides of the model.
- First is: 3185
- Second: 5268
- Turn the propeller and take the emerald from the front.
- Go to the left of the helm and put the emerald in the device to fix this as well.
- I suggest you skip the mini-game of fixing the emerald because if you try too hard you’re going to get stuck like I did and have an even harder time fixing it.
- Open the second compass to get the clue paper B.
- Go with it at the globe and put the emerald there.
- The path is drawn for you on the note.
- Now you can do the N31 and pick III and I
- And then E118 which is XI and VIII
- Take the new key and go at the bookshelf.
- There’s an empty ink bottle next tot he books, use the key there.
- Push the book back and take the metal frame and the wooden piece out of the shelf.
- Go to the open drawer on the desk and put them both inside.
- Check the calendar above the desk and set the frame to have the fifth symbol on the second row in the top right corner.

- Go to the control panel on the left in the helm room and turn the fuses up as needed as shown in the frame above.
- Another key will show up on the panel.
- Go to the bookshelf again and insert this one into the ink bottle as well.
- Now you’ll find another puzzle to solve.
- Gems for each color on the house model and drag the gems on the side to the right spot:
- Green 4
- Yellow 3
- Blue 2
- Red 5
- It will give you the sapphire to take to the gem fixer:
- Move the wheels so that all 4 blue lights cross the sapphire.

- Take it with you and go and solve the puzzle on the panel and drag each piece to the center in this order:
- 1. Bottom middle piece up.
- 2. Bottom right corner
- 3. Top right corner.
- 4. Middle right piece.
- 5. Bottom left corner.
- 6. Middle left piece.
- 7. Top left corner.
- 8. Top middle piece.
- Take the last note clue for the sapphire path.
- Go to the globe and follow the clue to drag the sapphire in its place.
- Once the labyrinth is solved go to the coordinates and set the N15 to I and V
- And then the W92 to IX and II.
- Take the other single-layer gear and put one of them on the device above the maps to the right of the globe, the left one first.
- Turn the lever and move the nub to the left to make room for the other gear to fit on the right side.
- Turn this lever too and use the three nubs and turn the two levers so that the square hole and empty spaces of the 3 moving pieces align with the tiny doors behind them so you can have access to it and open it.
- A note with the words “Memory is an eternal life” is behind those doors.
Wrapping up
Keep a close watch on my next walkthroughs and make sure you check out the other two walkthroughs I did for 3D Escape Room Detective Story Level 1 and Level 2.
If you have other games that you’d like me to write about, leave a recommendation in the comments section below, I’m open to suggestions.

Aylin is a content creator and co-founder of App Amped. She was a huge Tomb Raider fan before moving on to more casual titles. She spent way too much time tending for her FarmVille farm as well as playing text-based browser games. Now she plays and writes about mobile games, creating in-depth walkthroughs and useful guides.