
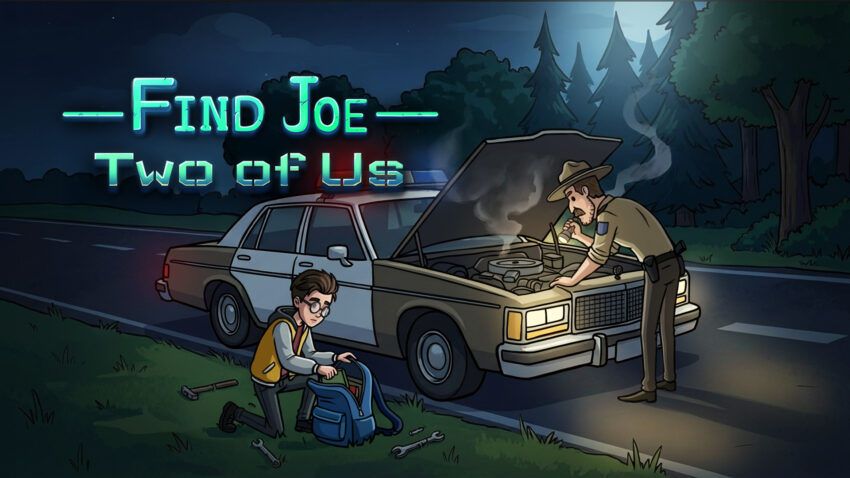
Join me on a new adventure in a Find Joe mystery story. I’ll show you every secret in every scene you walk in. Follow my lead to find your answers.
Find Joe: Two of Us invites you to step into the shoes of two distinct heroes simultaneously: the resourceful Joe and the relentless Sheriff Jones.
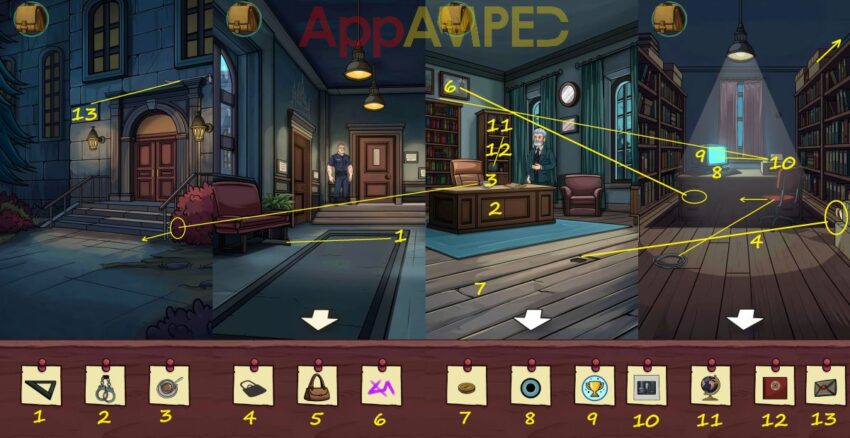
Two of Us: Part 1 – Joe’s House Walkthrough
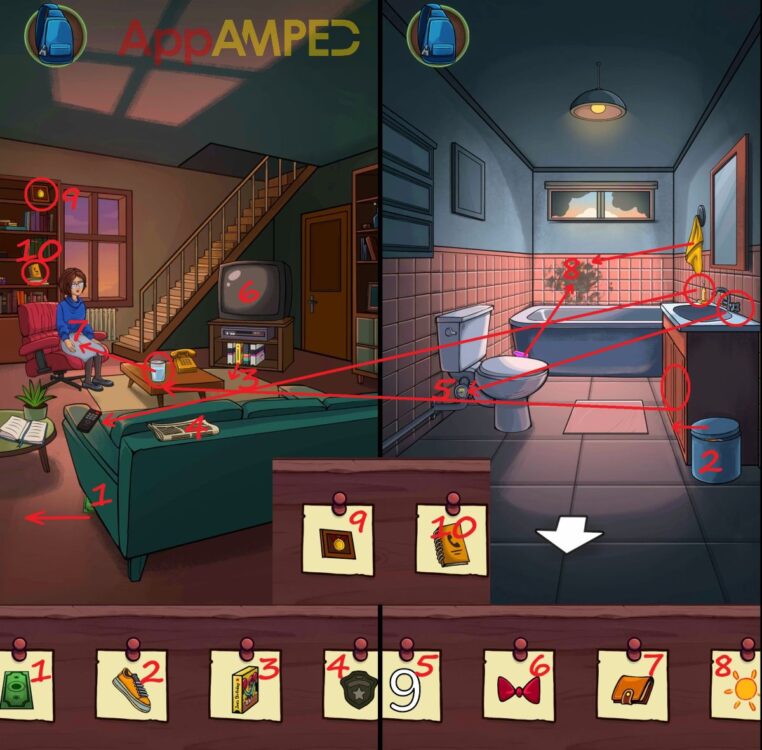
The money (1) is under the couch, the videotape (3) under the TV, the badge (4) in a picture in the newspaper. Take the medal (9) from the bookshelf, above the phonebook (10).
Enter the bathroom, through the door on the right, use the spray from behind the toilet to clean the wall above the bathtub with the towel next to the window, to find the sun (8).
Inside the bin is the sneaker (2). Go to the sink and look at your toothbrush, then turn it and take the batteries. Turn on the water on the sink and go to the water meter by the toilet and wait for number 9 (5). Look in the cupboard under the sink and take the pills.
Go back to the living room and use the batteries on the remote control, then turn on the TV, change the program until you find the man with the bow tie (6). Give mom the pills in the glass of water on the table. After she leaves you can take the wallet (7).
Now you can answer the phone and talk to Phil. He’ll ask you to meet him at the Roadside Cafe.
Two of Us: Part 1 – Roadside Cafe Walkthrough

There’s a round plate (2) on the red car’s back wheel. Take the wire cutters (11) from the ground, and move the letter A from behind the bin to the CAFE sign (8). Now you can go inside.
There’s a pin (12) on the chair and a paper on the floor, move it to find the oil stain (5). Rearrange the albums on the wall to get them. Take the food plate and put the bread slice in the toaster on the counter to get the toast (3).
You’ll find the camera (9) under the bench. Now insert the money bill in your inventory into the music jukebox and press disco (6). You’ll get a coin. Play the game on the chair at the bar and draw a 9 (10).
Go outside and put the food plate on the ground to get the dog (1) to get out from behind the car. Insert the coin in the candy machine, rotate the button and take the blue candy (7).
Two of Us: Part 1 – Jewelry Store Walkthrough

Pull out the antenna (8) on the building. There’s a rock (12) behind the car. Use the hook behind the jewelry building to remove the lid on the sewer. Look inside and tap the turtle (4) repeatedly to get it.
Pull up the window above the door to the store and take the vase (7). Then look inside the car to find a fingerprint kit under the chair then roll down the right side window to find the clock (10).
There’s a blue button in between the hairs, put it where the cables are sticking out.Press the button before getting out and see the siren (6).
Now you can go inside the store and take the ring (1) from under the first glass case. Look at the calculator on the floor, remove the tape to make it work, then tap 0 : to get the error (5).
Remove the glass to find the pendant (11). Go to the shop owner and open the blue case in front of him to find the purple stone (2). If you wait he’ll pull out a handkerchief (3) to wipe his forehead.
Look at the glass case behind him and you’ll find a lockpick (13) here. Use the fingerprint kit from the glass case, open the lid, put the brush in the black dust, then over the glass, put tape on then put it on the piece of paper, to get a fingerprint (9)
To open the safe you need to count the symbols on the buildings outside:
- triangles: 2
- hexagons: 3
- half circles: 4
- diamonds: 1
You’ll find the gold bar (14) inside.
Two of Us: Part 1 – Phil’s House Walkthrough
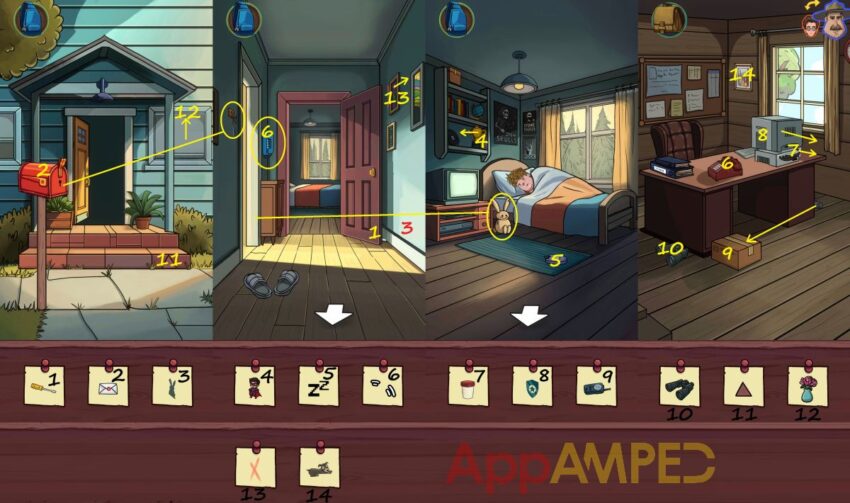
Get the triangle (11) from the steps to the door and the flower vase (12) from behind the sun shade on the window, then knock on the door to talk to Phil’s mom and get inside. Take the screwdriver (1) from behind the door in the front.
Move the picture on the wall to find the red X (13). Take the key in the hook on the left wall then go inside Phil’s room. Behind the cup on the shelf there’s a hero toy (4). Take the bunny then look at the pet simulator on the floor.
Push the middle button, then left – middle – right – middle and you’ll get the Zz (5). Now go outside, use the key on the mailbox to find the letter (2). Go into the hallway and put the bunny in the left door frame to get the bunny shade (3).
Check out the phone on the wall and use the phonebook, after looking through it to find Sheriff Jones phone number 9922, then call him. You’ll find the lines (6) over the red phone in his office.
Now that you’re in his office, you’ll find binoculars (10) on the ground. Look at the photo on the wall next to the window to find the dog (14). Turn over the monitor to find the badge (8). Then behind the monitor you’ll find the evidence container (7).
Use the cutter behind the desk to open the box and get the radio (9). Go back to Joe to Phil’s room and listen to him.
Two of Us: Part 1 – School Walkthrough
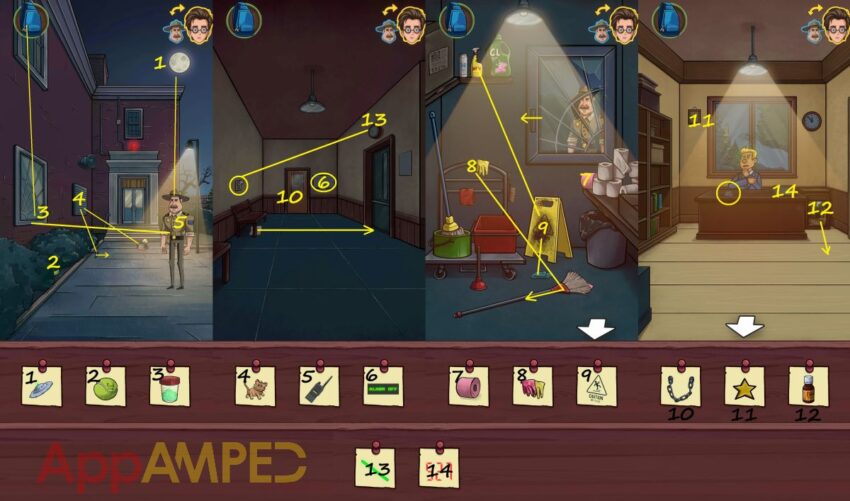
Take the tennis ball (2) from the bush. Change the perspective to the sheriff and take out the crowbar from the bush and open the grate on the wall. Then put the can there to get the cat (4).
Use the binoculars in your inventory and look at the moon to get the space ship (1). Look at the window on the left, use the evidence container to get the glowing dust (3), from the windowsill.
Change to Joe and get inside the vent where the cat was, the sheriff will give you the walkies-talkie (5). Turn on the light from the switch on the left, then turn it back off and look at the clock on the right to get the glowing hand (13).
Look at the panel next to the door in the front, slide it to the left to open it, ask the sheriff what wires to cut, use the wire cutter to cut numbers 67 (red wire) and 33 (green wire).
Get the alarm off (7) and switch to the sheriff. Have him break the window with his rock, then tell Joe about catching the keys. Switch to Joe and slide the newspaper under the door on the right.
Now the sheriff can knock the keys off with the stick, and Joe can get them pulling the paper out. Take them and use them to open the door to the supply room.
Once inside, move the broom to the left, move the glove next to the yellow one on the trolley and take the gloves (8). Use the spray on the yellow sign, and the cloth from the floor to wipe it and get the wet floor sign (9).
Open the window and take the fallen toilet paper (7). Switch to the sheriff and give Joe the lockpick. Then have him use it on the other locked door at the end of the corridor, and open the door when each pin is in the green area.
Open the door, take the chain (10) and enter the principal’s office. Take the star (11) from the frame on the wall, then look at the device on his desk and make the number 527 (14) from the lines using the buttons.
Look at the frame on the desk, open the back take the photo. Move the picture from the desk on the right, open the drawer and take the medicine (12). Give the principle the photo to help him remember and snap out of it.
Two of Us: Part 1 – Forensic Lab Walkthrough
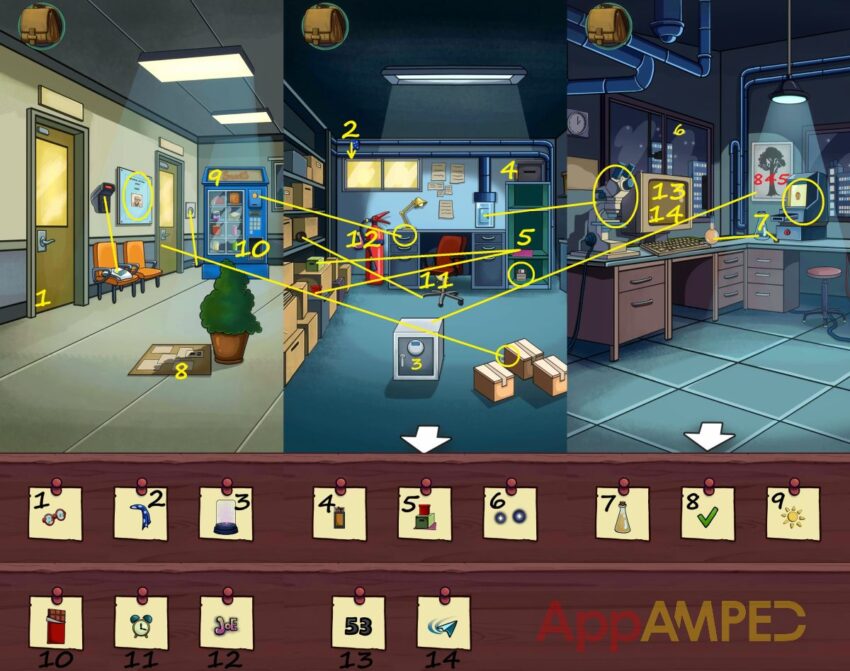
Look through the cardboard on the floor and get the check mark (9). Plug in the vending machine to find the sun (8). Pull out the card from the coat on the chair and use it on the card reader to open the first door.
You’ll find the glasses (1) in the door frame then enter the evidence room. Make the blue scarf (2) fall down to get it. Get the matches (4) from behind the box on the shelf in front.
Pull the fire extinguisher out of the way to find the word JOE (11). Put the wheel on the chair, from the shelf on the left, and push the chair away to find the clock (10).
Take the floppy disk from the shelf, the key from behind the boxes on the ground, and the coin from the top drawer of the desk.
Go out into the corridor and to the vending machine. Insert the coin and take the chocolate (9). Use the key to open the next door and enter the laboratory.
Move the yellow liquid from one bottle to the other, put the lid on and take the yellow tube (7). At the window you’ll see the two sparks (6). Put the finger print from your inventory in the print machine next to the tree picture.
Look at the frame with the tree on the wall and notice the code 845, go and use that on the safe in the other room to get the sparkling device (3), then go back.
Put the green dust in your inventory into the microscope on the left. Look at the computer and turn it on. If you push the ? you’ll need to enter the result of 1+2+3+…+99, which is 4950 to log in.
Press the print and click search to find the caution sign (12). Open the flap at the bottom of the monitor and insert the floppy disk then open the new icon on the monitor.
Press the + sign to zoom in on the picture, then move to the left of his right hand to find the number 53 (13). For the green dust analysis you need the code of the reagent A73. Go to the other room and enter that code in the reagent machine.
Take the reagent and add it to the green dust on the microscope, then analyze the sample at the computer, click share and enter the professor’s email: adam.doyle.
After you write the email click send to get the paper plane icon (14). Wait for a reply and read it.
Two of Us: Part 1 – Hospital Walkthrough

Look at the clock on the wall and move the clock arm to get the 3 (11). Look at the nurse’s cap and find the + (5). Check out the frame on the right wall, use the pin in your inventory to pin the paper and get the white flower (12). Now enter Phil’s room.
Close the window, pull the drape to find the calendar (4). Grab the extension cord (7) from under the bedside table and the socket (6) from under the table.
Take off the cap of the kettle, pour water from the bottle, then put the hot water in the mug to get the skeleton head (2). Give the thermometer to Phil’s to get the 100°F (8).
Move the bed up using the red up arrow and put all the picture pieces back on the wall to get the entire picture (13). Look at the video game on the chair and play it to get the win (9).
Take the stethoscope from the floor. Put the cord and socket together then plug into the socket in the wall then push it down towards the door. Go out to the corridor and give the nurse the stethoscope to get the sun (1).
Plug in the big heart frame (10) in the extension. Pay attention to the chairs in the waiting room and go inside to the machine on the cupboard to the left, and arrange the tiles the same: yellow – yellow – yellow – yellow – blue – blue.
You’ll find the medicine (3) inside and Phil will give you more clues to solve the mystery.
Two of Us: Part 1 – Radio Station Walkthrough
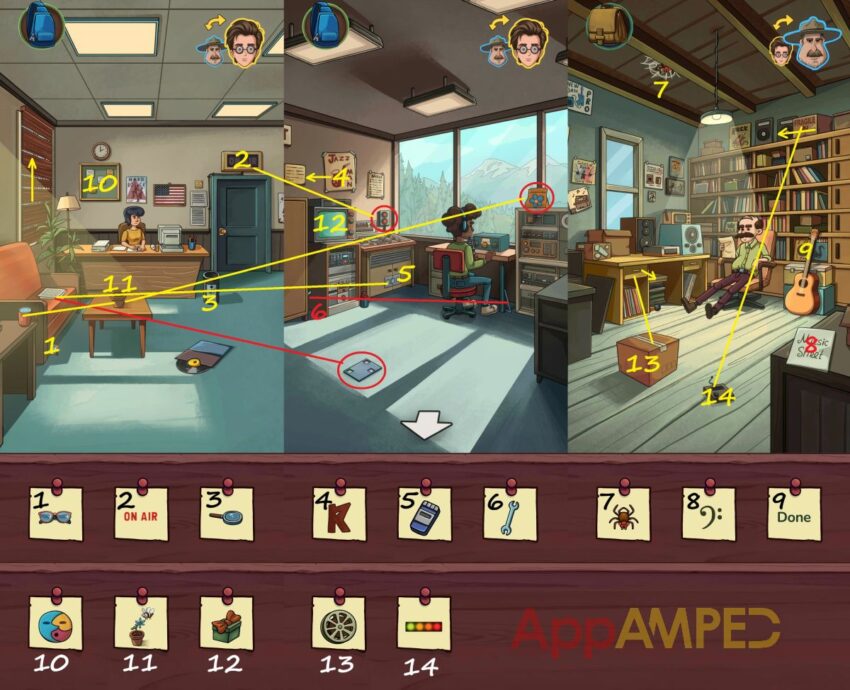
Take the glasses (1) from under the couch, look at the board behind the secretary and put the 3 colorful pieces together to form the symbol (10). Enter the studio and take the seeds and the metal plate. Tap the bin a few rimes to get the magnifying glass (3).
Go to the 2 buttons next to the TV and turn it on so the light is green. Go outside in the lobby and get the on air sign (2). Pull up the blinds from the window. Put a seed in the pot on the table, and use the cup of water to get a flower & bee (11).
Look at the papers on the couch and use the metal plate to see the code: 5 red – 2 purple – 8 green. Go back to the studio at the cupboard next to the TV and enter the code 582 and you’ll find an audio player (5).
Look at the TV, turn the power on, and use the tape in your inventory, rotate the buttons all the way to the left to get the gift (12) . Look behind the jazz poster to find the letter R (4). There’s a wire next to his desk, that you can use to get the wrench (6).
Switch to the sheriff and look on the ceiling to find the spider (7). Look at the music sheet on the corner in front of you, turn the page to find the music symbol (8).
Pull down the box on the top shelf to get a microphone, then combine it with the device on the floor and turn it on. Tap repeatedly on the phone to get the lights (14). Get the cutter from the drawer of the desk and open the box on the floor to get the film roll (13).
Tap the guitar and try to adjust the cords (swipe up/down) so that all the lights are green and the needle is in the middle to get the done message (9). Now you can switch to Joe and talk to John at the radio station.
Tell the information to the sheriff and he’ll ask the music expert about the song, he’ll give you more clues.
Two of Us: Part 1 – Billy’s House Walkthrough
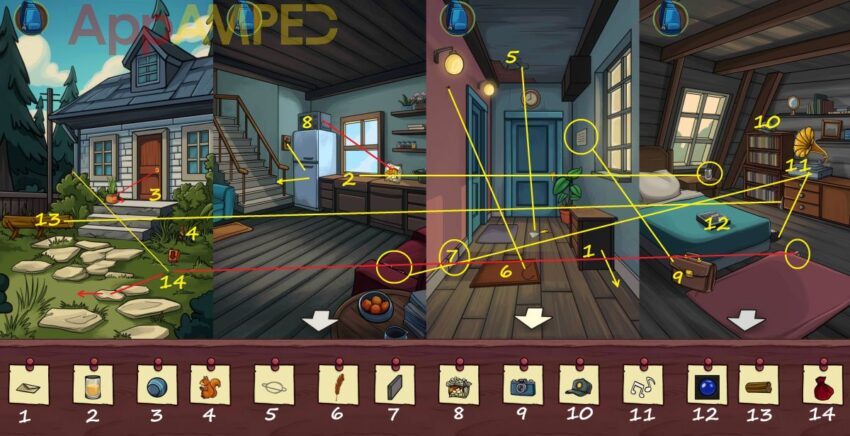
There’s a key behind the pot by the door that you can use to open the door and take the ball (3) behind it. There’s a shovel behind the house, use it to dig a hole where the arrow and X points to the ground, you’ll find a treasure chest.
Wait for the squirrel (4) to get out of the bush before you take it. Now go inside and put the popcorn (8) in the microwave to make it. You can take the crank handle in the side of the couch.
Go up the stairs and use the paint scraper on the floor to clean the ceiling and take the planet (5). Hang the painting from the floor to the nail in the wall to find the feather (6). Take the tile (7) from the wall under the painting. Move the cupboard to find the letter (1).
Go inside the bedroom and take the glass cup on the stand. You’ll find the cap (10) on the book shelf. Grab the vinyl from behind the bed, put it on and use the crank handle to play the music to get the notes (11).
Take the key from under the carpet. To open the briefcase next to the bed you need the first letter of each verse of the poem on the wall of the hallway, which is HOPE, and you’ll find the camera (9).
Play the game on the bed and take the blue ball (12) to the hole to get it. Note: first move the red ball on the same path so that the blue ball doesn’t remain stuck. Open the window and throw the saw outside.
Go back out, to the kitchen. Open the fridge, take the juice out and open the bottle using the device on the wall next to the fridge. Put the glass cup on the counter and pout some juice (2) in the cup.
Go outside, use the saw to cut up the wood and take the log (13). Use the key to open the chest and move the stone to get another key for the second chest to find the red bag (14). Now you can talk to Billy and he’ll give you the tape.
Two of Us: Part 1 – Hospital Again Walkthrough
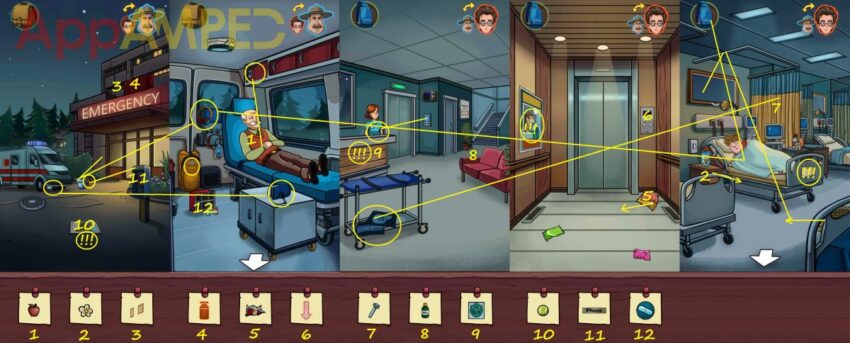
Look at the poster in the ground to find the tennis ball (10) and remember KORV is for movement. Take the rag from the bucket and go to the public phone and use it to clean the top and get the phone plate (11).
You’ll find a blood pressure monitor under the ambulance. Check out the red cover over the hospital and light all the lines using the 5 bulbs.
Take the bottle (4) and you can enter the ambulance to find an old man there. Take the cuff and put it together with the blood pressure monitor then use it on the old man. Press the air pump a few times, then release from the wheel.
He has a pill in his hand, he needs water which you can find in the cupboard above his head. He’ll give you an apple (1). In the orange back pack you’ll find a coin you should take. Get the headphones above it as well.
Switch to Joe, he’ll find a medicine bottle (8) on the couch and some X-rays under the gurney, to get to Phil’s room you need the sheriff to distract the receptionist.
Switch to the sheriff after you talk about it and use the coin to make a call and get her out of her post. Now switch back to Joe to look at her desk. You’ll find an elevator key card under the papers.
Put the 4 pieces of puzzle together to get the symbol (9). Read the note and remember EPAF is for digestion. Use the elevator card to get in the elevator.
Look at the poster on the left and remember VIROX is for the flu. Move the wrappers away to get the red wrapper (5). Press the button to go up to 2nd floor.
You can press to 1st floor after to get the red down arrow (6), but then you need to go up again to Phil’s room. Remember the note at the end of his bed, CYMA is for memory.
Move the curtain away, go to the monitor and turn it on, then put the x-rays there to find a screw (7). Pull out the cabinet next to Phil’s bed to find the flower (2). Turn on both lights from the switches.
Put the cassette player on Phil’s bed, then add the tape. Switch to the sheriff and you’ll find the 2 lit windows (3) on the hospital. Go to the ambulance at the medicine on the floor and put the bottles in the correct slots. and you’ll get the pill (12).
- NEXA – sleep
- VIROX – flu thermometer
- CYMA – brain
- KORV – bones
- ORIN – eye
- EPAF – stomach
Switch to Joe, pull the rope from behind the bed and throw it out the window then switch to the sheriff, move the bucket to the rope and put the headphones in. Switch to Joe and pull on the rope then give the headphones to Phil to wake him up.
Two of Us: Part 1 – Archive Walkthrough
Take the crowbar from the wall, open the rock tile and take the envelope (13). Behind the red bush is a bottle of milk you can take. Get into the room on the left, look at the desk, put the milk into the coffee (3), stir with the spoon and take it.
Press the pedal on the right side of the desk. The game on the desk is a code guessing game, enter the colors in the right order, use the clues about the position and correct colors, he’ll give you a pass.
Go to the bookshelf, move the plant out of the way, but the Earth globe (11) on the support to get it. Move the stacked books on the middle shelf to the top shelf, then put the wood board lower to get the red book (12) on that shelf.
Look at the painting above to the bookshelf and take the ink cartridge. Get a closer look at the clock and remember the arms, then go to the safe and turn the wheels from the top to the bottom the same as the clock arms.
- Top: 12 o’clock
- Middle: 4 o’clock
- Bottom: 8 o’clock
You’ll find the handcuffs (2). Go back in the hallway, give your pass to the guard to be able to enter the archives. Move the chair to the left and the rope on the chair to get the shadow (4).
Open the middle drawer on the left and get the UV flashlight. Look at the printer, open it and put the ink printer in place of the old one. Now go to the computer, tap the picture (10) and print it to get it.
At the computer you can tap the game icon and play the game to win the cup (9). Tap the cylinder on the computer next and enter the name Becky Cole. Unplug the wire to find the hole (8).
Take the heavy trophy from behind the boxes on the floor. Move the boxes on the top right shelf and get the purse (5).
Go to the big office and put the heavy trophy on the floor in the hole to get the coin (7). Look at the painting, use the UV light to find the symbol (6).
Go back to the archive room and to the computer. Press the cylinder icon and read about Becky Cole to find her address.
Two of Us: Part 1 – Hermit’s House Walkthrough

Take the door handle from the ground. Move one of the stones and take the gems and put the the white then yellow next to the gate, then add the grey one from the tree above, last, like the clue on the flag points out to open the gate.
Take the scissors from behind the fence, then use the rake near the gate to move the leaves out of the way and take the sewer cap (1). Go inside the house, take the ruler from the stairs.
Move the yellow flower pot to the side to find the blue flower (6). Open the bottom drawer next to the door to find the mask (2), then pull out the drawer to find the wig (3). Use the scissors to cut the thread holding the frame under the poster and find the spider (8).
Look at the white frame next to the door and peel off the alien head to get the star (7).Use the door handle to open the door to the basement. Read the book on the floor first and note the animals: cow – pig – goat – horse.
Go down to the basement and press the stones with the animal head in the same order to get the bone (12). You’ll find the chair (4) behind the crates, and a wooden rod above the chair. Use the black coal on the ground to draw an X on the top left crate (11).
There’s a coconut on top of all the crates. Take the red thread ball to the others on the table. Look at the threads closer and put the ruler here, then measure each thread:
- red 5
- blue 7
- yellow 4
Go out and peel off the poster with the black man to find a safe. Multiply 5x7x4 = 140 and enter that as a code to find the amulet (9). Pull the metal piece up on the stair rail, and put the coconut at the base to get a coconut halves (10).
Go outside and use the wooden rod on the headless doll, then get the head out from the push to put it on top and complete the voodoo doll (5). Go back down into the basement and talk to Becky.
Two of Us: Part 1 – Tower Walkthrough
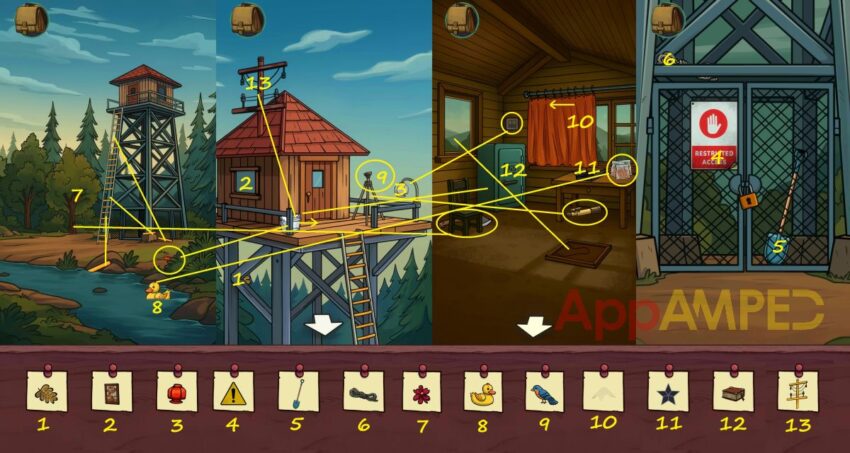
Take the brush from behind the bush, put the ladder steps back on the ladder and go up to the tower. You’ll find the leaf (1) under the cabin here. Enter the cabin, pull the drape to see the mountain top (10). Solve the puzzle on the desk to get a star (11).
Take the bird feed, the telescope, and the axe from here and turn on the lights in the corner, then open the drawer and take the key. Look at the trees in front of the mountain and use that sequence to open the safe.
Take the dye and the book (12). Put the painting on the floor to the window. You can go outside to see the painting (2) and the red lamp (3). Pull out the white paint, add the dye and put in the brush then paint the electric post (13).
Put the telescope on its support and look through, spot the bird (9) behind the tree. Go back down and use the bird feed for the duck (8) to get to the shore. Use the axe to cut off the tree and find a flower (7).
Look at the gates under the tower and take the rope (6) from above. Peel off the restricted access sign to get the danger sign (4). Use the key to open the gate and take the shovel (5).
Go back up the ladder and look through the telescope to discover the portal in the forest.
Two of Us: Part 1 – Forest Gate Walkthrough
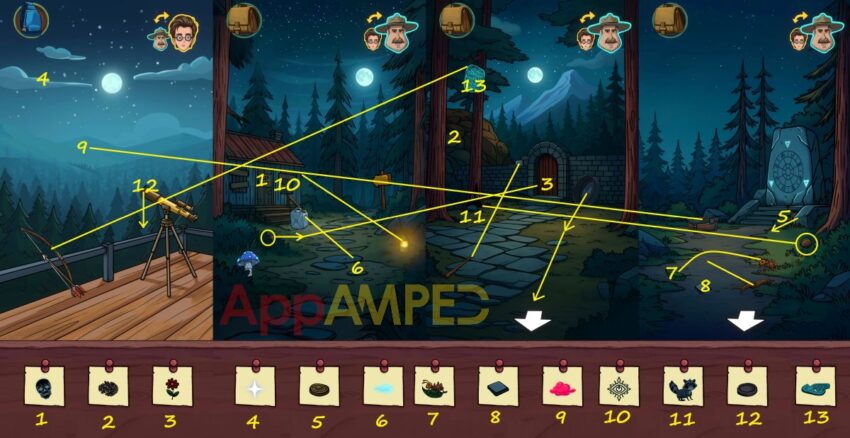
You start with Joe, make sure you take the cap (12) of the telescope off. Look through to find the bright star (4) somewhere on the sky up-up and to the left.
You can switch to the sheriff to get more things done. Turn the Keep Out sign on the other side to find a skull (1). Take the axe behind the bush and put the lantern in the hook next to the door to find the eye symbol (10 ) on the window.
Move forward on the path to reach a gate. Look at the metal plate on the tree, since you can’t reach it you’ll ask Joe to shoot it down with the arrow. Switch to Joe and take the bow and arrow then aim at the circle on the screen.
Switch to the sheriff and take the broken plate (13) on the ground and the pine cone (2) in the tree. Use the stick to push the stone by the gate on the other side.
Push the pot, then drag it down towards the house. Go there and pour the gas in the gas tank in the pot, to get the moon reflection (6). Go back to the gate and use the axe to brake it and find the flower (3) then go through the gate.
Move the stick in front of the ant (7) to make it move towards the leaf and stay there. Take the stone (8) on the ground. You’ll find the cap (5) hidden next to the stairs. Take the nut and go back to the gate.
Give the nut to the creature in the tree to make the raccoon (11) come out. Go back to the rock and look at the chest nearby. To solve the puzzle you need to figure out what’s the next pattern. This are the tiles:
1 2 3
4 5 6
7 8 9
The pattern logic: the last square removes all the common tiles and only adds the tiles that are not in common on the previous 2 squares. The lighted tiles are: 12678
Light up a firework then switch fast to Joe so you could see the red cloud (9). Switch back to the sheriff and look at the symbols on the stone.
You need to figure out the symbol solution for each triangle after you put the 2 symbols together then click the check mark. Joe will look through the telescope at the sheriff and go to him. Give him the bottle in your inventory.
Two of Us: Part 1 – City Hall Walkthrough
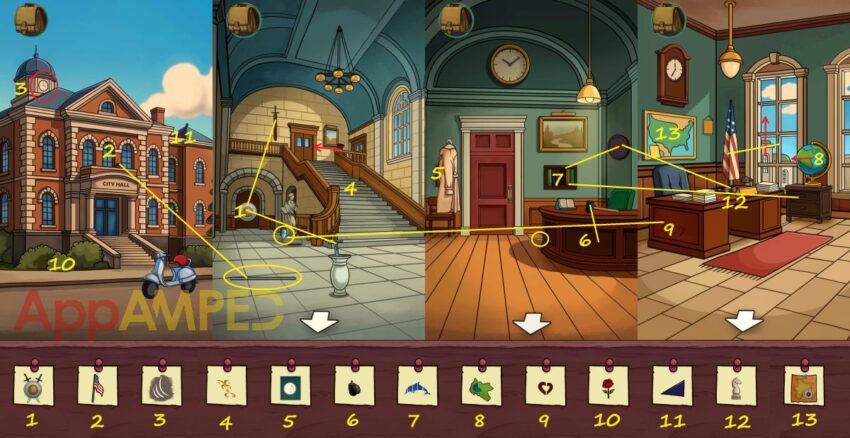
Look at the clock and turn the arms to get it to 11 o’clock sharp so the bell rings and you get the sound waves (3). Look in the bush in front to find the rose (10). Look at the far right roof and get the triangle (11) from there.
Now you can go inside and put the two swords on the shield to get the shield and swords (1). Take the metal stick on the floor and look behind the statue to get the mirror. Go outside and put the stick in the hole above the City Hall.
Now go back and up the stairs into the waiting room. Look behind the desk on the floor to get half of scissors. Pull down the coat by tapping on it and look at the painting to find the moon (5).
Use the hammer on the desk to break the middle part of the desk and find a wheel (6). Enter the office and open the first drawer under the globe to get a book. Now get the other half of scissors from behind this desk.
Put them together and turn the globe to find the continent (8). Pull the window up and hang the flag on the stick. Put the mirror next to the desk on the side to get the heart (9). Look at the map on the wall and put all the puzzle pieces so they all fit in.
You’ll find the map (13) and can go in the waiting room. Put the book back in the shelf under the painting and rearrange the books to complete the dolphin (7). Keep the word FISH in mind and look at the circle on the wall with letters.
F = T
I = R
S = A
H = P
Go to the office and look at the chess board on the desk. Move 1 to T, 2 to R, 3 to A and 4 to P to get the chess piece (12). Now go to the entry where the staircase is. Push down the carpet and cut the tie with the scissors to find the symbols (4).
Now go outside and take the flag (2). Go to the office to check if the mayor came back and talk to him and finish the chapter.
Wrapping up
The chapter is done, but the story isn’t over. The aliens need to be dealt with and Joe and the sheriff are the only ones that know what truly happened.
Stay tuned for my next walkthrough for the story of Find Joe: Two of Us, I’ll write one as soon as I can after they release the update.
Until then you can enjoy more Find Joe games and walkthroughs like:
- Find Joe Lumen – Part 1
- Find Joe Lumen – Part 2
- Find Joe: Secret of the Stones Part 1
- Find Joe: Secret of the Stones Part 2

Aylin is a content creator and co-founder of App Amped. She was a huge Tomb Raider fan before moving on to more casual titles. She spent way too much time tending for her FarmVille farm as well as playing text-based browser games. Now she plays and writes about mobile games, creating in-depth walkthroughs and useful guides.