

Welcome to another full walkthrough, this time with all the answers you need for Find Joe: Secret of the Stones Part 1 Margaret.
After witnessing a mysterious meteorite crash into her small city, Margaret is drawn into a thrilling quest filled with danger, mystery, and discovery.
Find Joe: Secret of the Stones Part 1 – Margaret Walkthrough
Chapter description: Young scientist Margaret becomes a witness of a strange meteorite falling in her hometown.
The tutorial does not need instructions, pointless for me to mansplain it to you. So we’re going to start with the classroom and find all the objects Margaret needs.
Find Joe – Part 1 Classroom Walkthrough

- Put the mouse in the wheel to light up the bulb.
- Give the sponge to the professor so he can wipe the blackboard.
- Then give him the chalk on the bench and he’ll write the 4th element you need to find.
Find Joe – Part 1 Meteorite Walkthrough

- Use the fire extinguisher from your backpack to put out the fire and use the key on the roof to open up the car door and get the dog.
- Slide up the garage door and pull out the bike, then put the basket on it to get the item.
- The boots are separated, so get them together on the tree branch.
- The garbage is in the other garage door you need to slide up.
- Remove the rocks to get the stop sign and use the pickaxe to get to the purple meteorite.
- You’ll find the toolbox behind the planks.
Find Joe – Part 1 Police Walkthrough

- Use the half-scissors in the drawer and the scissors in the box to make the scissor to cut the wire of the ventilator and get the bandage.
- Use the key in the drawer in front to open the middle drawer and take the camera.
- Take a closer look at the radio, turn it around, and unscrew the 4 bolts to get the first item.
- The note on the desk will tell you how to turn the lock of the safe on the wall.
- The arrow should stop at 30 – 50 – 90
- Take the Top Secret folder.
Find Joe – Part 1 Dormitory Walkthrough

- Underneath the books on the floor there’s the mirror (1)
- Fold the clothes on the floor to find the dress (2) and put it on the hanger.
- Unscrew the lightbulb (3) to get it.
- Look at the labyrinth note on the wall by the bed and use the arrows to reach the red dot. Underneath you’ll find the letter (4)
- Take the suitcase from under the bed to find the disk (5)
- Pull the blinds up to find the sun (6)
- The bag (7) is on the bed.
- Put the speaker part from the chair on the phone (8) by the window.
- Look on the desk and solve the match challenge. Move one match from the + sign to the 6: 8-4=4 And you’ll find the Done! sign (9)
Put the meteorite light on the lamp and use the violet lens to shine a bean of light and open a portal.
Find Joe – Part 1 Laboratory Walkthrough

- You can find the acorn (1) in the tree and the can (2) on the chimney.
- Open the bottom window to find half of a magnet, and pull the other half from the ground. Put the two parts together to make the magnet (3) you need.
- Open the top window and put the rake head to the stick on the ground, then rake the ground where the scratch marks are to find a compass (4)
- Clean the sign of the laboratory and get the hazard symbol (5)
- Pull the book (6) out of the bag hanging in the tree.
- Push down the barrel and take the hammer to pull the nails out from the Keep out sign and find the ladybug (7)
- Pull the tire and then pull the air pump (8) from the bushes
- Look next to the door and solve the puzzle to open it and get red light (9)

Use the pen from your inventory, to write a note on the paper the guard gives you. He’ll take your note to the science people inside the Laboratory.
Find Joe – Part 1 Roadside Cafe Walkthrough

- Pull up the poster to find the hotdog (1).
- Shake your phone so that the vase falls and you find the water stain (2)
- Underneath the cloth on the chair is the bone (3)
- Look in the fridge and get the milk into the shaker to make the pink drink (4) and pour it in the glass.
- Pour coffee in the cup on the table to the right, then pour water, and give it to the lady in the back to get the stars (5)
- Open the window above the bald man and clean up the leaves (6) with the broom in the scoop under the table.
- Turn the hat upside down and check the tag (7) with the magnifying glass in your inventory.
- Take the lid (8) from the candy jar on the table.
- Check out the stove and make a hamburger: ketchup, cheese, meat, tomato, salad bun. Give it to the other customer and get the hearts (9)
Find Joe – Part 1 Secret Lab Walkthrough
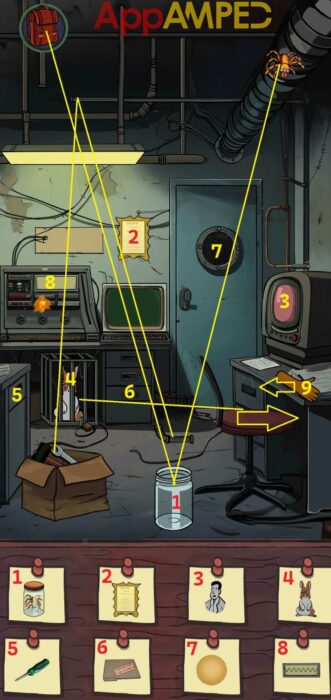
- Drag the spider in the jar (1) and put the lid on from your inventory.
- Take the Diploma (2) from the wall.
- Turn the TV on and switch the image until you find the man (3)
- Move the chair under the desk and use the key in the second drawer to free the rabbit (4)
- Open the drawer next to the cardboard box and get the screwdriver (5)
- Find the file (6) in the second to last drawer ahead.
- Press the light in the window when it’s yellow (7)
- Fix the leaking pipe with the wrench in the cardboard box and the pipe on the floor, then look at the device and turn the nubs to make the white line have the same pattern as the black waves (8).
- Move the glove to find the glasses (9)
In the first drawer of the desk (with the chair) you’ll find a Classified note with the computer information. Login: wilson – Password: 1913. Type that info in the computer that opens at the end and press enter after each entry.
Type 2 to find out the Commands, then 0 to go back to the other screen. Type 3 to Enter Commands, then color red followed by cls, and finally open door.
Find Joe – Part 1 Laser Room Walkthrough

- There are some papers on the desk to the right, go through them to find a key that you can use on the doors on the floor and get the rope (1)
- Break the glass case with the hammer, stretch the map (2) on the wall and complete it with the missing part from the glass case.
- Take the red crowbar in the bottom right and use it to open the vent and get the fan (3)
- Use the scissors in the drawer to the right, on the rope on the second floor. Pull on the lever on the machine to the left, and the old battery will get out. Put on the new green battery and push the red button to get the antenna (4).
- Take the ladder (5) from the second floor.
- Open the door on the right, pull up the briefcase and open it, take the saw and use it on the pipe on the ceiling, and pull out the banana peel (6)
- Open the door on the left and take the coat (7)
- Use the lightbulb in your inventory to put a light in the lamp above the TV (8) then take it..
- Find the oil can (9) and take it.
- Take the meteorite (10) off the floor
Now look at the switches that light up and adjust the laser brightness to 100: 25+7+30+25+13. Now you can go through the gateway.
Conclusion
Find Joe – Secret of the the Storm Part 1 walkthrough is now complete. Make sure to check back soon for the rest of the chapters’ walkthroughs and let me know if you need more help in the comments section below.
Here’is another puzzle adventure mystery you might enjoy:

Aylin is a content creator and co-founder of App Amped. She was a huge Tomb Raider fan before moving on to more casual titles. She spent way too much time tending for her FarmVille farm as well as playing text-based browser games. Now she plays and writes about mobile games, creating in-depth walkthroughs and useful guides.