
Here is another mysterious Artifact Seekers adventure, and in this walkthrough I’ll guide you step-by-step through every challenge hidden at the Dragon’s Castle.
Break into the monster’s lair to claim the legendary artifact.
Dragon’s Castle Walkthrough

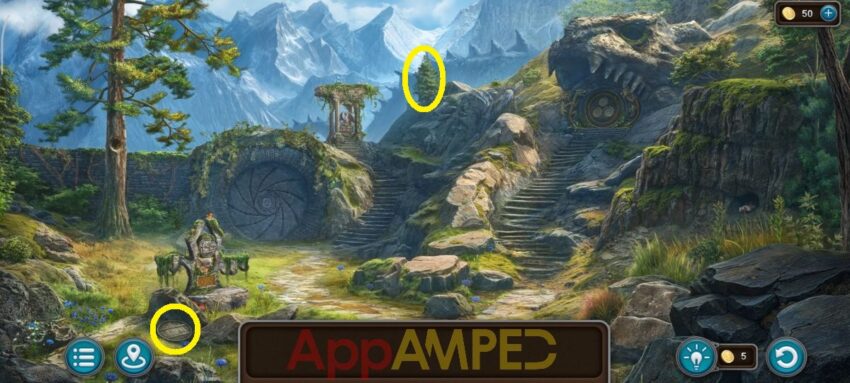
Note for collectibles: I circled a morphing object and a fir tree for you. At the round metal plate on the ground, under the leaves on the right, there’s a pixie*.
Look at the tree by the path and take the knife. Right on the ground next to the tree there’s a metal plate with a medallion (1/3) on it. Use the knife to cut the cloth over the carriage.
Look inside to find another medallion (2/3). Now go up the path to discover more mysteries around the cave.
Note for collectibles: I circled a morphing object and a fir tree for you. After you find the ladder and go up the tree, on the wall in the back, behind some leaves, you’ll find a pixie*.
Look at the hole in the rock on your right and take the hook. Look at the statue on the left and take the last medallion (3/3). Go to the door inside the monster’s mouth and use the medallions to open it. Move the dragons on their places.
You can now enter the cave to find the sword and explore to find more clues.
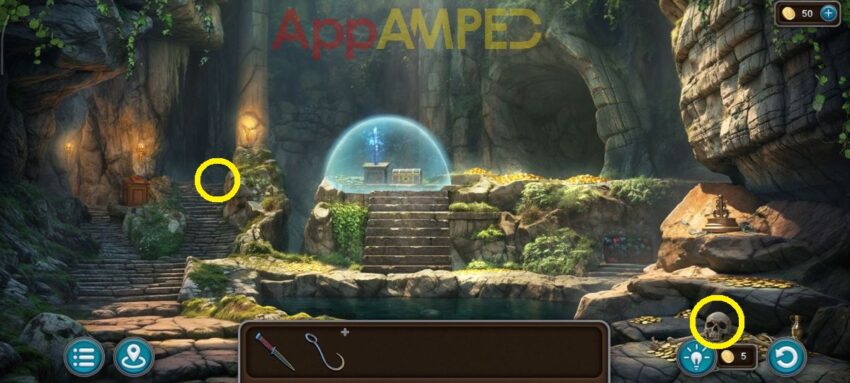
Note for collectibles: I circled a morphing object for you. On the path to the left, under the rock there’s a dwarf*. There’s a bottle at the bottom of the pond, but it will take a while to look there.
Look at the grown weeds on the left from the stairs and take the ribbon. Put that on the hook and go outside. Use the hook to get the key from between the two rocks. Use that on the chest in the carriage. Connect the rays with the chips of the corresponding color.
Take the gear, the hacksaw, and stone leaf from inside. Go inside the cave and use the knife to cut the weeds next to the stairs and put the stone leaf in its place.
Go up the stairs to look at the sword and talk to the dragon, he’ll give you a mission and a heraldic lily. Go to the gate and use the lily on the shield the stone dragon is holding. Place the chip on the appropriate image.
You’ll open the bridge to cross to the castle and gain a star if you solve the puzzle within the moves you are given. Now you can cross and explore the castle garden.
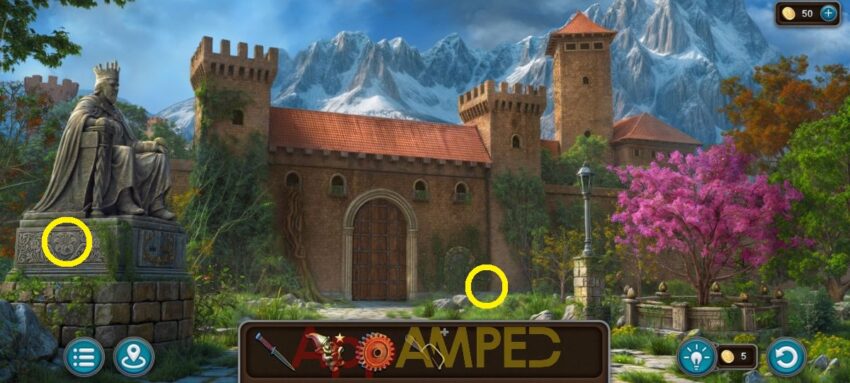
Note for collectibles: I circled a morphing object for you. On the left of the weed covered door, under the rock there’s a dwarf*. Through the weed-covered door you’ll find a bottle.
There’s a long weed from the ground to the window, look at the window and take the bell (1/6) and the shovel. Look at the door covered in weeds and use the knife to cut through, then remember the golden symbols: 69 – 2 rhombuses – sun – star with circle.
Go outside the castle gate and look at the target in the tree and press the symbols you just saw to find a salamander. Now go back to the castle, at the door with the symbols and use the salamander on it to open.
Replace the broken gear and take the torch. Go outside the caves, in the eye-hole of the rock monster and use the torch to get a bell (2/6) and a handle.
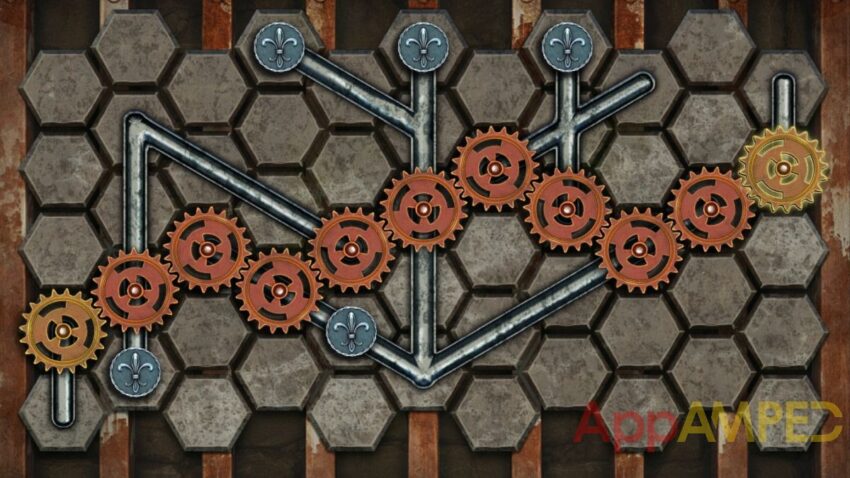
Go back to the room where you put the gear and put the handle and then check out the grill under the mechanism. Make the mechanism rotate completely by rearranging the gears. All gears must be used.
Now that the gates are open you can enter the city and explore.
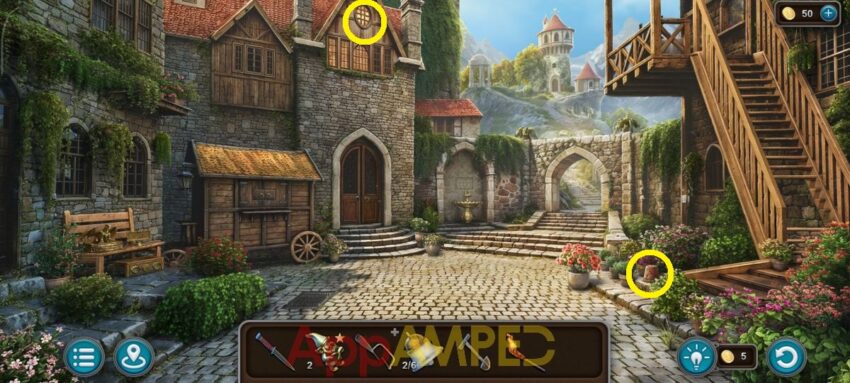
Note for collectibles: I circled a morphing object for you. Under the cracked pot between the flowers on the right there’s a precious flower*. There’s a pixie* behind the pineapple after you open the cart, and a bottle.
Look in the flower pot with the big red flowers to find a bell (3/6). Look at the doors on the left, listen to the guards talk about servants and take the crowbar by the door. Now you can go through the archway and look around the tower.
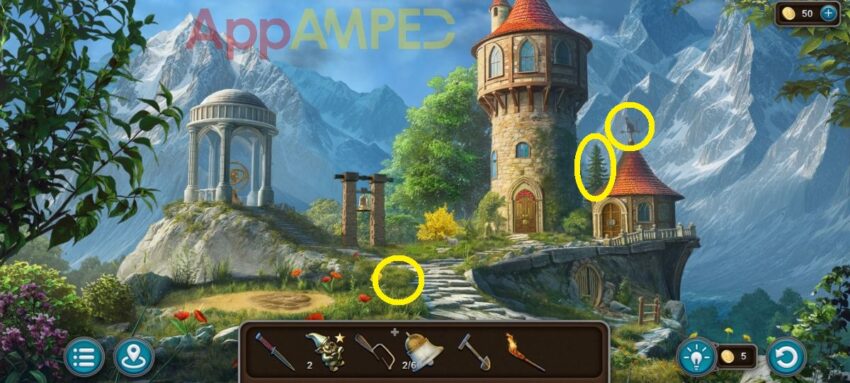
Note for collectibles: I circled a morphing object for you. There’s a fir tree here above the hut. Next to the yellow flower in the grass there’s a dwarf*.
Look at the patch of sand and use the shovel to dig to find a sphere and planks. Go to the stone pavilion and take the star on the side. Go outside the castle walls and check out the disc on the ground in front of the tree.
Put the sphere here and remember the pattern: 1-4-2-5-3-6-9-8-7. Go outside the caves, to the dragon statue up the stairs and put the star here, then remake the same pattern.
Take the triangular key and the apple relief (1/2). Go back to the city center and use the key to open the sewer grates on the ground to find the pliers. Use those to cut the wire on the cart on the left.
Move the chip through the maze and guide it to the marked spot at the other end of the board:
- up – up – right – down – up – right – down – right – up – right – up – right – down – up – right.
Take the owl (1/4) and the cabbage, then go outside the tower and feed the goat under the yellow tree that cabbage you found so you can take its handkerchief. Go use those notes on the handkerchief on the door of the hut to the right and press the buttons:
- red – purple – green – blue – fuchsia – yellow
Open the door and go inside the hut.
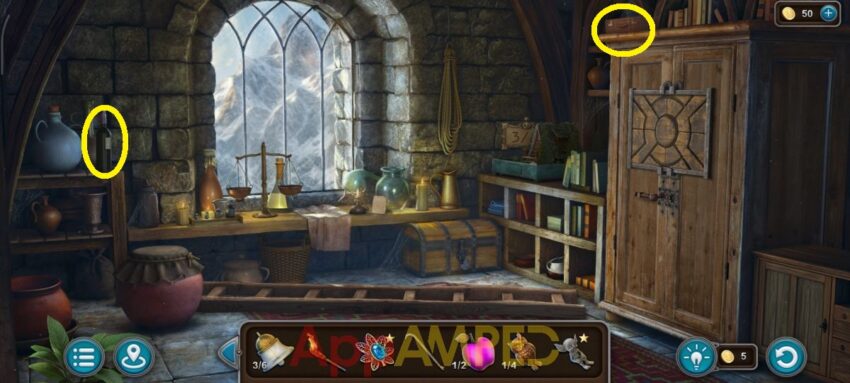
Note for collectibles: I circled a morphing object for you. There’s a bottle here on the shelf to the left. Look under the closet to find a precious flower*.
Take the ladder, remove the carper and use the crowbar to move the tile and get the handle and the owl (2/4). Look on the table under the window. Read the note and take the bag of millet.
Go to the closet on the right and use the handle to open it. Turn over the tiles and find all the pairs of images. Do it within the time limit to get a star. If you get too close to 0, restart the level.
Take the sieve and the uniforms. Look at the covered pot and use the knife to open it and then use the sieve to find all the nails. Go outside the caves, use the ladder to get to the hole in the tall tree to find a crown and a bell (4/6).
Go to the city center and put the crown under the statue of the king then use all the guides to guide the beam to the opposite button. There should be no red beams on the board.
Take the hammer and the emerald. Go to the city center and use the planks on the stairs to the right, add the nails, then use the hammer to secure the stairs and go upstairs. You’ll find an owl (3/4) and you can go back down.
Now you can enter through the doors on the left, as you’re wearing servant clothes. Talk to the guard in the Castle’s lobby and go find the key.
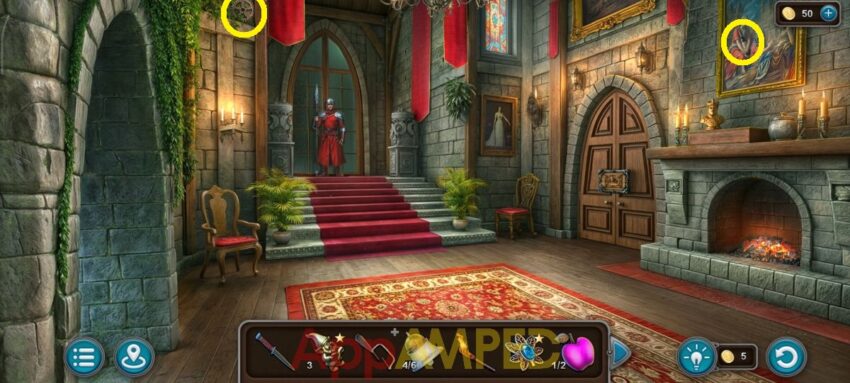
Note for collectibles: I circled a morphing object for you. There’s a bottle on the painting above the fireplace. There’s a stone on the left of the fireplace and behind it is a pixie*.
Look at the painting with the lady in white. Open it and pull the lever to get the chandelier down. You’ll find a statuette on it.
Go to the red chair on the left, use the knife to cut the stitches and get the bull skull. Now you can go to the wine cellar on the left and put the torch on the support to see around.
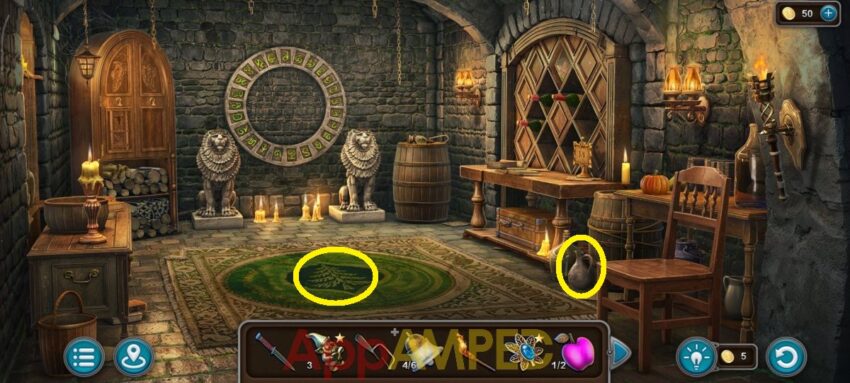
Note for collectibles: I circled a morphing object for you. There’s a fir tree on the carpet. If you look behind the lion on the left, and behind the mop, you’ll find a dwarf*. Under the top left corner of the rug there’s a precious flower*.
Go to the closet in the corner and put the bull head on the door. Rotate the board using the arrows to guide the moving cube to the exit:
- right x 3 – left – right – left x 2 – right – left x 3 – right
- left – right – left x 4 – right – left – right – left
- right x 2 – left x 3 – right x 2 – left
Take the perfume and dried meat then look under at the wood to find the tongs. Go to the lobby and use the tongs to get the handle from the fireplace.
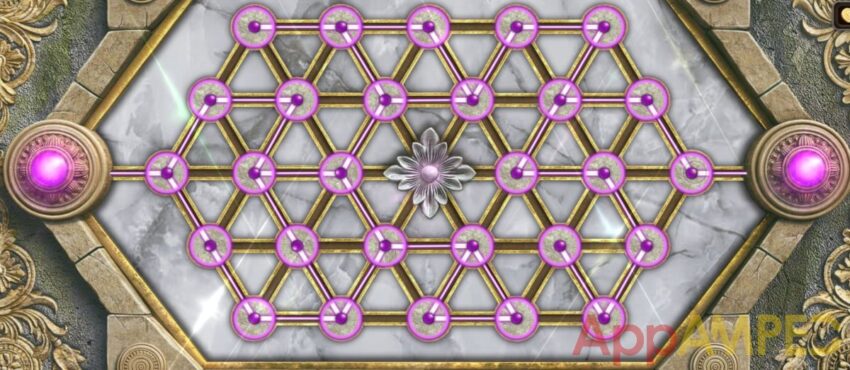
Go back into the wine cellar and use the handle on the chest under the wine to find another emerald. Use the emeralds on the lions’ heads. Open the middle of the circle and solve the puzzle.
Activate the gems on the left. To do this, create an empty row opposite the gems and pass the wire through it. You’ll get some copper ingots when you finish it.
Go outside to the city center and look at golden fountain next to the doors. Put the statuette here and tap the plaque. Move the figure through all points illuminating all segments. You can’t pass through the same segment twice.
You’ll get a feather from the fountain. Go back to the caves and look at the wolverine’s den on the right. Give it the dried meat to get it out and find the last owl (4/4).
Go to the city center and up the stairs and use the perfume to wipe the window and remember the figures: fairy with sword – mermaid with staff – beardman with flower – knight with lute – man with wand – wizard with beer.
Now you can go into the lobby of the castle and put all 4 owls on the room to your right. Move the tiles with animals and place them in their places:
- right x 2 – down – right – down – left – up – left x 2 – up – left x 2 – right – down – left – up – left x 2 – down – left – down – right x 3 – down – left x 2 – up – left – up – right – up – right x 2 – up – right – down – right – down – left – up – left x 2 – down – left – down – left x 2 – down – right – down – left x 2 – down – right – down – right x 3 – up – left x 2 – down – right x 2
Now you can enter the tree library and explore to find more clues.

Note for collectibles: I circled a morphing object for you. There’s a fir tree on a book sitting on the desk. Above the statues on the shelf, there are some purple books you need to take out to find a pixie*. Go to the book at the top of the stairs, pull on the nub, then go back and look at the shelves on the right, there’s an empty space where you can find a precious flower*.
There’s a globe right above the stairs, you can open it using your knife to get the planet inside. On the right shelf there are a few statues with shields next to them. Redo them as the patterns on the stained window you cleaned earlier.
- wizard with beer
- knight with lute
- mermaid with staff
- man with wand
- fairy with sword
- beardman with flower
You’ll find a keyring you can use to open the drawers on the desk. Take the carved heart and the casting mold.
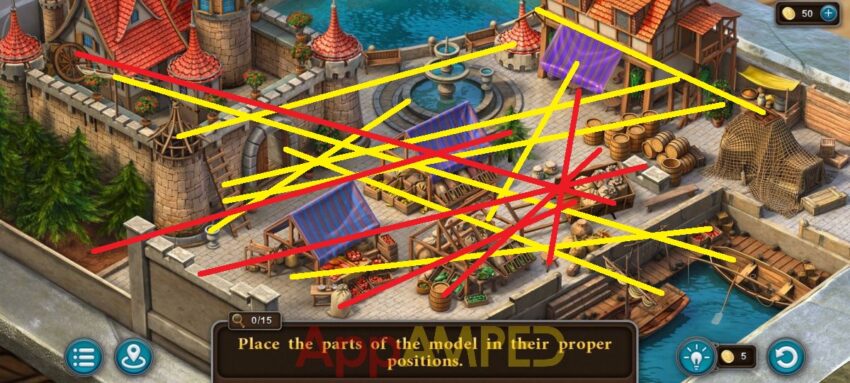
Put the feather in its place at the middle of the stairs, where the carved birds are. You’ll find a turquoise star. Put that on the chest to your left and look at the miniature city, then put it in order, each item in its place.
You’ll find a bell (5/6) and a clock hand. Now go to the tower and check out the pavilion with the planets. After you put the planet here, you can solve the puzzle.
Set the hand of the clock to the correct position. The hint is in the library, at the top of the stairs there’s a book with stars and shapes:
- swan: 10 star points
- dragon: 7 star points
- horse: 2 star points
Set the clock hands accordingly and you’ll find the royal ring. Go to the tower doors and use the carved heart on it, then place all the figures in their place to open it.
Now you can go through the doors, put the royal ring on the hand to get the stairs and go up to the princess and talk to her about the tunnel.
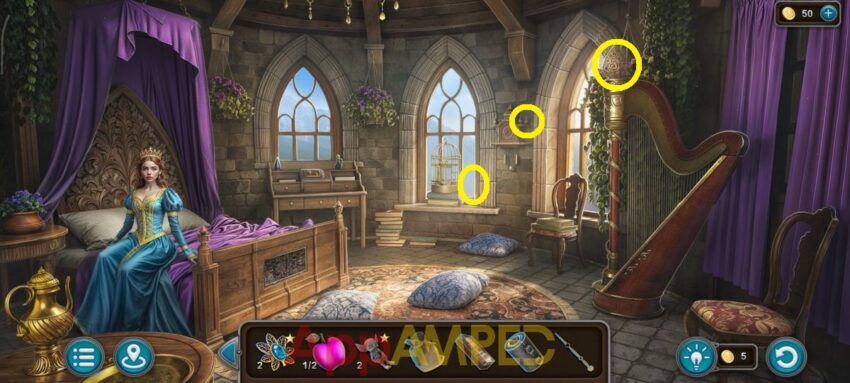
Note for collectibles: I circled a morphing object for you. A fir tree is outside the window when you look at the bird cage. There’s a precious flower* on the clock inside the right ball.
Look at the cage and put some millet for the birds in their bowl to be able to open it and get the bell (6/6). Use the knife to open the grate at the front of the bed and take the apple relief (2/2).
Go to the desk and put the two apples on the book there.Distribute all the crystals on the right to obtain the correct equations:
- V + IV = IX (9)
- VI + IV = X (10)
- VI + V = XI (11)
Take the mirror and remember the drawn symbols in this order:
- house + flag
- fire
- pigeon + letter
- tree + cat
Go inside the cave, under the dragon and put the bells here, the pair up the symbols like the previous hint showed you. Take the treble clef and put the mirror on the right, where the glass shards are broken, then direct it to look in the pond.
You’ll find a clock on the bottom so remember the hands are pointing to 04:35. Now go back to the princess and put the clock hand on the clock on the wall, then point them to say 04:35 and take the queen.
Use the treble clef on the bottom of the harp to make it sing and get a dragon coin (1/2). Go to the castle lobby and put the queen next to the king on the fireplace to find the last dragon coin (2/2).
Go outside to the city center and put the two coins on the chest under the bench and get the hacksaw blade. Use it to fix the hacksaw. Go outside the tower, at the metal grate that keeps the tunnel closed and use the hacksaw to cut the grate.
Go inside and use the torch to see better. Go up to the princess to tell her then go to the tunnel and get out of the maze. Take the first left to reach the gate with the dragons.
You need to count each kind of dragons as you walk around the tunnels. There’s a dragon behind the fallen rocks right in the middle and one behind the bush on the left.
When you count all the dragons that you find you can go back to the first part and take a left then enter the numbers for each dragon:
- left: 5
- up: 2
- right: 6
- down: 1
The princess will find her way to the dragon and he’ll give you a dragon stone. Go outside the cave to the carved rock and put the dragon stone here. Set the rotation sequence of the maze using the arrows and guide the token to the recess:
- right – left x 2 – right x 2 – left x 2 – right x 2 – left
- right – left x 3 – right x 2 – left – right x 2 – left
Go through the arch to find the Crystal Lake and explore the location to find the sword.
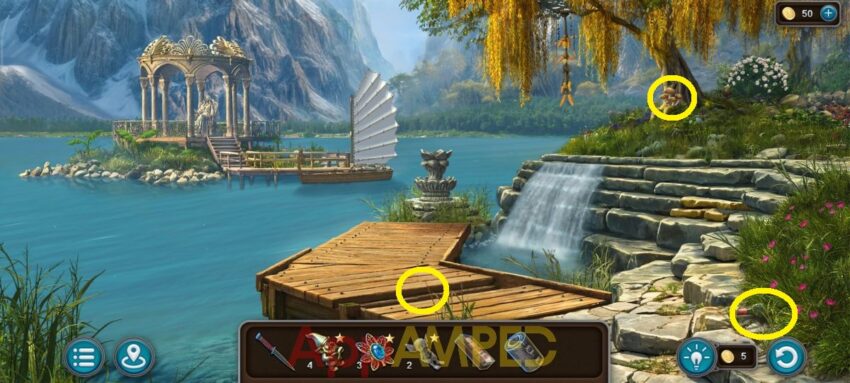
Note for collectibles: I circled a morphing object for you. A bottle is hidden in the grass on your right. The wooden dock has a missing plank, look closer to find the last dwarf*.
Look at the stone stairs that are a different color and use the knife to get the stone petal (1/3). Look at the white rose bush and take the pinecone. There’s a ornament hanging in the tree where you’ll find another stone petal (2/3).
Go outside the castle, at the gate and put the pinecone on the stone edge under the pink blossom tree. You’ll find a last stone petal (3/3) and a pruning sheers.
Now go back to the Crystal Lake and put the 3 stone petals on the stone ornament at the end of the dock. Place the chips in rows opposite their symbols in the specified order to make the boat come to the shore.
Take the boat and go to the gazebo on the water. Take the shell from the statue’s hand and go to the Dragon’s cave and talk to him. Put the shell on the chest next to the dragon. Take the golden ingots and the seal.
Put the seal on the red book on your left and read about Vertruda. Go outside the Castle gates and look at the flowers under the tree and take some purple starflower. Enter through the gates and take some sakura flowers from the pink tree.
Go inside the hut next to the tower and go at the table by the window. Put the gold and copper ingots on the table weight the amount needed and take the crucible. Put that over the flame and the casting mold on the table.
Pour the liquid metal inside the mold, then open it to get the red-gold cup. Go to the Crystal lake, use the sheers to cut some white roses, then fill the cup with some water from the waterfall.
Put all the flowers and the cup on the ritual book and go take the offering to the statue under the gazebo. Go at the blade with the boat and take the sword to complete the story.
For more stars go take the ones for your collectibles and play the mini games for the other special items you found.
Dragon’s Castle Secret Mission Walkthrough
At the end you can ring the bell outside the tower and that will make the guard outside the throne room leave his post and you can go inside. You have 10 minutes to look around before he returns, so use them wisely.
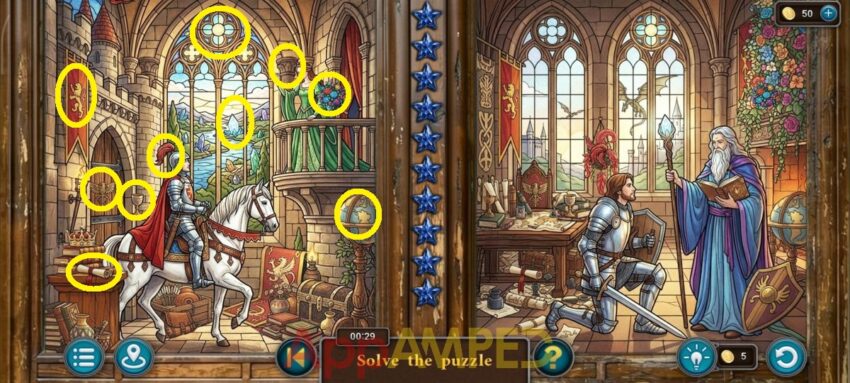
Go to the first stained window and find the 10 differences in them:
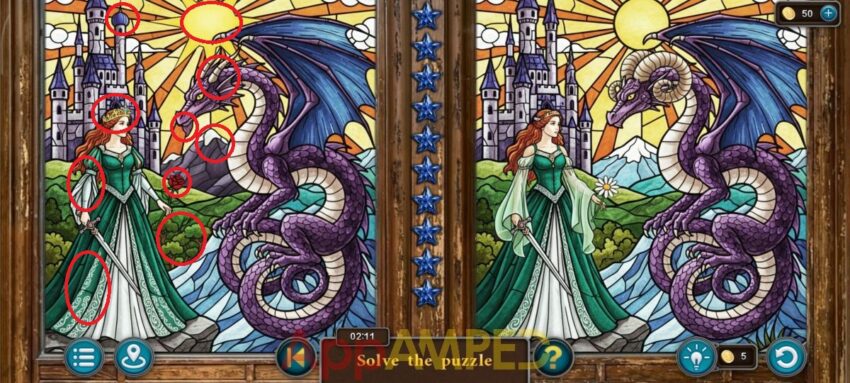
In the second stained window you need to find the similarities and pair them together:
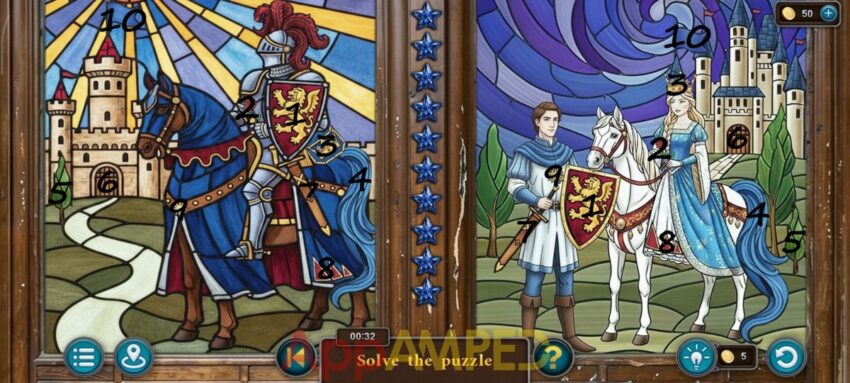
And in the third stained window you need to find the common similarities:
Finding all three in time will earn you a star. If you don’t manage to be quick enough, just go back to the tower and ring the bell again, you’ll get a bit more time on your second try.
The Morphing Object Collection
Take your star from the bench on the left, at the city center.
The Fir Tree Collection
When you have all 6 fir trees you can go take your star from the hut next to the tower. There’s a miniature house behind the open closet doors.
The Bottle Collection
Get the bottle star from the wine cellar in the castle.
The Dwarf Collection Mini Games
You’ll find the mini games for the dwarfs at the library, on the desk. Place the figures in their position. The figures can only move in a straight line.
Dwarf Collection Level 1 Solution
Dwarf Collection Level 2 Solution
Dwarf Collection Level 3 Solution
Dwarf Collection Level 4 Solution
Dwarf Collection Level 5 Solution
The Pixie Collection Mini Games
Go outside the cave to find the pixies* mini games. Guide the chip to the recess. Clear a path by moving the slabs and turning the rods.
Pixie Collection Level 1 Solution
Pixie Collection Level 2 Solution
Pixie Collection Level 3 Solution
Pixie Collection Level 4 Solution
Pixie Collection Level 5 Solution
The Precious Flower Collection Mini Games
You’ll find the precious flowers* mini games in the city center up the stairs. Move the block and fill the empty cells on the board.
Precious Flower Collection Level 1 Solution
Precious Flower Collection Level 2 Solution
Precious Flower Collection Level 3 Solution
Precious Flower Collection Level 4 Solution
Precious Flower Collection Level 5 Solution
Wrapping up
Reaching the end and winning all the stars is a nice feeling for sure. We just have to wait for more stories to play in Artifact Seekers.
Until next time, take a look at my other Artifact Seekers walkthroughs, maybe you’ll find something you’d like to play as you wait for more.
- Artifact Seekers – Haunted Theater
- Artifact Seekers – Santa’s Manor
- Artifact Seekers – Circus Arena
- Artifact Seekers – Pirate Bay

Aylin is a content creator and co-founder of App Amped. She was a huge Tomb Raider fan before moving on to more casual titles. She spent way too much time tending for her FarmVille farm as well as playing text-based browser games. Now she plays and writes about mobile games, creating in-depth walkthroughs and useful guides.
I am stuck with where to find the hint for the clock under the planet display, looking forward to you continuing. Best walkthrough ever!
Thank you so much! Encountered some technical problems on my health! I’m gonna write more today, not sure I’ll finish it before the weekend tho. I’ll try my best to cover as much as I can. Thank you for being a reader! I appreciate you!
That doesn’t sound good. 🫤 I hope you are well. Many of us would be lost without you. Thank you for the best walkthroughs ever ~ I always look for you first (and keep my fingers crossed that you’ve been there before me! 😊
I can get passed the tunnel puzzle. I don’t what to do. I have gone through and through trying to find the dragons, it seems like I’ve found them all, but it won’t let me put the answers in the gate saying that “it’s unclear how they relate to the dragons,” which is so stupid because it’s so obvious(I know that doesn’t matter in these games, but still). Help me, please?
Ok. Go through all the paths and uncover all the dragons, once you reveal them all, return to the door on foot, do not restart the maze. Just make sure you went through all the caves and reach every closed end.
In the dragons castle in the escape cave I don’t get 5621
I did that went trough the maze got the dragons but can’t remember the different dragons help!
So, when you’re in the maze, go to the door with the code and it will give you that “Idk how they relate bla bla”, then go through every single crevice and path in the maze and reveal all the dragons (14 total). Do not reset the maze to get to the code door, just go back through the maze and enter that 5621 code.
If they changed the code maybe try to draw them, sticky figures, nothing too elaborate, and count them as you go. If they changed the code, unfortunately I can’t do much from my end. I didn’t see any other code on other walkthroughs.