
Join me for another festive Artifact Seekers adventure, and in this walkthrough I’ll guide you step-by-step through every challenge hidden inside the Haunted Theatre.
Challenge the cursed genius and lift the curse that has engulfed the theatre.
Haunted Theatre Walkthrough
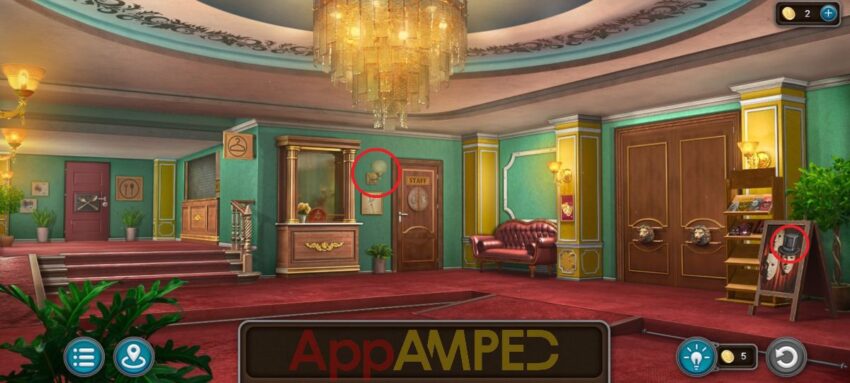
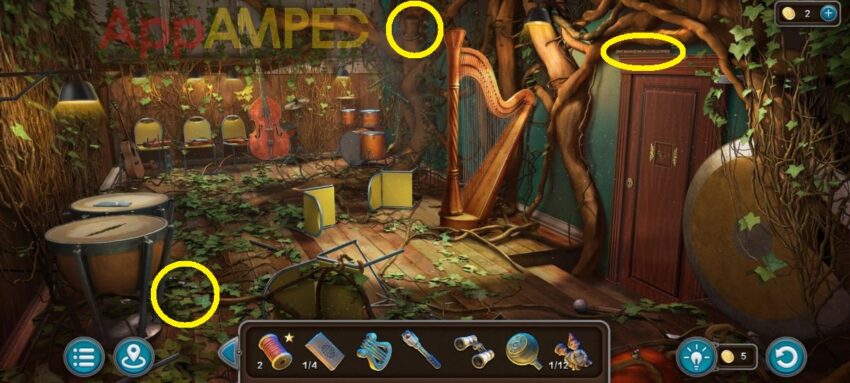
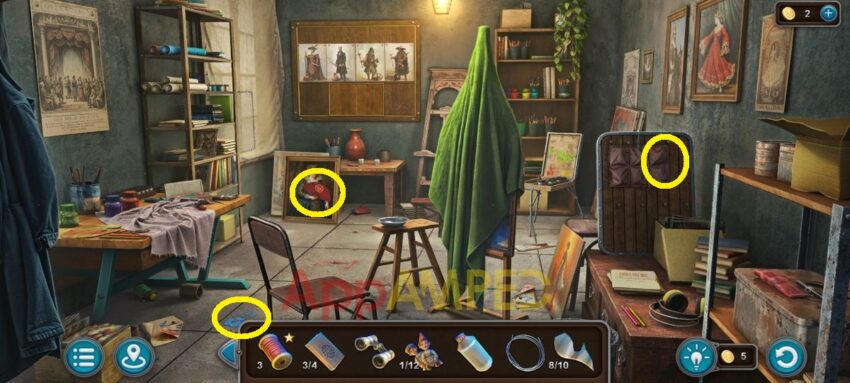
Note for collectibles: I circled a morphing object and a hat for you. There’s scraped paint on the tile and behind you’ll find an archer* for your collectibles.
Look at the pamphlets on the right and take the knife and a poster on the bottom shelf. Look under the red frame with a mask, next to the double door. Move the couch out of the way and use the knife to open the screws.
Get the stone eye (1/2) and go to the ticket store, I think, to find another stone eye (2/2). Go to the double doors and put the eyes on the lion head, solve the puzzle to open the door. Place the pieces into the matching slots of the same shape.
You can get inside to the theater stage and see the ghost that is looking for his mask.
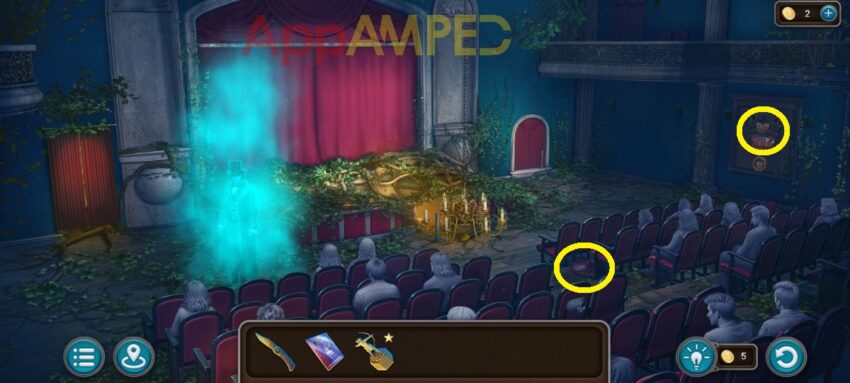
Note for collectibles: I circled a fan for you and the place where all the morphing objects are gathered.
The morphing object will be visible above the red door on the right, at the balcony. There’s a statue that changes shape. Also, after the lights are on, there’s a program in front of an empty chair and a thread*.
Look at the fallen candelabrum and take the torch, the gear (1/4) and the press plate. Go to the red door next to the stage, move the drapes and take the lever (1/3). Open the grate and take the hex key (1/2).
Go through the drapes on the left side of the stage to go behind it.
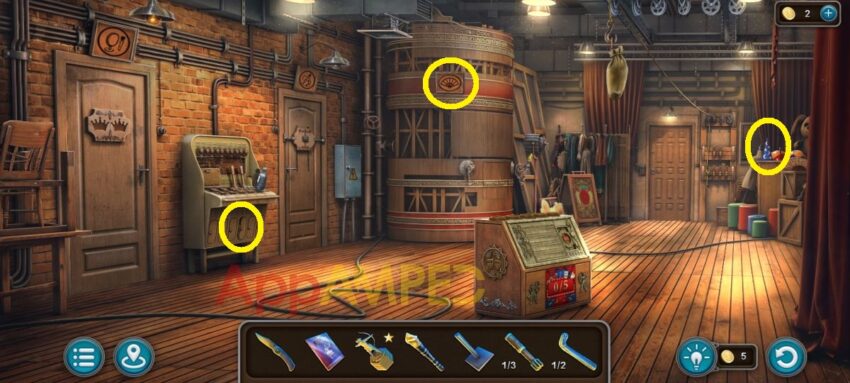
Note for collectibles: I circled a morphing object and a fan for you. Under the control table between the two doors on the left there’s an open drawer with another archer*.
Go to the cylinder in front and put the torch here to open the section in the middle, get a gear (2/4), and a stage diagram. Check out next to the door at the end of the room, take the medallion and untie the rope knot.
Go to the sand bag that dropped and take the handle from under the floor and the rope. Go to the control panel between the 2 doors on the left and take the water.
Now go back to the stage and back into the hallway. Go to the grate where they keep the coats and use the handle to open it and talk to the man, then take the key. Go to the door with a spoon and fork and use the key to open it then go in the restaurant.
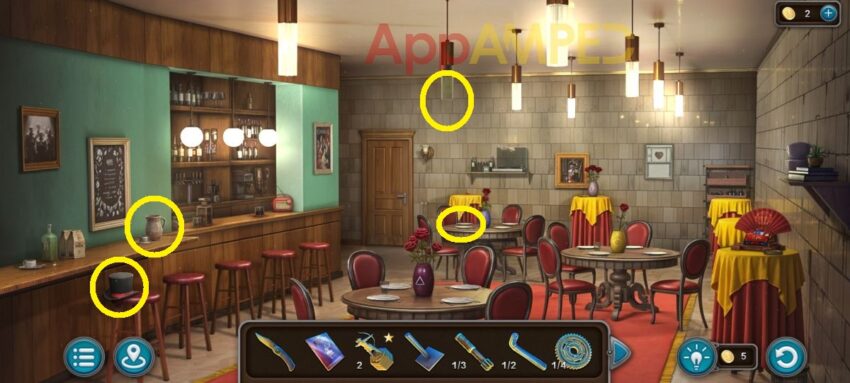
Note for collectibles: I circled a morphing object and a hat for you. Check out the purple vase with the rhombus and 2 roses, next to it there’s a plate and under that a sun symbol*. Now look at the lamp that’s not on and take another sun symbol*.
Look at the vase on the last table far back and take the crown (1/2). Go to the table with the fan and take the gear (3/4). Observe all 4 vases and roses:
- 1 rose – yellow vase – pentagon (5)
- 2 roses – purple vase – rhombus (4)
- 3 roses – pink vase – hexagon (6)
- 4 roses – red vase – triangle (3)
Now go back stage to the door on the other side of the room and enter the code 5463 to get to the inner courtyard.
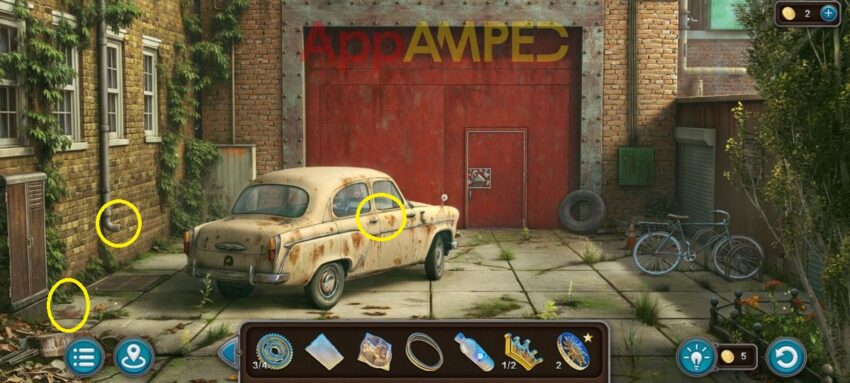
Note for collectibles: I circled a morphing object and a for you. Look into the downspout to get another archer*. After you open the car you’ll find a hat in the newspaper in the front seat.
Look at the car and get the gear (4/4) from the hood. Go to the bike and take the heart. Now go to the restaurant, use the heart on the little white cabinet on the wall in the back. Arrange identical chips in rows opposite the corresponding symbols.
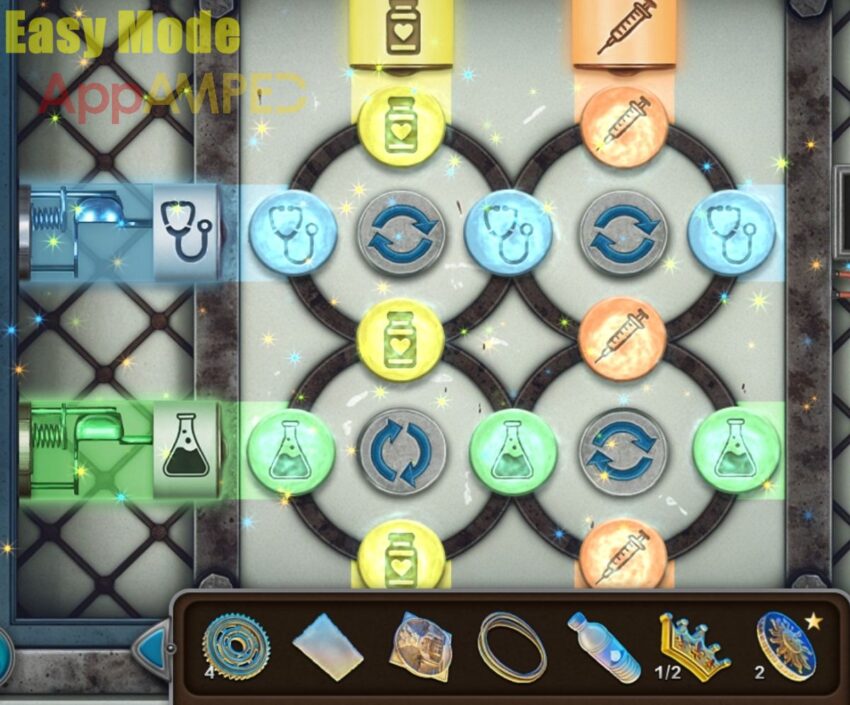
Note: Solving this in time will give you a star. Make sure you start over if you don’t think you can finish in time.
Take the sedative and go give it to the man in the lobby, then give him the water as well. Explain to him what happened and if he knows something about the robbery, he’ll give you a key.
Go to the inner courtyard and use the key to open the car door. Look inside the chess box to find the wire cutters. Look under the hat to find another key.
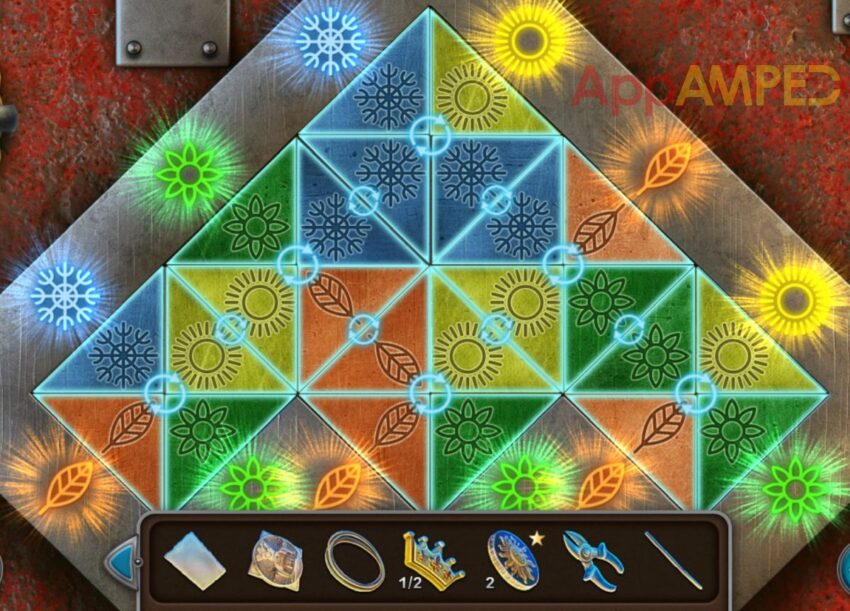
Use the wire cutter on the wheel of the bike and get a wire. Use the key you just found to open the red door in the back. Rotate the triangles and place them next to the same symbols.
You can enter through the door to find a repair shop and explore more.
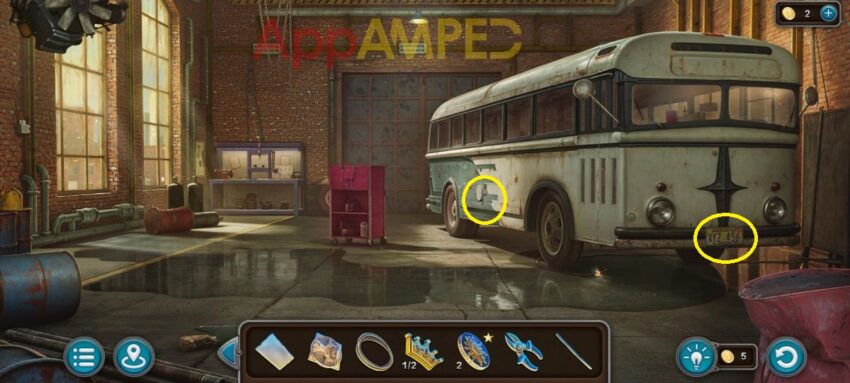
Note for collectibles: I circled a morphing object and a for you. There’s a fan inside the panel of the bus, after you open it. There’s a thread* inside the bus under the chair’s cover.
Go outside and take the tire next to the door so you can put it over the water and keep safe from the electricity.
Go to the red workbench in the middle and use the wire to open it. Rotate the maze and its sections to place the screws in the hole.
Take the wrench and the hex key (2/2). Go to the workbench in the back and take the rubber glove. Look at the sketch of assembling the press. Put the press plate then go to the side of the bus where the white panel is.
Put the medallion on the cap, then rotate the ball in the center to move the suitcases and place them in the same shaped slots.
Go outside and use the wrench on the bike to get the rusty chain. Go to the car and look under the hood, then use the wrench to take the battery. Go inside the repair shop and put the battery next to the suitcases.
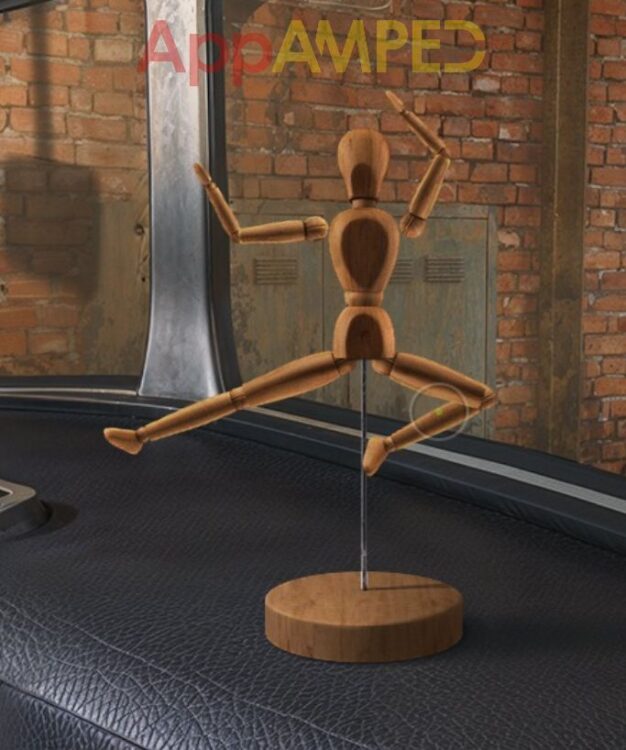
After you connect it to the wires the bus doors will open and you can get inside. Put the poster next to the wooden figurine and imitate the same stance of the ballet dancer on the cover.
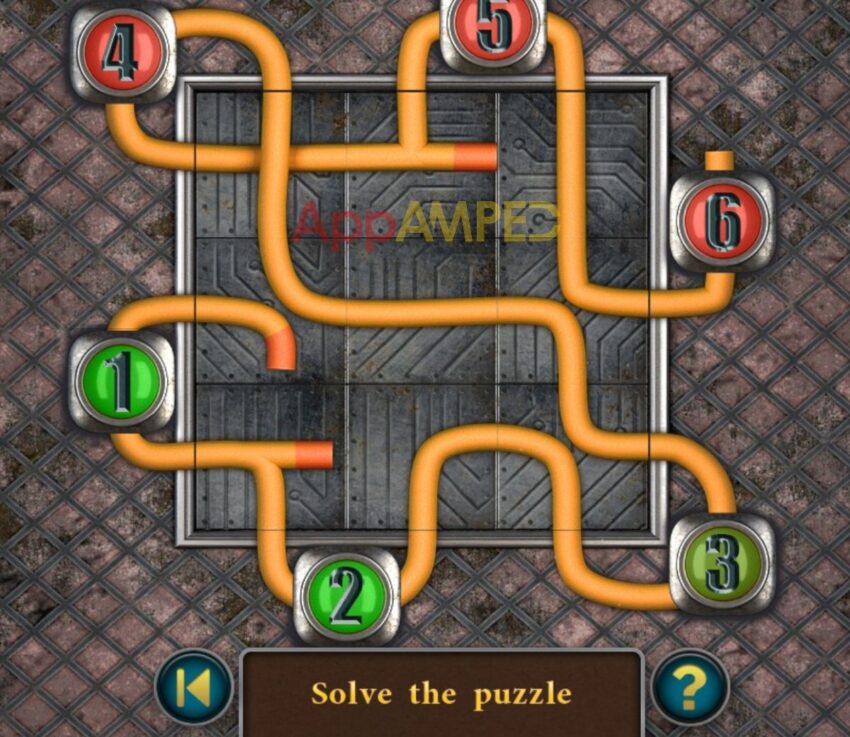
You’ll open the glove drawer and get the crown (2/2) from inside. You need to go behind the scene at the electric panel on the left, use the 2 hex keys to open it and rearrange the wire sections so that they connect all the numbers in order.
Push the lever to get the lights on where the stage is, then look at the door on the left and put the 2 crowns on it. Move the chips into the slots with the same pattern to open the door to the changing room.
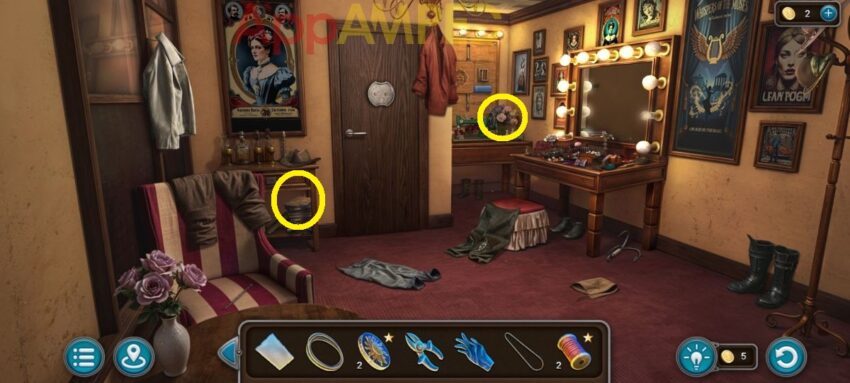
Note for collectibles: I circled a morphing object and a for you. There’s a sun symbol* at the sewing machine in the corner.
Take the grappling hook from the ground, check out the table in the back corner, and you’ll find a lever (2/3). Look at the drawer on the left, under the drink to find a book (1/4) inside.
Check out the armchair and use the knife to open the sewing patch then take the harp. Go back to the stage, the lights are on so now you can see better.
Use the rope on the grappling hook and use these on the balcony in the far corner to go up and search it. Take the press arm next to the chair and the binoculars, then there’s a door handle under them.
Go to the restaurant and open the door in the back, then look at the cooking area on the left and open the fryer. Insert the rusted chain in the hot oil and take it out using the wire cutters.
Go to the stage, on the right, where the door is, use the gears and the chain to open the panel above. Restore the gears by moving their fragments.
This will pull up the candelabrum so you can go look under the stage and explore some more.
Note for collectibles: I circled a morphing object for you, a hat, and a thread* you will find under the leaves next to the drum.
Look at the drum on the left and use the knife to tore it open and get the hose. Behind the chairs in the back there’s a solvent you will need. Use the wire cutter to get some string from the harp.
There’s another book (2/4) behind the harp. Use the door knob on the door to your right. Move the rows and restore the pattern in the center.
As it is dark here, you need to go to the changing room and grab the small light bulb at the table using the glove. Then come back to the music room, look close to the ceiling on your right and change the broken light bulb with yours to get some light here.
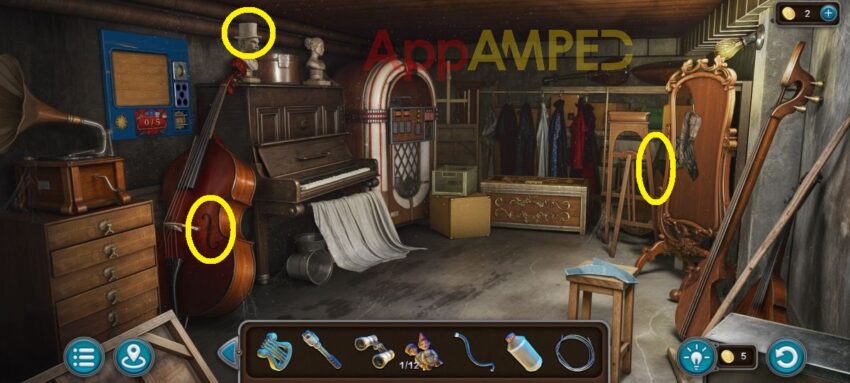
Note for collectibles: I circled a morphing object and a hat for you. There’s an archer* behind the broken mirror, on the shelf.
Pick up the mirror shard (1/10) from the chair. Look into the box next to the music jukebox and take the music stand. There’s a chest next to it with a ticket register figurine. Go out to look for more shards.
There’s one shard (2/10) on the violins, and another shard (3/10) on the drums to your left. Go to the lobby, and in the open vent behind the couch you’ll find a shard (4/10). You can put the registry figurine on the ticket window to get the ticket.
Use that on the staff door then restore the picture by rotating its fragments, and get inside to explore.
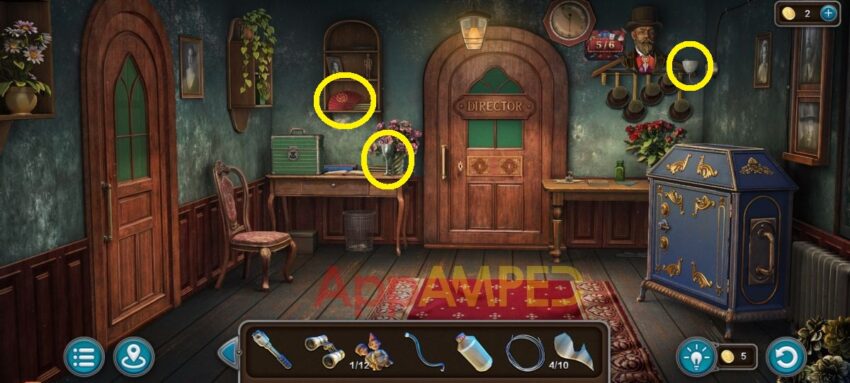
Note for collectibles: I circled a morphing object and a fan for you. There’s a sun symbol* next to the hat man, inside the lamp.
Go at the table under the hats and take a shard (5/10) and a book (3/4). Look at the table on the left. Open the drawer and take the shard (6/10).
Use the harp to open the box and take the ball with a key. Open the door on the left and look inside the drawer at the picture.
Go to the changing room backstage, look in the drawer under the cowboy hat and take another shard (7/10), and another shard (8/10) you can find next to the sewing machine.
Go to the repair shop, put the hose on the press pump, and the press arm, then put the ball and pull the lever. Take the cross-shaped key and go back stage. Use it to open the remaining door next to the electric panel, then find 10 differences.
Now you can enter the workshop and explore to find more clues.
Note for collectibles: I circled a morphing object and a fan for you. There’s a thread* in the pouches to the right.
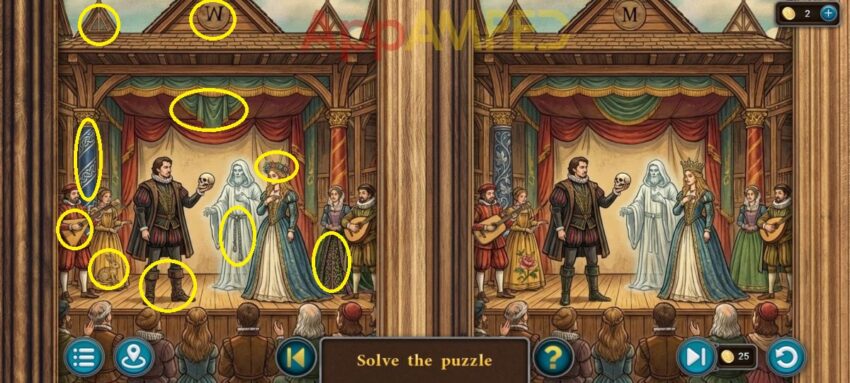
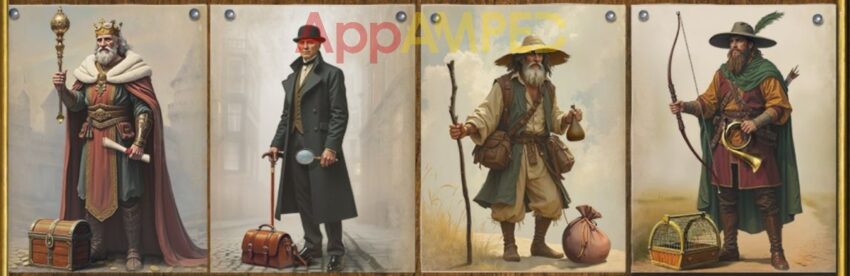
Look at the drape over the window and cut it with the knife, take the shard (9/10) and the sponge. Go to the 4 characters on the wall and give them the correct attributes.
You will find the last shard (10/10) here. Look at the painting under the green cloth, put solvent into the bowl. Now go to the mirror in the music room and put the shards back together.
After you talk to the kid you can find his lockpicks behind the base on the left. Go to the staff room and use the lockpicks on the door to the director’s office, then solve the puzzle to open it.
- 4 x2 – 5 – 4 – 6 – 4 – 5 – 9 – 4 x2 – 5 – 11 – 6 – 4 x3 – 5 – 11 – 4 x6 – 6 – 4
Enter the Director’s office and look for more clues.
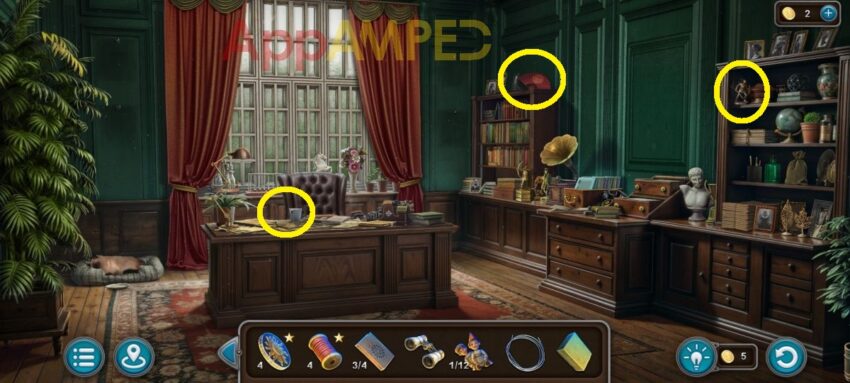
Note for collectibles: I circled a morphing object and a fan for you. On his desk in the mug is a thread*. There’s also an archer* next to the gramophone on the right.
Look on his desk and read the paper, then take the last book (4/4). Notice the most used keys on the typewriter. Put the books on the shelf and solve the puzzle. Place the symbol tiles in the corresponding columns at the indicated height.
You’ll find a sheet music and a paintbrush. Make sure you solve before the time ends so you get another star. Before you leave look at the wall on each side of the window and notice the missing paintings.
Find the 4 paintings from the newspaper in the drawer of the room inside the staff room:
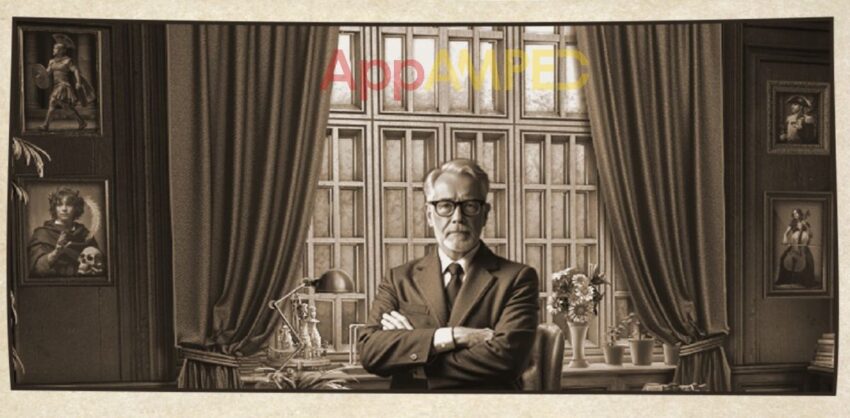
- Warrior portrait (top left) in the workshop, use the paintbrush to put solvent on the painting, and the sponge to clear the paint.
- General’s portrait (
- top right) is in the restaurant on the wall in front.
- Musician’s portrait (bottom right) is in the changing room, back stage.
Go under the stage to the drums in the corner, put the music stand and the sheet music then play the music and you’ll get an ornate plate (1/2).
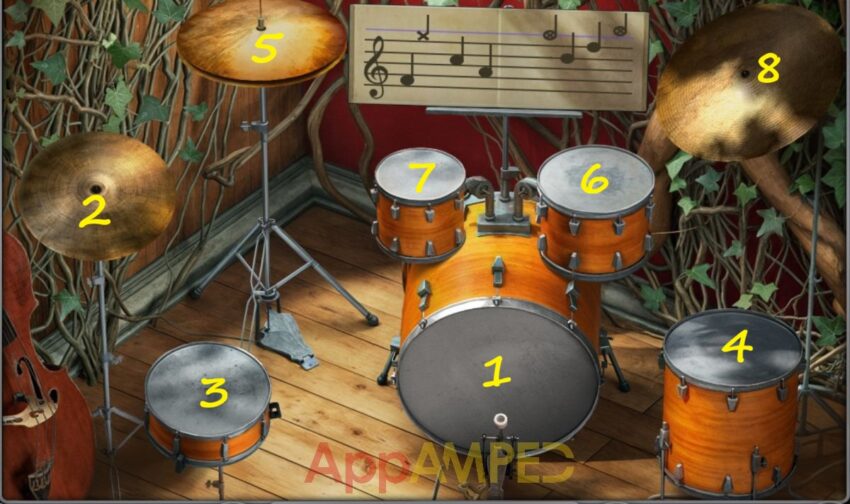
Go to the music room, with the boy in the mirror, look at the chest there and enter the code XHE and you’ll find the last lever (3/3). Go backstage at the machine between the doors and put all levers in.
Put the stage diagram next to them and follow the clue to set the levers. 0 + 1 – 1 + 1 – 1
- 1st – middle (green)
- 2nd – up
- 3rd – down
- 4th – up
- 5th – down
Go check out the stage and look at the tree to get the last boy’s portrait.
Go to the Director’s office and put the portraits on the wall in their place. Check out the secret spot, take the magnetic card and the ornate plate (2/2).
Go to the changing room and put the 2 ornate plates on the door there. You’ll find the last hat here for your collectibles.
Take out the mannequin and dress him up like the tall boy in the picture in the newspaper on the director’s desk.
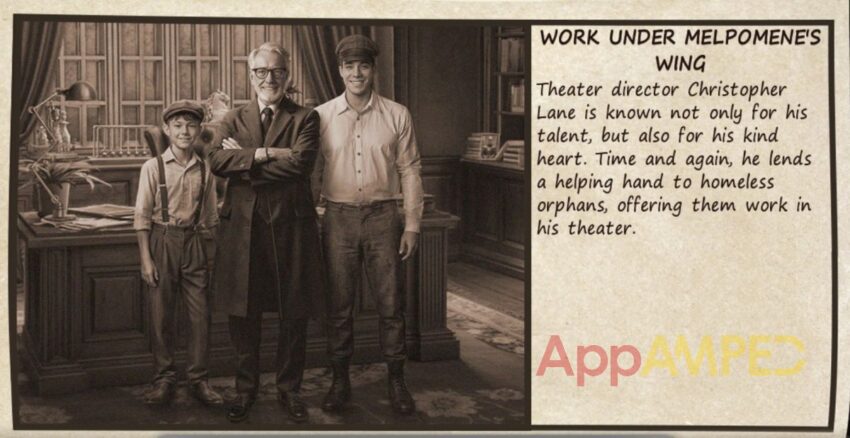
The pants are on the floor, boots are under the make-up table, the white shirt hanging on the left and the cap, right under the cowboy hat on the shelf. Talk to the boy to find out more.
Go to the staff room and use the magnetic card on the safe there. Navigate the piece through the maze:
- Buttons: > top > bottom > bottom > top > top > bottom > top > bottom > bottom > top > bottom > top > top > top > top > bottom > bottom > top > top > bottom > top > bottom > bottom > top > top > bottom >
Take the crowbar, the crystal (1/4) and the handle. Use the crowbar under the rug here to open the board and you’ll find a magnet.
Go to the restaurant and use the handle on the fridge behind the bar, and get some milk. Go to the office and give the milk to the cat to get another crystal (2/4).
Go to the inner courtyard, behind the car there’s a grate on the ground. Use the string on the magnet, open the grate with the crowbar and lower the magnet to get the key.
Go to the staff room and use the key to open the registry and find a music token and a crystal (3/4). Go to the music room with the mirror and use the token on the jukebox. Restore the pairs of musical instruments.
You’ll find the last crystal (4/4) here. Go to the Director’s office and put the 4 crystals on his frame. Talk to him about the mask, then go to the inner courtyard to open the trunk with the crowbar.
Open the gas tank under the trunk to find the last sun symbol*. Take the mask and go give it to the ghost. You’ll earn a star. Before you end the game, go collect all the stars with the collectibles you’ve gathered and solve the Secret Room.
Follow my video walkthrough below to get a clear picture of what to do:
Haunted Theater Archers* Walkthrough
You can find the archer* mini game backstage and win a star after completing all levels.
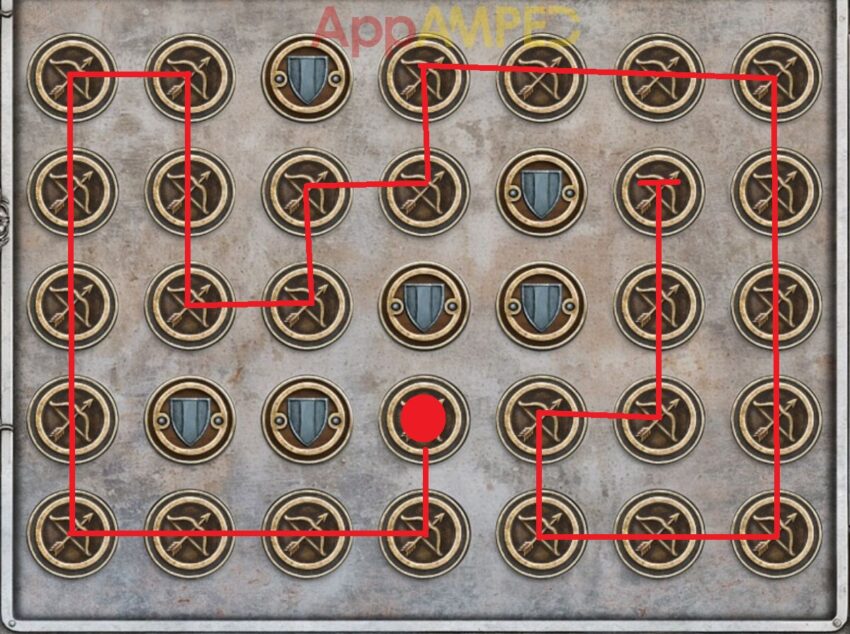
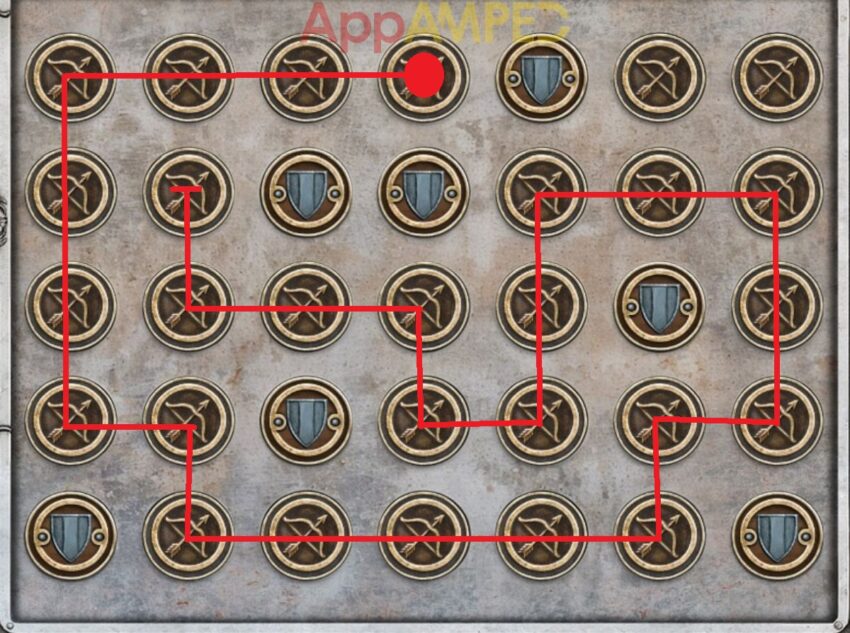
Collectible Archers Level 1 Solution
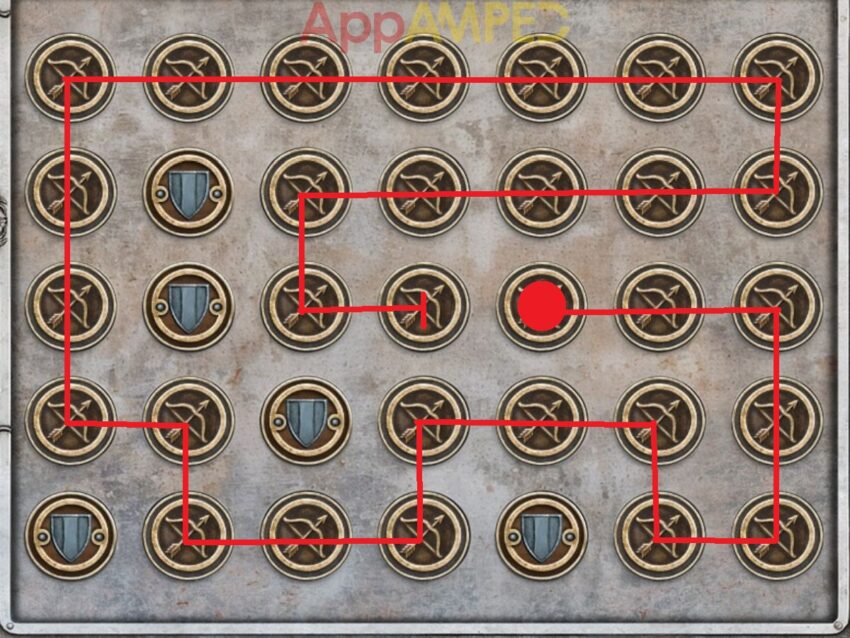
Collectible Archers Level 2 Solution
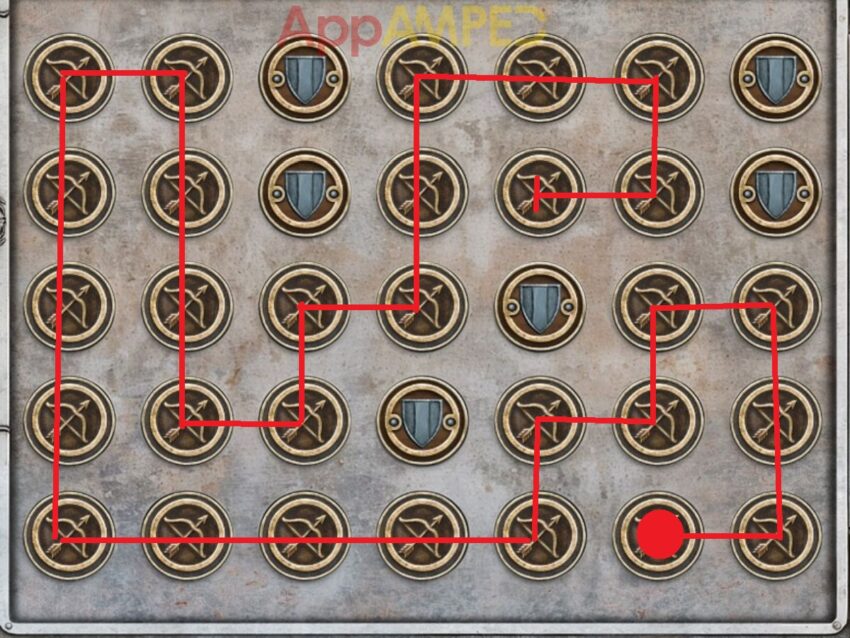
Collectible Archers Level 3 Solution
Collectible Archers Level 4 Solution
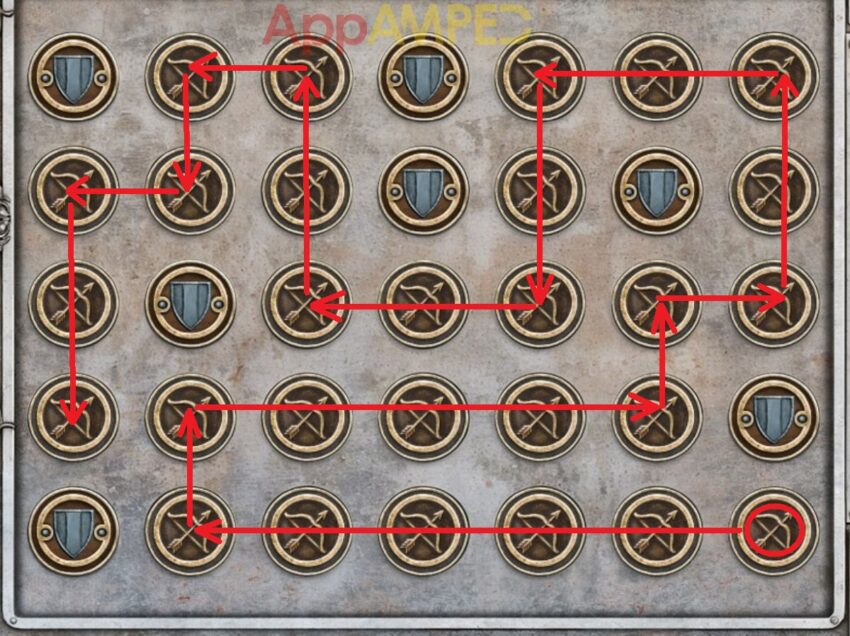
Collectible Archers Level 5 Solution
Haunted Theater Threads* Walkthrough
You can find the threads* mini games in the changing room, and if you solve all 5 levels you get a star. Here are all the levels for the thread collection:
Haunted Theater Sun Symbols* Walkthrough
You can find the sun symbols* mini games under the stage, in the music room, on the left wall.
Collectible Sun Level 1 Solution
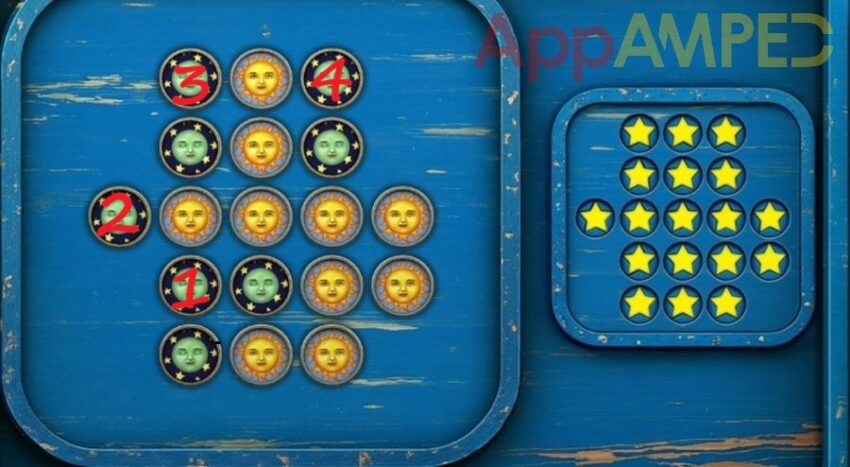
Collectible Sun Level 2 Solution
Collectible Sun Level 3 Solution
Collectible Sun Level 4 Solution
Collectible Sun Level 5 Solution
Haunted Theater Morphing Objects
You can find the star for the morphing objects in the theater, on the wall to your right.
Haunted Theater Fans
You can find the star for the fans in the restaurant, the table on the right.
Haunted Theater Hats
You can find the star for the hats in the staff room in the right corner of the room.
Haunted Theater Secret Room Walkthrough
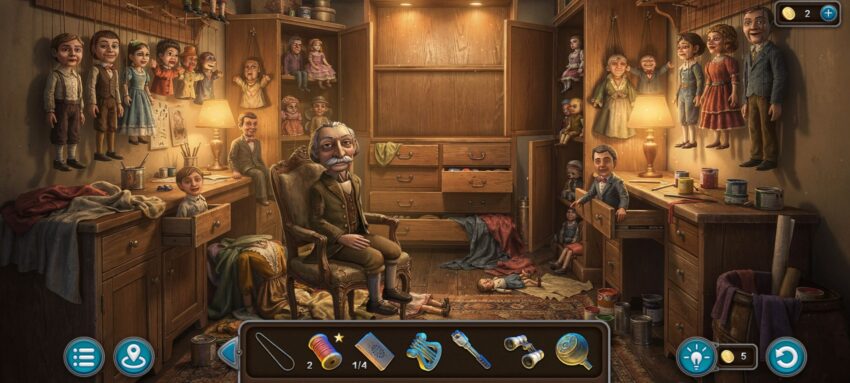
You’ll find it if you look through the binoculars – that you find in the balcony above the stage – at the theater and open the door under the balconies.
You’ll need to fin 12 puppets that are wandering through the theater and bring them to the puppet master. You can only see them if you look through the binoculars in each room.
- In the theater on a chair in the middle.
- Under the stage, next to the drums on the right.
- In the music room on a shelf above the mirror.
- Back stage, behind the archer game box.
- In the changing room on the armchair.
- In the workshop next to the shelf in the right corner.
- Inner courtyard on the panel above the car.
- Repair shop, on the front of the bus.
- In the lobby behind the poster stand.
- In the restaurant, behind the bar.
- In the staff room on the chair.
- In the Director’s Office on the desk.
Go give the puppet master his dolls and he’ll give you a star.
Wrapping up
Now that you found all stars and finished the game you can wait for the next episode, Dragon’s Castle or play other Artifact Seekers episodes from before, like Santa’s Manor or Pirate Bay.
Enjoy!

Aylin is a content creator and co-founder of App Amped. She was a huge Tomb Raider fan before moving on to more casual titles. She spent way too much time tending for her FarmVille farm as well as playing text-based browser games. Now she plays and writes about mobile games, creating in-depth walkthroughs and useful guides.
Your solution for the 5th Archer game won’t work. The 5th step won’t behave that way and instead will go straight across. Do you happen to have the correct solution?
Sorry for the late reply. Are the shields placed the same way as in the photo? If not, I can look for a different solution for you if you can send me the photo of the mini-game.
Just a quick heads-up, it starts from the big red dot and ends in the line.
where are the thread walkthroughs?
I’m sorry, Dan, I didn’t record them. I’ll try to do that the next few days and post them in this article.