

Welcome back to the walkthrough of Find Joe Lumen Part 2 adventure. We pick up right where our first guide left off, if you haven’t explored Part 1’s in-depth walkthrough yet, be sure to dive into that before continuing here.
Today’s walkthrough delivers all the answers you need to uncover each hidden object and secret in every level, so you can smoothly progress through this chapter’s intriguing mysteries and puzzles.
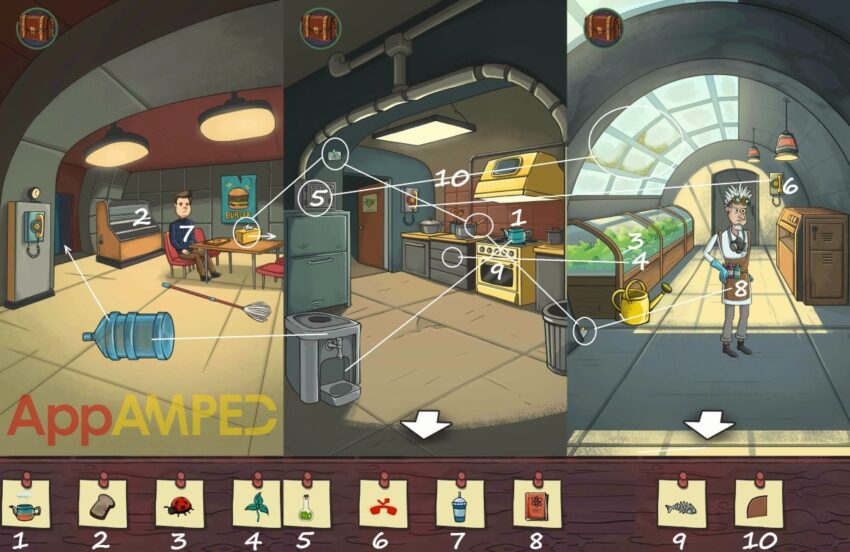
Find Joe Lumen Part 2 Bus Station Walkthrough

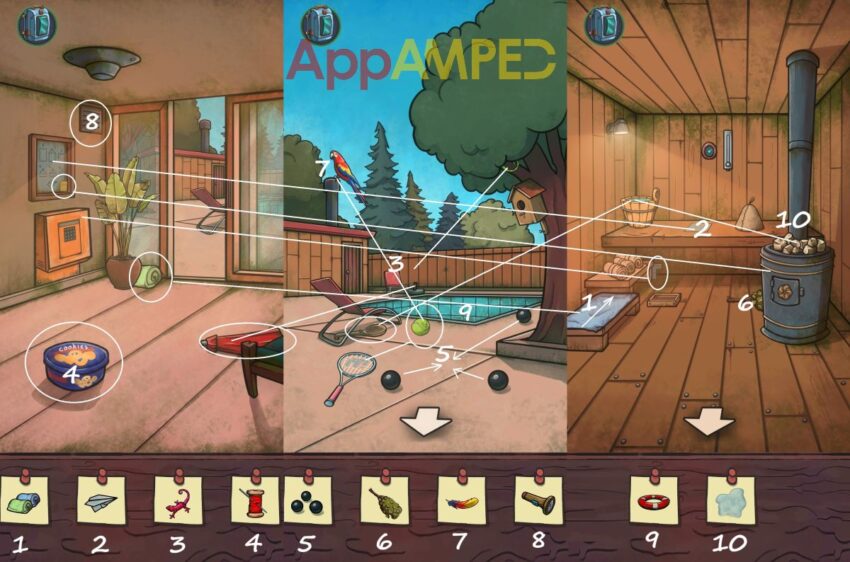
Move the stones away to find the snake (1). Take the pyramid from behind the gas sign. Look at the gas pump to find a virus test kit. Behind the flame symbol on the pump you’ll find the soda (2). On the mountain to the left is the blue shadow (9)
Enter the bus and pull on the shade flap. Get the virus test kit, find the stickman (7), and use the key to start the bus. Get out and look at the back of the bus. Open the gas lid, then the window and take the funnel from the lady to put it in the gas tank.
Enter the gas station and move the gas can outside. Move the paper on the ground to the side to get to the coin, and put it in the soda machine, push it to get a glass of water (4). Take the virus test kit from the lamp on the ceiling.
Look at the vending machine and arrange the items so that they don’t appear twice in any row, column, or 2×2 square.

You’ll be given a pizza box (5). Play the mini-game next to the vending machine. Be careful not to get squashed by cars as you find your way to the other side. Winning will give you the glasses (3).
Check out the radio and turn it around. Put the batteries from your inventory into the radio to turn it on. Rotate the side button to find the right frequency with the most green line and put the antenna up to catch a better signal with 4 green lines (10).
Put the pyramid on the counter next to the ax and put the oil can next to it. Their shadows (6) is what you’re looking for.
Go out, fill the gas tank with gas from the gas pump, go back and move the gas tank to the back of the bus where the gas with the funnel inside, pour the gas in. Get inside the bus and turn on the engine using the key. Now get out to get the gas cloud (8).
Give all 3 people that are here a virus test kit and you’ll find the doctor to be positive. Now you and the other 2 can go to the bunker.
Check out my video walkthrough for the Bus Station level:
Find Joe Lumen Part 2 Forest Walkthrough

Look through the camera, and move the lens on the sky to find the matching stars (2). Move the tree branch on the right side to find the owl (3). Take the axe from the snow and cut the fallen tree.
Move the fire wood to the fire pit and drag the kettle out from behind the snow pile on the right. Move inside the tent and look on the chest at the entrance to find the sweater (1).
Use the shovel on the snow pile to the left to find the berries (4). Tap on the garbage bin on the right.
To open the lid you need to rotate the button so it points at 2 numbers that you can add to make the numbers on the lid 597. Answer: 4+1, 6+3, 7+0. Take the chicken leg (5) from inside.
Talk to the director and play his memory game by finding matching pairs. When you win he’ll give you a donut (6). Move the lamp to the side and tap the spider (7) shadow until it comes out.
Look at the paper on the ground and connect just 5 dots and make a house (8). Move the sleeping bag away to find a casserole, open it to find a sausage. Look at the books on the bed and through them to find a piece of paper.
Go back to the fire pit, put the piece of paper on the logs, use the matchbox to light the fire, hang the kettle on the hook above it, pour the hot water over the ice block to find the cone (10).
Now put the sausage on the fork, move it over the fire to get the fried sausage (9). Now lit the torch on the right to scare off the wolves.
Check out my video walkthrough for the Forest level:
Find Joe Lumen Part 2 Cabin Walkthrough

Move the pile of snow to the side to find a scoop, tap the snowman’s nose and take the carrot. Behind the house roof there’s a saw. Drag it out and cut the wood in the front in 2 and take the log (2).
You’ll find the pawprints (7) in the snow behind the snowman. Go inside the cabin. In the first drawer under the globe you’ll find the clock (1).
Use the scoop to get the snow in the window and put it in front of the fireplace to make a puddle (6). Close the window and take the feather (3).
On the table there’s a map that shows you the route to the old bridge: left – right – straight. Move the pillow to the side and get the lollipop. Move the wood from the fireplace to find a coal (5).
Go outside, give the girl the lollipop to get the stars (9) and follow the paths to the old bridge. Put the wooden planks over the bridge, two down and one on top.
Look at the rock with the arrow and click on the stones in the correct sequence where the arrows are pointing and you’ll find the crystals (10).
Put the carrot on the rock and the moose ( 4) will show up. Remove the snow pile on the right of the bridge by dragging it down, you’ll find the sign (8). Go take some nails from the man inside the cabin and nail the planks. Then put the board over the gap.
You’ll find the bunker. Remove the snow from the door. Wipe the plate above the lock to find the clue to open it. The answer to the riddle “The day before yesterday I was 25. The next year I will be 28. What day is my birthday?”
Check out my video walkthrough for the Cabin level:
Find Joe Lumen Part 2 Bunker Walkthrough

Use the red cutter to open the box on the floor and take the paper from inside. The triangle (1) is on the ceiling. Look at the puzzle on the floor, move and press the magnetic buttons to attract the puzzle pieces and you’ll find the robot (5).
Put the can opener through the disinfection machine, take the green button (2) and go through the open door. Look at the boxes on the machine to find the number 11 (3) on the sole of the shoe.
Take back the can opener. Look behind the wooden boards to find the shoe print (8). Take the table leg. Look under the floor boards to find the necklace (6). Go through the door on the left you’ll find the supply room. Take the other table leg.
Look at the coat hanging on the wall to the right, in the pocket you’ll find a pencil (9). Behind the boxes on the shelf there’s a fish can, use the can opener to open it and find the fish (7).
Put the paper in the typewriter, type an S, use the button on the right to scroll down once, then use the arrow to go back and write another S to find the SS symbol (10).
Go out to the first room, fix the table legs and get the table (4), then go back and take the elevator.
Check out my video walkthrough for the Bunker level:
Find Joe Lumen Part 2 Underground Bunker Walkthrough

You’ll find the face drawing (3) on the left of the elevator door. Pick up the red button and place it on the elevator panel, then push it to open the doors and get in the other room.
There’s a panel on the left wall. Press the 4 buttons in the right order written on the wall above (3411231) and you’ll turn on the lights (10). Look at the TV in front and take the watch (2) from the man’s wrist.
Look at the couch on the right and open the closest seat, take out the box and put it’s lid on to make the toolbox (1). To the left of the TV there’s a red sliding door, open to find a mug, turn it to find a wolf on it.
Move the panel on the ground to the left and find a triangle button. Use it on the elevator to go to another floor. Move the blue box to the left to find the square button. Look at the mug on the stack of paper to the left to find a hand print.
Use the tape on the desk to fix the camera on the ceiling and slide it up. Slide the stick down to the elevator. The machines right in front is a Quiz machine, play it to find the money icon (4).
- Which event led the US to enter World War II?
- C. Attack on Pearl Harbor
- Who invented the light bulb?
- C. Thomas Edison
- Who painted the Mona Lisa?
- D. Leonardo da Vinci
- Which civilization built Machu Picchu?
- A. Incas
- Which scientist proposed the laws of motion?
- C. Isaac Newton
- Who discovered penicillin?
- C. Alexander Fleming
- Who wrote “The adventures of Tom Sawyer”?
- A. Mark Twain
- Which famous ship disappeared in the Bermuda Triangle in 1918?
- A. USS Cyclops
- Who was the British Minister during World War II?
- C. Winston Churchill
- What year did the Titanic sink?
- D. 1912
- Which country gifted the Statue of Liberty to the US?
- B. France
Turn the radio on the left on and move the arrow to 240, then press the Walkie-Talkie to talk to Lumen. GO to the elevator and use the stick to open the loose board on the ceiling and get the money (8).
Put the square button in it place to get to another floor. Turn on the lights from the blue button on the left. Check out the mug above to get the eyes (9). Look at the monitor on the bottom right to find the robot (5).
Look at the monitor above the chair to find the black and white poster (7). Turn the chair around to find the magnifying glass (6). Check out the monitor where the man is and go there to get the key.
Go back to the security room and use the key to open the drawer next to the chair to find a schedule. Tap the alarm clock until the red line goes between 7 and 8 (7.30), now go back to the triangle room to find the man.
Check out my video walkthrough for the Underground Bunker level:
Find Joe Lumen Part 2 Abandoned Mall Walkthrough

You’ll find the screwdriver (6) behind the stairs. Pull the lever at the second floor to open the window blinds and get the bird (10). Enter the open store on the left to find a toy store.
Take the cutter from the robot’s hand and stab the inflated ball to find a key. Play the arcade game to get the ticket (5). On the shelf there’s a sheriff doll that sings, you can take the music notes (1). Move the robot box to the side to find the bunny (7). Move the train to the side to find the truck (9).
Go out and use the key to open the locked store. Get inside and you’ll find a toy brick behind the sofa chair. Drag the mannequin in front of the mirror, put its head on to see it in the mirror and tap on the head (4).
Behind the red drapes there’s a white paint you need. On the fallen shelf there’s a wallet (11). Next to the purple clothes there’s a bar you can put inside the closet.
Next put the hanger on it and move the clothes on the ground away to find the blue shirt (8) then hang it on the hanger. Get out and use the white paint to write an R next to UN (2) on the wall.
Go to the toy store, look at the toy bricks on the ground and make a house (3) with the toy brick in your inventory and then go outside. Check the electric panel and connect the red + and blue – contact using the wire pieces to complete the circuit to restore the power.

Check out my video walkthrough for the Abandoned Mall level:
Find Joe Lumen Part 2 Seb’s House Walkthrough

Tap and drag the sofa to get the spring (2) out. Put the lightbulb from under the TV in the lamp in the next room and you’ll find the scoop (5).
Solve the math puzzle on the blue box you can see on the ground. 2+5+9+1 – 1+6+7+3 – 2+4+8+3 all equal 17 on each side. You’ll find the watch (6) here. Tap the ceiling and drag out the doll (7). Pull down the wall clock to find a key.
Go in the garage and find a screwdriver shaft in the box. Put the two pieces in your inventory together to make a screwdriver and use it on the screw on the light to get the green spider keychain (8).
Use the broom to clean the spiderwebs and find the chest (1), then take the blue bottle with windshield liquid. Take a look under the hood of the car to find the wrench (3). Open the red cork here and pour down the windshield liquid the pop the hood back on.
Open the cupboard of the desk to get the fishing line (10). Use the blue jack to lift the car and drag the ball (9) from under there, then put the car back down. Use the key to get into the car, and pull on the lever by the steering wheel to find the SEB sticker (4).
Get back to the living room to talk to Seb, tap on the table and put the photograph pieces Seb gives you to make the photo whole.
Check out my video walkthrough for the Seb’s House level:
Find Joe Lumen Part 2 Bunker Greenhouse Walkthrough
Talk to the man at the table then play his game. Click an adjacent point to move your piece. Capture the Director’s piece to win the cup (7). Look at the glass case behind the man, open the right glass door, move the bun away and take the toast (2). Move the napkin box to the side to find a note.
Push the water bottle to the other room and go after it to the kitchen. Put the bottle on the water disposal, take the kettle, fill it with water from it put it on the stove and take the hot kettle (1). Open the oven, take the tray out to get the fish bones (9).
You’ll find the tile (10) on the wall of the kitchen in the corner. You’ll also find a note above the safe, another note behind the pots on the counter, then open the drawer under the pots to find a seed package.
Go into the other room, check out the greenhouse, open the glass door and catch the ladybug (3). Throw the seeds here and turn on the sprinkles to get the plant (4). Get the note from the left bottom corner and give all 4 notes to the scientist. to get the book.
Look at the phone here and remember 2912. Go to the kitchen and press those buttons on the phone here, then go back to the greenhouse to get the phone symbol (6). Notice the windows here and remember the 3 that have mold on them.
Go back to the kitchen, check out the safe, and position the chips in the same position as those windows, take the potion (5) from inside. Go to the greenhouse and through the open door in the back.
Program the robot using the arrows to reach the tomato in the back. You can multiply one arrow by pressing the number under it: ⇧ ⇦ ⇧ ⇨ ⇧(3) ⇨ ✂ ⇦ ⇩(5). Now you finished the level.
Check out my video walkthrough for the Bunker Greenhouse level:
Find Joe Lumen Part 2 Pier Walkthrough
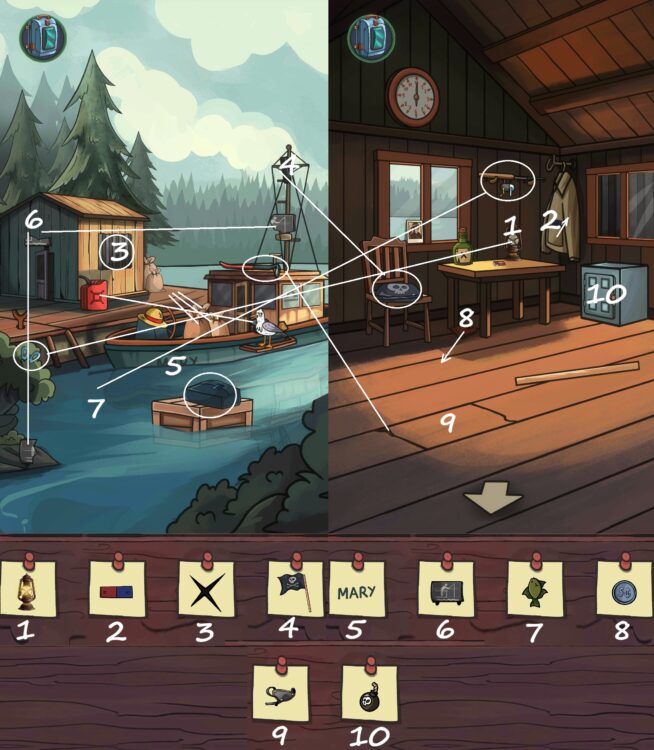
Move the bags from the boat to lighten it and get the name Mary (5) from the boat. Put the pieces together to form the sign (6) above the door. Take the crowbar from the boat, and the scissors from the bush on the left. Look behind the covers of the window to find the X (3) symbol.
Open the bag floating on the crate in the water and look through the book to find a page journal about eggs. Go inside the boathouse, drag the wallet from under the table and look inside, take the 5¢ (8). Look into the pocket of the coat to get the magnet (2). Take the flag cloth from the chair.
Look at the lamp on the table, open the glass by pulling the golden lever, use the scissors to cut off the wick, pull the red nub to get more and use a match to light the lamp (1) then close the glass back to take it.
Use the crowbar to get under the wooden floor board and find an eyepatch (9). Look at the safe and drag down each picture to find the right code: 6 – bird – libra – egg. You’ll find a bomb (10) inside.
Take the fishing rod from the wall and put the fishing line in your inventory onto it. Go outside, using the fishing gear to catch a fish (7). When the seagull leaves you can put some gas into the boat.
Check out my video walkthrough for the Pier level:
Find Joe Lumen Part 2 On the Boat Walkthrough
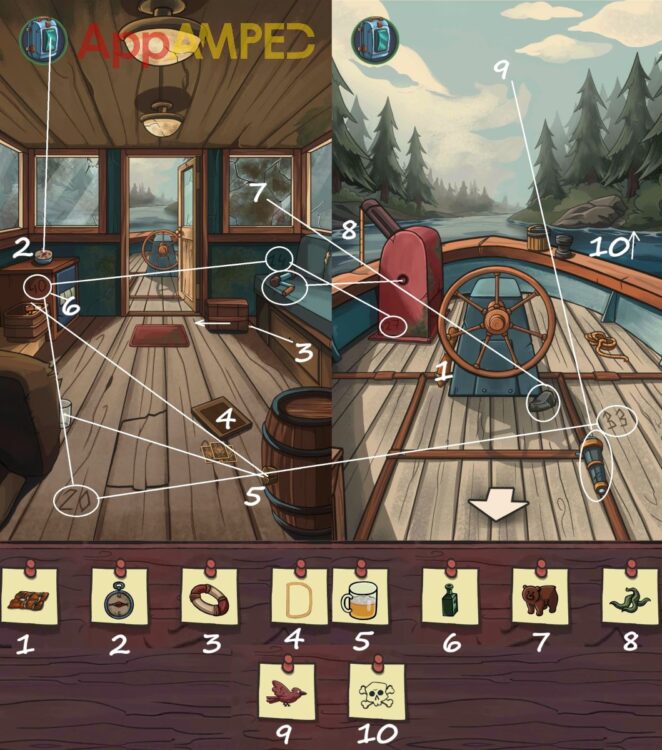
Look at the compass (2) on the safe and use the magnet to make it point W and E. Take the crank handle on the right. Behind the crate next to the door there’s a handle you can use on the drawer under the bench on the right, inside you’ll find a floating ring (3).
In the box on the left you’ll find a tap you can use on the barrel, then grab the mug on the floor to get a mug of ale (5). Look at the deck of cards on the floor and arrange 4 cards so that the middle shapes in the corner of the cards to make a D-shape (4).
Check out the numbers in this room and outside, add all of them up: 40+20+14+27+33=134. Go to the safe inside and enter that code to get the bottle (6).
Get outside and check out the item next to the wheel, that’s the first item (1) in your list. I can’t figure out what it is though. Take the stone on the ground, then use the monocular to look at the birds on the sky and tap on the red bird (9).
Use the crank handle on the anchor device to get the kelp (8). Pull the bottle from the water, get the message out and find the skull (10) on the letter. Go inside, use the stone on the window to the right to find the bear (7).
Go outside and tap the wheel, make sure you go around rocks and other debris, while distracting crocodiles so they don’t get too close, so you reach land.
Check out my video walkthrough for the On the Boat level:
Find Joe Lumen Part 2 Storehouse Walkthrough
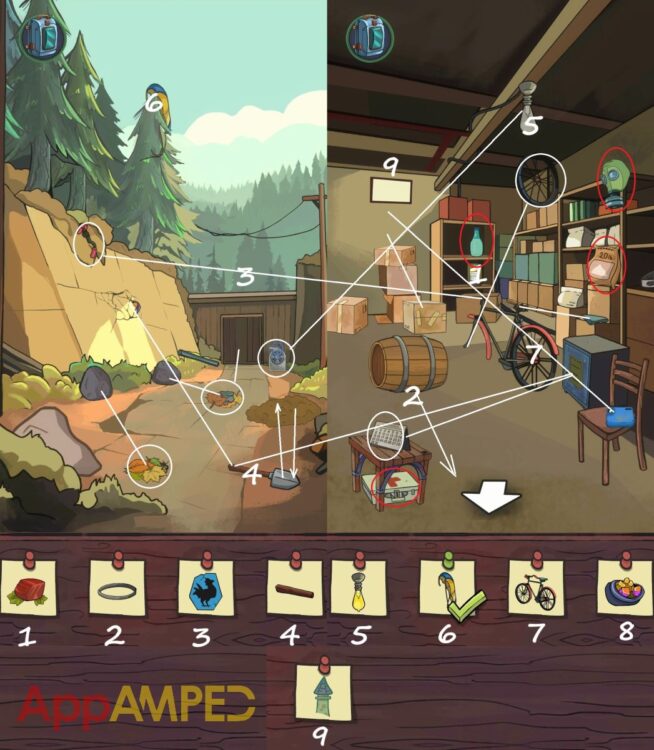
Move the leaves from the 2 piles and put the rocks on the Xs to open the door and get the rooster (3). Take the parachute (6) from the tree. By the door there’s a generator you need to fill up before entering to get the lightbulb (5).
Drag the barrel outside, then follow it and drag it until it breaks in the big rock and you can take the ring (2). Take the bicycle handles from the left side of the hill.
Go inside and put the bicycle wheel on the frame add the handles, and the seat on the boxes to the right, and take the bicycle (7). There’s a can on the shelf and if you turn it you’ll find the meat (1). Look at the calendar on the stool and notice the circled numbers 479.
Go to the safe and use those to open it and take the pickaxe head. Put the box on the floor on top of the other boxes by the window. Take the camera to put it on top of this pile of boxes to reach the window and take a picture, you’ll find the tower (9).
Go outside and use the shovel on the pile of dirt, look into the box and use the saw to cut off the handle of the shovel and take that wood (4). Put the pickax head on the wood and use it to break down the hole in the hill to find the gems (8).
Now find all the items on the list, I circled them with red to make it easier for you to see them.
Check out my video walkthrough for the Storehouse level:
Find Joe Lumen Part 2 Barn Walkthrough

The flute (1) is behind the grass, next to the barrels. The glue (4) is on the barrel. Grab the bucket behind the barn, tie it to the well to get water, and pour that water in the mud in front of the pig, then drag the pig to the mud to get pig prints (5).
Look at the windmill next to the barn, twist it upside down to get the half sky-wood (6). Put the brass rooster on the house to get the weathervane (9). The cart is missing a wheel you can find by the well, then after fixing it move it to the side to get the saddle (10).
Look at the papers on the ground and put them in chronological order red-blue-yellow stamps, and put that on the device by the door to get the cup (11) inside.
Go inside the barn, use the fork to move the pile of hay on the right and get the horseshoe (2). Move the goat next to the horse, tap the horse, then the goat to get the music notes (3).
Tap on the chicken to move it and then tap on the egg to get the chick (7). Unlock the back door by solving the maze and get the coat (8).
Go outside to find Mike. Check out my video walkthrough for the Barn level:
Find Joe Lumen Part 2 Doug’s House Walkthrough
Open the cookie box on the floor to get the thread and needle (4) inside. Take the towel behind the plant, the umbrella behind the chair, and the lighter from the framed instructions on how to make a paper plane.
In the vent above the plant there’s a flashlight (8). Go outside, put together the 3 black balls (5) to get them. Put the umbrella in the support by the chair in the back. Grab the lizard (3) from the tree, then put it on the umbrella to turn red.
Tap the tennis ball, use the racket to hit it into the parrot and get the feather (7). Take the ladle under the chair. Enter through the door in the back to get to the sauna.
There’s a metal part on the ground behind the towels. Take the bunch of herbs (6) behind the steamer. Roll the blue towel on the left then put the green one from your inventory next to it to get both towels (1).
Use the lighter to lit the fire on the steamer. Use the ladle to get some water from the bucket and pour over the coals to get the steam (10). Next to the bucket there’s a pieces of paper, fold it like shown in the instructions to get a paper plane (2).
Go back to the first room, put the metal part on the pool panel on the wall, and fit all 3 parts inside so only 3 buttons are left. Press them and get outside to get a swimming ring (9) and talk to Doug.
Check out my video walkthrough for the Doug’s House level:
Find Joe Lumen Part 2 Mike’s House Walkthrough
Look on the desk. Measure with the line the inside of the blue circle. Take the compass to match half of the measurement, which is 3. Now put the compass on the red paper to draw a circle, cut the red circle and put it inside the blue circle to get the target (1).
Take the black ball and break the glass case to get the camera (2). Move the chair away, go to the computer and enter the name Twain as a password, you can find Mike’s favorite writer on top of the bookshelf. Catch the robot (3) on the screen.
Tap the snake icon to play the game and gain 100 points (7). Move the book from the box to get a key. Now go in the other room, open the window, put the loaf of bread from the shelf to the windowsill so the bird comes and eats part of it and you get the rest of the bread (5).
Move the book from under the chair to find the ring (4). Look at the bookshelf and tap the poetry books in order from I to III to open a secret door, you’ll find a duck face (6) on the edge. Use the lantern to look inside.
Catch the spider (10) on the wall, get a scale weight next to the safe. Look on the shelf to the left, behind a box to find a chip programmer (9).
Use the key on the safe and take the floppy disk from inside. Get back to the other room, look at scales behind the shelf, put the weight here and now put the 200 to the left and the 300 to the right to get it balanced and take the middle scale (8). Go to the other room to talk to Seb.
Use the floppy disk on the computer, click on the square to add exception. Pick the photo of the robot that matches Lumen and finish this level.
Check out my video walkthrough for the Mike’s House level:
Find Joe Lumen Part 2 Factory Walkthrough
Take the rag from the car wheel in front. There’s a cutter behind the plant on the left. There’s a loosen brick in the wall, after it drops throw it through the window. Take the drill (9) on the ground, then go inside.
Pick up the broken glass (5). Find the white rhombus behind the green slime tube. Look inside the box to find a fuse (2). Use the cutter to cut the bottom of the box and get the light (3) inside.
Behind the car there’s a cleaning spray. There’s a blue toolbox where you can find the drill bit (10). Put the two parts together to make a drill. There’s a locked box in the back, use the drill to open it and get the notes (6).
Go outside, use the rag and the cleaning spray to wipe clean the panel under the tower. Now move the nub to the numbers written here 4168. Press the arrow pointing down so it gets to the roof.
Drag the cat to it, then go and press the down arrow again and then push the cat out to reach it’s kitten (1). Tap the bird drawing (4) on the tower.
Next to the door, under the window, there’s a blue and white pattern. Rotate the squares so you get a blue rhombus in the middle, and white rhombuses on each side, and fit the rhombus in your inventory in the middle to get the X shape (7).
Now go to the machine on the right and use the buttons to make a red cross in the middle. Press the 1st and 3rd button (on the left side from up to down). Press the right arrow 4 times, left arrow once, 2 button, left arrow twice, right and down.
Go inside the factory to talk to Lumen. Drag the magnet above Doug, then down to get him. Drag it up so it takes Doug to the green slime.
Check out my video walkthrough for the Factory level:
Wrapping up
This was the grand finale of Find Joe Lumen Part 2. The great sacrifice that Lumen did for his friend and master Mike was heartwarming and Mike will never forget him.
Hopefully we get more parts on this artificial intelligence adventure, and maybe Lumen comes back to save the day again.

Aylin is a content creator and co-founder of App Amped. She was a huge Tomb Raider fan before moving on to more casual titles. She spent way too much time tending for her FarmVille farm as well as playing text-based browser games. Now she plays and writes about mobile games, creating in-depth walkthroughs and useful guides.