

Escape games are my favorite genre, so I made this walkthrough for Panel Room so you can enjoy it too, in case you get stuck.
You need to make sure you don’t skip any steps. The game is pretty straightforward and rather simple in design, but it’s unique and makes the game even more fun to play.
After you go over the info the game is providing, about how to play the game and what you’re able to do, start playing by clicking things that you want to investigate. Follow my lead to see what you can find.
Panel Room Walkthrough

- You can tap on each framed picture and you can check out the Robot first:
- Tap on his arm and then on his bottom – there’s the number 8 written inside the blue hexagon.
- Check the bush and keep tapping till a key falls out of it.
- You can now see the key on the ground near the pot. Tap and take it.
- Use the key on the desk above the pot and open the drawer.
- Take the colored panel paper from the inside. (It will unlock the next step)
- Take the pencil from the desk and close back the drawer.
- Flip through the agenda on the desk.
- The bookmark is something you’ll need to come back to later.
- But if you keep flipping you’ll see a spot with a ripped paper: brown hexagon = teal hexagon x _____ <- ripped paper.
- You can now go to the next page.
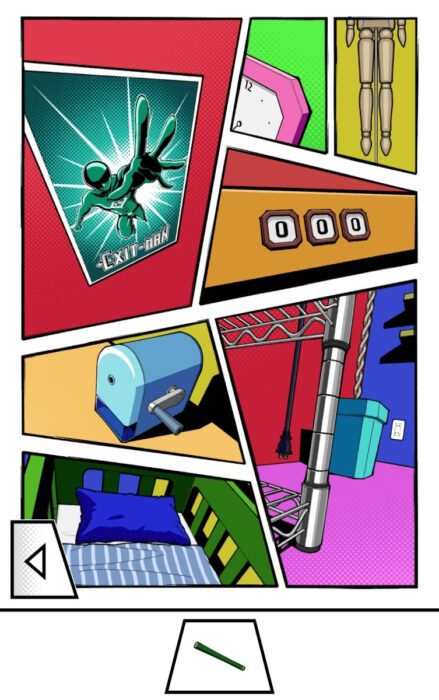
- Check out the poster of Exit Man.
- Sweep the upper right corner and get the piece of paper hidden there.
- Open it to find the ripped paper from the agenda.
- If you check out the pink watch, it only turns around and the arrow points at number 7.
- Check out the bed, remove the pillow, and take the teal toy scoop.
- Go back to the first page and use the toy scoop to dig in the dirt of the teal hexagon pot.
- The number 32 is written there.
- You can glue back the ripped paper of the hexagon equation in the agenda: brown = teal x blue + pink
- This means brown is: 32×8+7=263.
- Go back to the other page and enter that number in the 3 brown hexagons.
- Once you enter, go back to the desk on the first page and open the bottom drawer.
- Another page for you to explore.
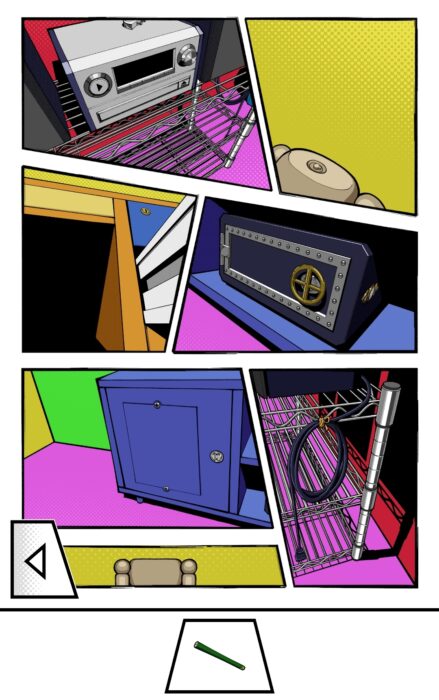
- In the first frame, you’ll find a metal handle on top of the CD player.
- Use this on the blue cupboard below.
- Tap it to open it and get the scissors and the flashlight.
- Go to the second page and use the scissors on the blue pillow.
- You’ll find a battery there.
- Put it inside the flashlight and turn it on.
- Got to the first page and check the area between the desk and the wall.
- You can pick up a toy gun.
- Move to the next frame with the cables and use the scissors on the knot that holds it up.
- Go back to the second page and take the plug to throw it closer to the socket.
- Go to the first page and tap the image with the pot and throw the plug even further.
- Now that it finally reached the socket, plug it in.
- Go to the third page and open the disc drawer and take the golden gear inside.
- Go to the second page of the pencil sharpener and turn it around.
- Open its back and use the gear to fix it.
- Close and turn, and put the pencil in the pencil sharpener and sharpen it.
- Take the sharp pencil and go to the agenda in the first page.
- Go to the page with the pink bookmark and use the pencil on the smudged area.
- It will show you the position of the mannequin.

- Open up the blue drawer of the desk here and go to the second page.
- You’ll find a wooden part stuck in the drawer if you look at the image below the CD player.
- Put it on the body next to the CD player and turn it.
- Check the image of the mannequin at the bottom of this page, and click the arms so they go in that position.
- Then move to the first page and fix the legs so they look like in the picture.
- If you did it right you can go to the neck part again and click it to get a wooden key.
- Use it on the robot on the first page.
- You’ll find a screwdriver and that he’s missing some batteries.
- Go to the blue cupboard on the last page.
- If you closed the door you’ll see it has some screws for you to unscrew.
- This is where you’ll find the fourth page. But open this blue door before you go.

- If you opened the door of the blue cupboard, you’ll see a remote controller in the first frame.
- Take the battery out of the flashlight and put it inside the remote.
- Use the flashlight on the dark area in the frame next to the mirror.
- You’ll find a locked box.
- Take the toy car and check the frame at the bottom of the page.
- Tilt it and use the screwdriver on that screw.
- You can now turn it and see it’s a mirror that shows you 3 parts of the room.
- Look above the frame and take the radio control from there.
- Turn the mirror to see the TV and use the remote to turn it on.
- It will show you a key and Roman numbers: I V III VI (it’s in the mirror so it looks like IV to you)
- Go to the fourth page and click on the circle with Roman numbers.
- Use the arrows to pick your number, and when it’s the right one, click on it.
- It will unlock the safe on the third page.
- You’ll find a missing car track.
- Go back to the fourth page and put the missing car track in the bottom left corner.
- Take the battery out of the remote and put it to the toy car.
- Put the toy car back on track and use the remote control to start the car.
- Once the car gets back to you, take it off the track and take the ball bullets too.
- Open up the toy gun and enter the ball bullets inside.
- Use the toy gun to blow off the red heart balloon.
- Go to the bed in the second page and take the key.
- Use the key in the locked box to find the fifth page.
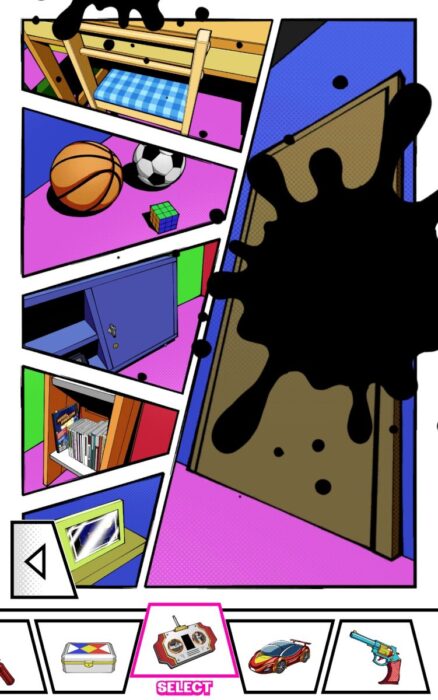
- Grab the Rubik’s Cube and the magazine from the bookshelf.
- Look through the magazine and notice the red square.
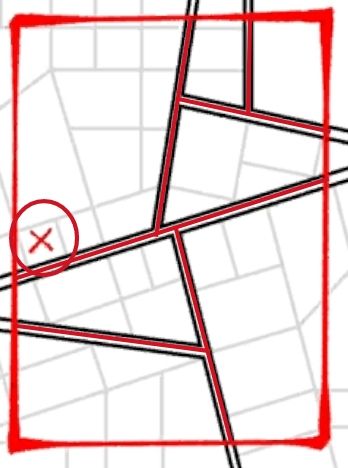
- It’s a clue to one of the pages you need to take a closer look at.
- It has the frames and cuts as shown there.
- It’s actually the second page, and you need to go there and tap somewhere lower than the poster, where the red X is showing.
- Take the battery from the wall and the battery from the toy car and go to the first page and put them on the robot.
- Now press its button and take the purple piece of cube from its mouth.
- Remember the colors: blue – green – purple – red – white – yellow
- Take the batteries with you.
- Take your Rubik’s Cube and put the purple piece back, click it, then turn it around to click the colors in the right order.
- It will open and give you a drawer knob.
- Go to the fifth page again, move the chair in the top left corner, out of the way.
- Put the knob to the drawer and open it.
- That’s our sixth and final page.
- Move the red cap out of the way and take the key.
- You can go with the key to the blue cupboard on the previous page.
- Open it and take the tree house.
- Put one battery in the flashlight and light up the lower right corner of the sixth page.
- You’ll see a screw you can unscrew.
- With the flashlight check out the frame right next to this.
- Put a battery in the car, set it there, and turn it on with the remote so it pushes on what’s behind the desk.
- Go to the fourth page, where the car track is, and light up with the flashlight the bottom middle frame.
- Take the books and go to the sixth page.
- Look at the books on the bookshelf.
- Their book spines make up some letters if they were positioned right.
- Put the books you found to be able to rearrange them.
- They will show the letters: RSG
- Now go to the fifth page and look at the photo frame with the owls.
- Turn it around and add the letters RSG.
- It will unlock and give you a flat screwdriver.
- Put the tree house in the blue open cupboard on the third page.
- Turn it with the back to you, then close the door.
- Now go to the fourth page and look inside the top left corner with the flashlight.
- You found a blue screwdriver.
- Put the handle together with the flat screwdriver and go to the sixth page.
- Click the button and everything will turn black and white.
- Go to the fifth page where the black smudge was and use the pencil to draw a door.
- Tap the top left corner frame on this page and above it you’ll see a draw button that will color everything back again.
- Tap on the door and the door handle and you’ll be able to escape.
Wrapping up
I can definitely say this is a unique escape game. The design and idea, although following the same objective as any escape game, it’s very original, and that made it more fun to play.
You can watch the video of me playing it (the second time) so you see how things were done and maybe understand better.
If the creators will give us more Panel Rooms to escape from, I’ll make sure to play it and give you a full walkthrough.
Until then you might want to take a look at Rooms and Exits walkthroughs, maybe you get inspired to play.

Aylin is a content creator and co-founder of App Amped. She was a huge Tomb Raider fan before moving on to more casual titles. She spent way too much time tending for her FarmVille farm as well as playing text-based browser games. Now she plays and writes about mobile games, creating in-depth walkthroughs and useful guides.