
Here is another chapter to find a new adventure in Lost Lands 11 and I’m gonna help you solve all the mysteries in Chapter 2 – The Trials of the Big City.
A young traveler is making his way home. Fate grants him fascinating encounters – but also presents difficult challenges. The greatest of them all is the city that lies along his path.
Chapter 2 – The Trials of the Big City Walkthrough

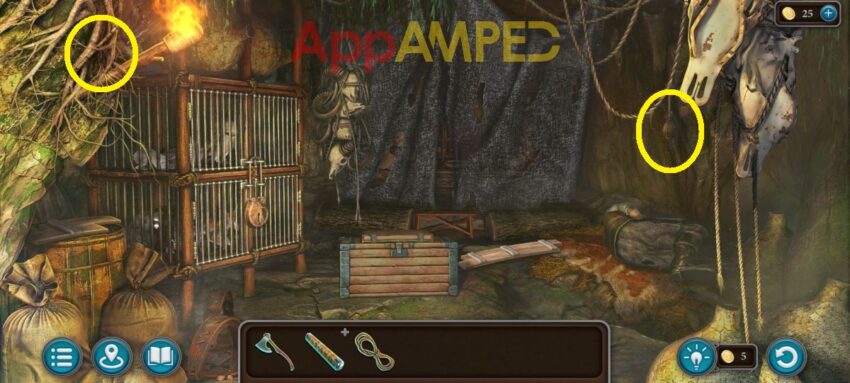
Note for collectibles: I’ve circled a morphing object and a lute for you.
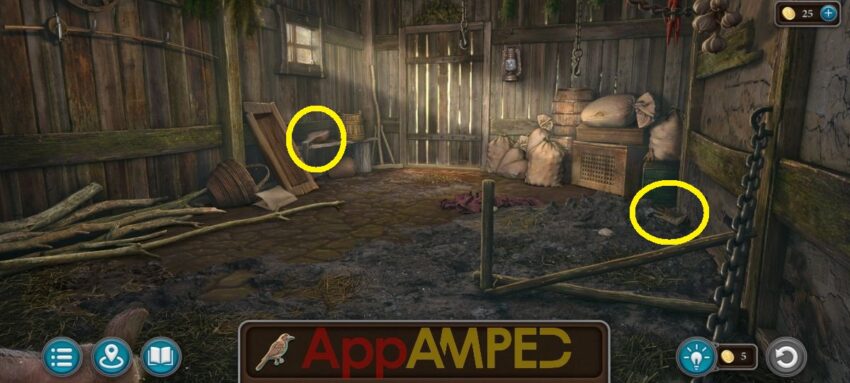
Look at the pile of fire wood on the right, and behind the bush to get an axe. There’s a pile of rocks and other things right under the edge of the cliff. Get a valve and a wooden staff from there.
Go to the half-chopped tree and finish the job with the axe. Look at the bee hive that fell from the tree and take the fragment next to the rocks above the hive. Go up the tree trunk to find the ruins of the city.

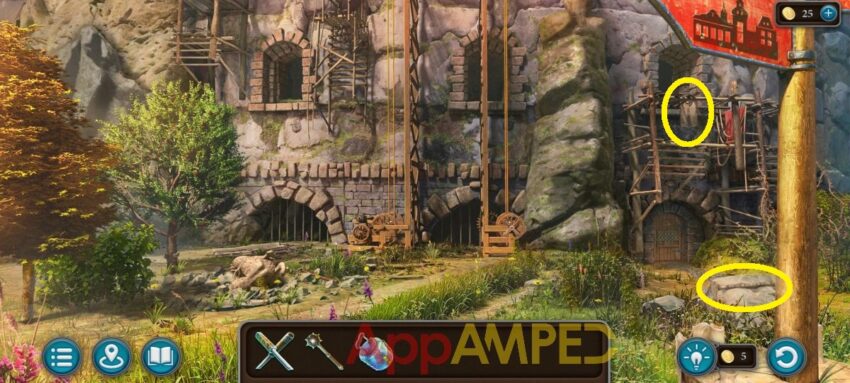
Note for collectibles: I’ve circled a morphing object and a flute for you.
Check out the gears on the left that are tied to the rope and use the axe to unstuck the gear. Go to the chandelier to find another fragment nearby, use the tile shard on the ground to cut and take the rope.
Check out the other mechanism on the right and take the broken part. Use the 2 fragments to fix it and secure them in place with the rope, cut just a piece with the tile shard.
Put back the fixed part and pull the lever number 4, for the wall to slide down. Now go to the telescope device in the middle and look through the lens. Adjust the telescope by connecting blocks with machine symbols in a line.

Adjust the telescope using the valve and find the tower through it. Find more information and head down to try and reach the tower. Go over the walls and follow the path then talk to the Minotaur.

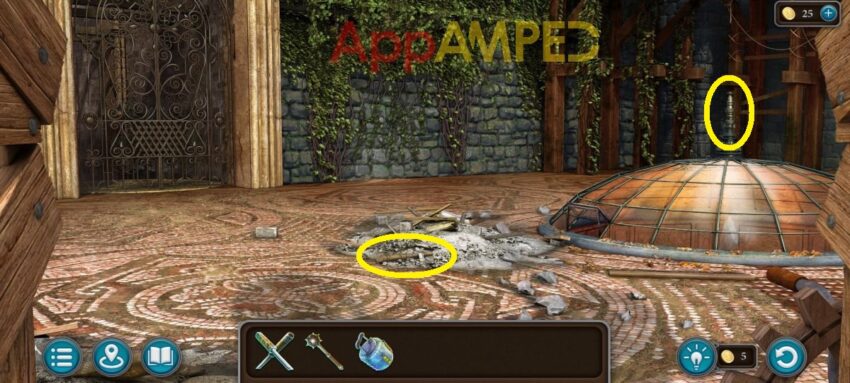
Note for collectibles: I’ve circled a morphing object and a lute for you.
Check out the cave and take out the torch from the left wall. Go out to the cage and check the box to the left to get some gauze. Take the old cloth from the torch and put the gauze on.
Look at the crates to find the flammable pot, use the axe to smash it when the Minotaur sneezes. Put the torch in the liquid to get it ready. Go back to the telescope and put the torch to the side, turn the telescope and use all gears to connect the opposite sides.

You’ll light up the torch with the beam of light. Take it to the cave and put it back to see better.
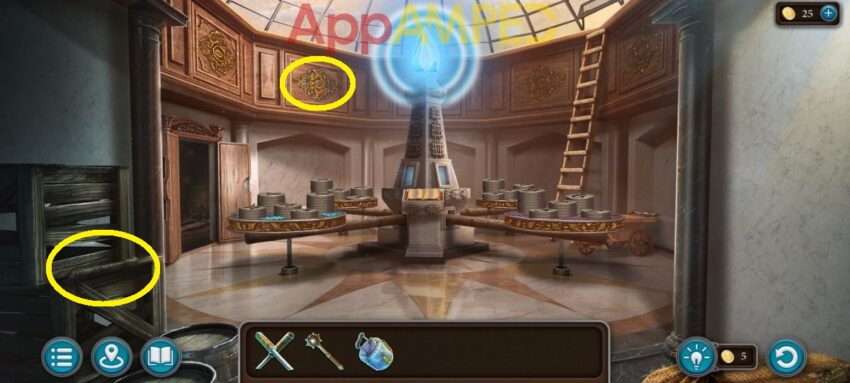
Note for collectibles: I’ve circled a morphing object and a flute for you.
Look where the poacher is sleeping and take the sleep potion note under his blanket. Put it on the table behind the curtain in the back and follow the instructions on it take all the hidden objects needed.
You’ll need the rod, last item on the list, to open the little drawer in the cabinet and get the flower. Then follow the recipe step-by-step to get the sleeping potion in the syringe. Use it on the sleeping man so you can turn him around.
Get his journal, read it, and get his keys. Following the drawing in the journal, redo the same code, to open the wooden staff into 2 daggers. Use the keys to open the Minotaur’s cage. Then pull out all the blocked bars, one by one.
Give the Minotaur your axe to get the poachers to run away. You can go inside the cave and free the animals in the cage using your keys and take the nails from inside the cage. Go down the path to find the lake.

Note for collectibles: I’ve circled a morphing object and a flute for you.
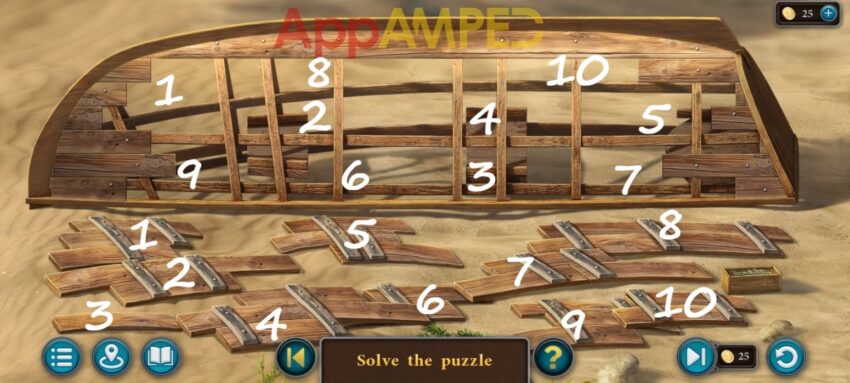
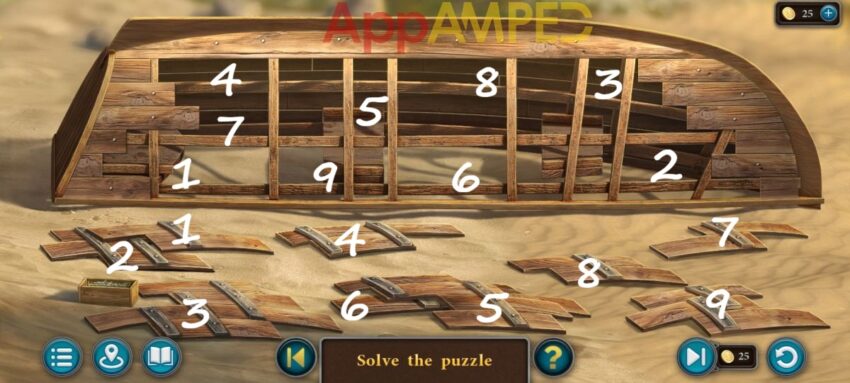
Take the 2 boat parts (2/10) by the broken boat. Use the dagger to cut off the net in the tree and take the shovel, scoop, and paintbrush. Look in the haycock and take the pitchfork.
Go back to the poachers tent to find 2 more boat parts (4/10). Take the hammer in the box by the fire, the cauldron, and use the scoop to get some hot coals. Inside the cave you’ll find 2 more boat parts (6/10).
Go to the ruins to find 2 more (8/10) and in the forest for the last 2 (10/10). Look at the bee hive and throw the hot coals next to it. Now put the cauldron down and use the pitchfork to get the hive into the pot, then take it.
Go back to the lake to fix the boat with all the boat parts + nails + hammer and solve the puzzles.
And on the other side:
Now go to the cave at the table in the back, and put the bee hive on. Put it in the presser to get the honey out then take the wax with you. Go to the fire camp and put the cauldron on the fire to get melted wax.
Go to the boat and coat it with wax using the paintbrush. The Minotaur will help you turn the boat around and talk to him. You’ll help him get some coins. Use the shovel to dig in the sand where 2 sticks are sticking out, and you’ll find your oars.
Use them and get into the boat. Steer the boat and cross the river without hitting any obstacles. You’ll soon reach Greylmar and find the arena.

Note for collectibles: I’ve circled a morphing object and a lute for you. The manuscript is next to the fountain.
Look at the note board and get the riddle. Look at the riddle towards the sun to get the code: 25134. Go to the Exchange office in the middle and help the woman with her husband’s lunch.
Give that to the guard at the city gate and he’ll give you 5 kyolls and a flower. Go back to the exchange office to give her the flower and take the charcoal stick. Use it to write the code you saw on the paper as you look at the sun again.
Go to the door on the right and put the riddle clue here. Knock each knocker as many time as the clue says: 25134. Then go inside and talk to the man about giving you some work, he’ll give you some instructions for the chest.

Note for collectibles: I’ve circled a morphing object and a lute for you.
Go to the cave and put the instructions on the chest to solve it. Redo the same pattern on the instructions. Take the box and the pouch and the sleeping ranger after you tie him up with the rope.
Use the daggers to cut the cord and open the pouch to get a heraldic seal and 10 gold kyolls. You’ll also find a screwdriver inside the chest.
Now you can go back to the city and use the screwdriver to open the grates on the fountain, where you need to find 15 kyolls.
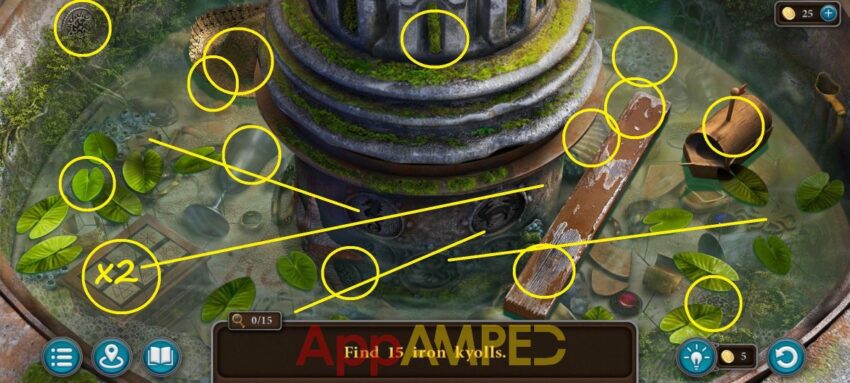
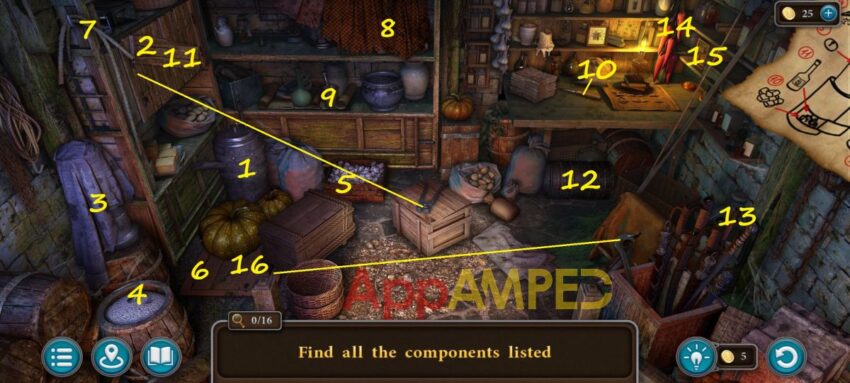
After you open the shell with the fork to find a coin, on the side of the fountain there are some symbols: 3 triangles – circle and cross – triangle with circle inside – star made of lines – flower – 5 circles intersected.
Go to the box on the left and push them in that order: 4th – 1st – 5th – 3rd – 6th – 2nd. The last coin was hard to find, it was under a tile next to the sea shell I opened earlier.
With the 15 iron kyolls you can go to the exchange office to get 2 gold kyolls for the 20 you have. Now go to the man after you look at the box and give it to him and he’ll give you 6 more gold kyolls. Then put the sleeping ranger with the monkeys for 2 more gold kyolls.
Now you can go to the arena again and pay the 20 gold kyolls then go inside and talk to the owner about entering a fight.
Note for collectibles: I’ve circled a morphing object and a flute for you. The manuscript is in the cupboard at the desk in the corner.
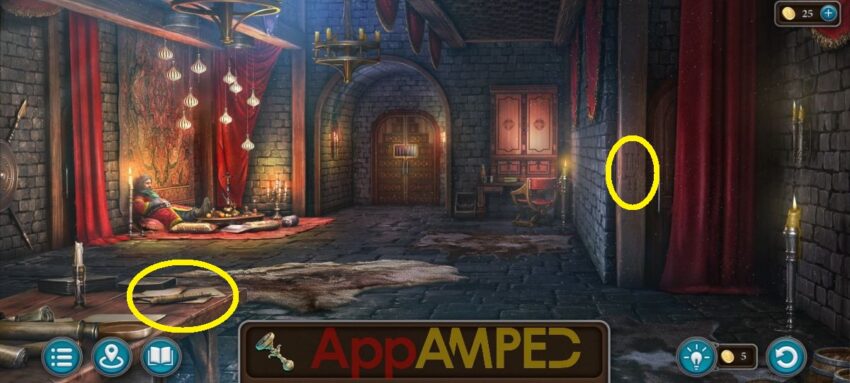
Go back to the other man that has the ranger, he’s not there but after a talk with the prisoner you can try to open the box you got him. At his desk, you’ll find a key in the little drawer on the right to open the big drawer under the desk and take the box.
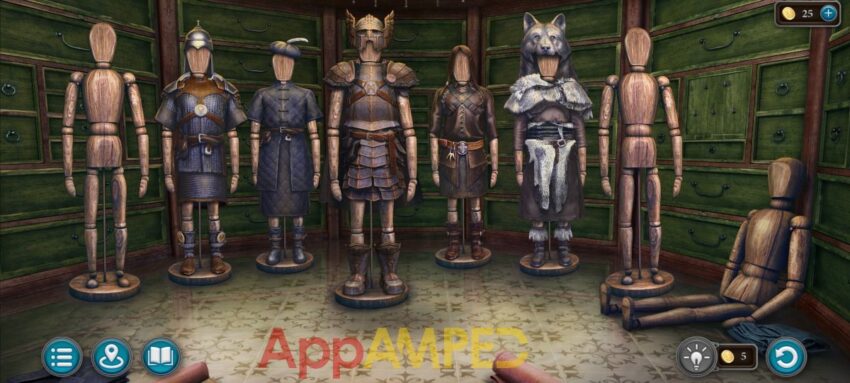
Look at the weapons and take the lever from between them then go to the open drawer of the desk and put it on the mechanism inside to open the armor room behind the desk. Assemble the armors in the right way.
You’ll find a key that opens the lock on the chain that holds the ranger. Open it to go to the camping site. Look under the little tree in the grass, then go take the shovel from the beach. Start digging under the tree until you find a bottle with a code.
Use the code on the box and press the buttons in the correct order according to the code. Last button is the simple line.
Move the tiles around until you are able to pull the lock out. Move the block to clear the way and slide out the hook shaped block.
Use the seal to open the box further and read the document inside. Now use the key and free the ranger, he’ll tell you about a book. Take the artifact and go back to the guild to look for a special book in the library.
Take the template and use it on the note inside the box to find the secret code. Look at the weapons and use the secret code to push the right buttons: 5743162. Now take the mace and go to the arena and through the doors in the back.
- up x 3 – left x 2 – up – left x 3 – down x 2 – left x 3 – up x 2 – left – up
Seal the section of the labyrinth by connecting all the symbols that are similar 2 by 2.
- up – left – up x 3 – right – up x 3 – right x 3 – down – right x 2
Seal the next section by putting the puzzle together.
- right x 7 – down – right – down x 4 – left x 2 – up – left – up – left x 3
Seal the third section by breaking it with the mace, then assemble the shapes using the fragments in the center.
- left x 4 – reach the chest
Move the blocks into the highlighted cells within the given number of moves to open the chest. But things are bad for you, and now you need to escape. Next to your hand there’s a bird figurine.
Note for collectibles: I’ve circled a morphing object and a lute for you. And a manuscript next to the basket on the ground.
There’s a short stick in front of you. Use it to get the fishing rod from the fence on the right. Then use that to pull the oil lamp to you. Use the oil in it to slip your hand through the handcuff.
Go to the window and use the weight to break the glass and take a glass shard then look at the bags in the corner and take the other bird figurine. Use the shard to unhook the door and get out in the yard.

Note for collectibles: I’ve circled a morphing object and a flute for you.
Look at the cupboard on the right to find your things: daggers + barn lock + mace + mysterious artifact. At the table next to it, in the grass on the ground there’s a bird figurine.
Check out the stone oven on the left to find another bird figurine. Go to the dog house and open the window. Take the handcart in the middle and go back inside. Use it on the heavy bags, take the cart with you and open the box to get the tongs.
Go outside to the oven, use the tongs to get some roasted ribs, then throw that inside the dog house, and cover the entrance with the sack. Go listen to the door to hear the man’s plans.
Use the barn lock to lock the door so he doesn’t catch you. You’ll find another bird figurine in the pot outside the door. Put all the birds on the gates then place the chips in their correct position.

Note for collectibles: I’ve circled a morphing object and a lute for you.
You can now move along the path towards the tower to reach it.
Note for collectibles: I’ve circled a morphing object and a flute for you.
Check out the gear mechanism at the base of the tower and take off the breaks. Now you can go up to the top of the tower.
Note for collectibles: I’ve circled a morphing object and a flute for you.
As you can’t go through the gates, you’ll find a secret lock behind the vines on the wall up ahead, just cut the vines with your daggers. Look at the open window of the dome and get down to the Chamber of Balance.
Note for collectibles: I’ve circled a morphing object and a flute for you.
Look at the book to understand the stabilizer. Go back up and then back down to the ground. Go to the stone gargoyle on the ground and use the stick to turn it over, then the mace to smash it.
Take the gargoyle head and go to the secret lock at the top of the tower and put it in the middle. The drawing in the book tells you the order in which you need to push the buttons.

You’ll find a secret room where you’ll find an antidote recipe, a storage key. Go back to the ground to look for the ingredients. Check out the door on the right at the base of the tower and use the storage key to open it.

After you go inside the storage room, put the recipe on the side and start gathering all the items on the list.
Go up to the secret room and put the antidote kit on the table, then follow the recipe to make it. Take the antidote in the sprayer and go to Grilur’s yard and talk to him to give you instructions on where to go and a key.
Take the file from the crate where you found your items and give it to Grilur to break himself free and he’ll tell you where Mini is.
Return to the forked path where the well is and use the key to get the stopper opened. Let the rope fall into the well, then hook the crate and use the stopper and the key to get to it. Take a bottle and put it in the antidote.
Now go to the campsite where the poachers were holding Mini and put the artifact (lantern) in the cage where Mini was held, open it and put some fur inside. Place the chips in their spots.
Sorting them takes a while, no easy way to fix it, you just need to start from the bottom and go up. Take the glowing lantern and use it in the arena. Remove the carpet to find a trap door and take the key.
Use it to open the cupboard in the corner, take the prize coins in the backpack for Mini. Look at the mechanism here, it needs a lever. Go to Grilur’s armory and take it from his desk, then go use it to open Mini’s door.
Go outside and take the ladder leaning on the wall, then go to the arena to use it in the hole where Mini is. Get some pillows from the left to get a softer landing. You’ll find Mini and you can free him using the lever to activate the crystals in the correct order.
Give Mini the antidote and get the lockpick from Mini’s horn, then use it for his handcuffs. Try to break the wall with the mace, then Mini will break it for you.

Note for collectibles: I’ve circled a morphing object and a flute for you. A manuscript is next to the morphing object.
Now you can go outside to the sewer to find your way out of here.

Note for collectibles: I’ve circled a morphing object and a lute for you.
Look at the door on the other side, take the valve on the ground and read the note. Go down the stairs on the left and put the valve here then take the other valve.
Go back to the prison to get the ladder, and use it in the sewer to replace the broken one and go down there to use the valve here, put a dagger to hold the door open.
Go to the prison and take the pillow, go put it on the edge of the sewer system, use the dagger to cut it then take the feathers and throw them on the first path. Now turn all tree valves in the order the feathers went.
After the door opens, take the torch and go through. You’ll need to run into the maze and find your way out.
- up x 2 – right x 4 – up x 2 – right x 3 – up + button
- down – left – down x 4 – left x 2 + button
- right x 2 – up x 4 – left x 2 – down x 2 – left x 4 – up x 2 – left x 4 – down x 4 – left x 3 – up x 2 – right x 2 + button
- left x 2 – down x 2 – right x 3 – up x 4 – right x 2 + open door
- up – right x 2 – up – left – up – right – up – right + take key
- left – down – left – down – right – down – left x 2 – up x 2 – left x 2 – up + key
- up x 3 – right x 2 – up x 2 – left x 4 – down – left – down x 2 + shovel
- up x 2 – right – up – right x 4 – down x 2 – left – down x 2 – right x 7 – up x 2 – right x 3 – down x 5 + use shovel to get key
- up x 5 – left x 3 – down x 2 – left x 4 – up x 3 + key

Note for collectibles: I’ve circled a morphing object and a lute for you.
Read the note from the frog the use the dagger to cut the vines, push the button on its head then give it some coins. Give it all so it gives you all the steps you need to get out.
Go to the city, to Grilur’s place and use the lockpick to open the cabinet. Take the book to find the Bear gum recipe. Go to the arena and take the burner from the table on the left.
Go to the forked road at the well and take a corn from the field on the right. Go to Grilur’s yard and use the 3 items on the table to get the corn flour. Then to the cave to get the honey.
Put the honey and the corn flour on the recipe, then the corn in the honey and mix. Use the burner on it to get the honey gum. Go to the Chamber of Balance and use the gum on the book to erase the charcoal.
Adjust the stabilizer by illuminating all crystals. Now you can get back after talking to Dudi to let you in. After the story ends you’ll be pushed through the portal and get ready for a new adventure.
Wrapping up
Another Chapter filled with adventure for the young prince has ended, but what comes next for the we’ll find out in the next Chapter.
Stay tuned for my next walkthrough and in the mean time you can check out other games and walkthroughs like Legendary Tales 5 Chapter 1 or Artifact Seekers – Santa’s Manor.

Aylin is a content creator and co-founder of App Amped. She was a huge Tomb Raider fan before moving on to more casual titles. She spent way too much time tending for her FarmVille farm as well as playing text-based browser games. Now she plays and writes about mobile games, creating in-depth walkthroughs and useful guides.
Thank you! ❤️
Thank you so much for locating the collectibles – I only needed to find two, and I was stumped! Thank you
You’re welcome! Thank you for reading my walkthroughs! <3
Can’t figure out the chips on the lantern. Can you help me out?
Every column has a shape at the bottom so you need to put all the chips of the same shape in line above it. It takes a long while, tedious puzzle, that’s why I couldn’t find a simple solution to write about. Too many permutations and switches to write.
Got it!! Thank you! 🧩
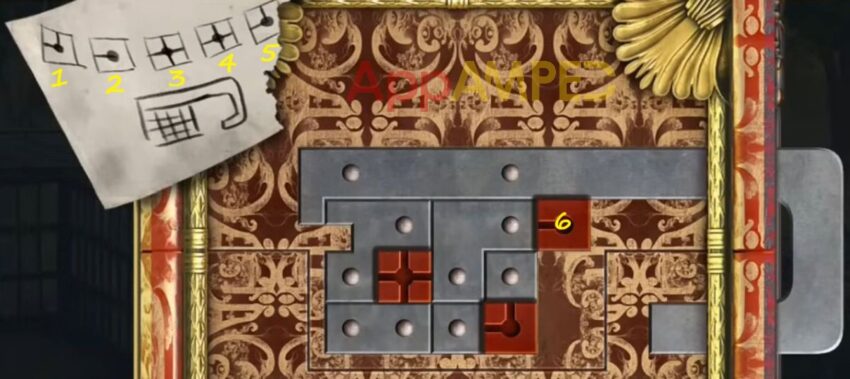
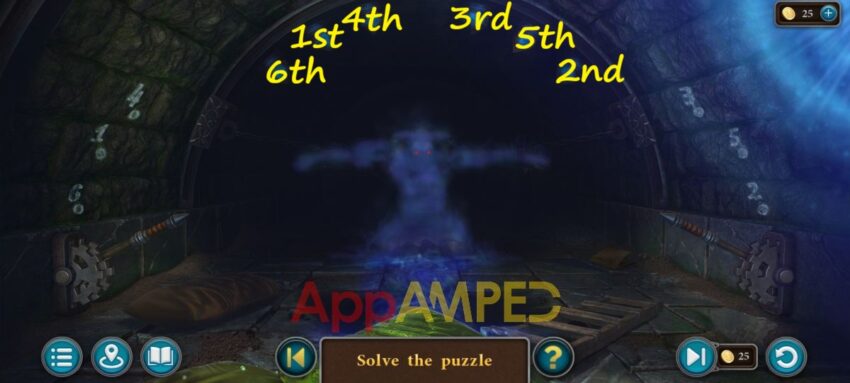
Leider komme ich bei der Box des Typen nicht weiter, der Code zum drücken der Tasten scheint bei mir nicht zu funktionieren oder ich konnte zu doof. Habe die Symbole wie in der Beschreibung gedrückt aber ich komme nicht zum nächsten Schritt dem verschieben der Teile
Hallo! So you found the bottle with the code after you dug it out from under the tree? Then you put the note with the code ON the box, and the code has 6 buttons, so the ones on the paper + 1 that comes after and you need to figure out. I’m adding a photo for you on there to explain it better, so check it out.