
Come with me on another journey to find a new puzzle-adventure game and let me help you solve all the mysteries in Lost Lands 11 for Chapter 1 – Anomalous Event.
During the construction of the tower, an important magical artifact is stolen. A young sorceress named Cassandra sets out to discover who took the artifact – and why.
Chapter 1 – Anomalous Event Walkthrough
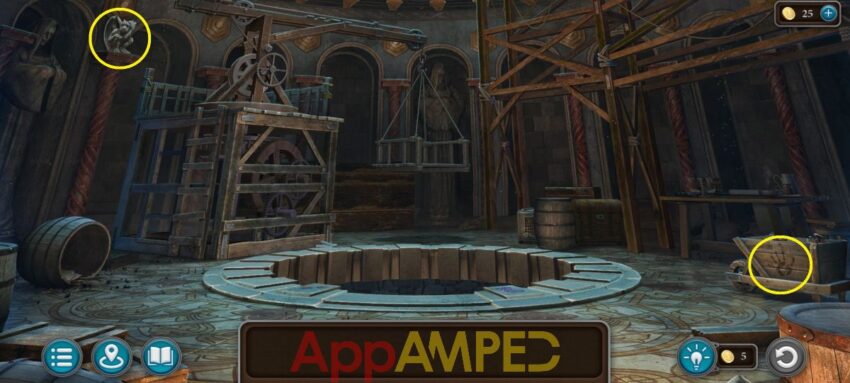
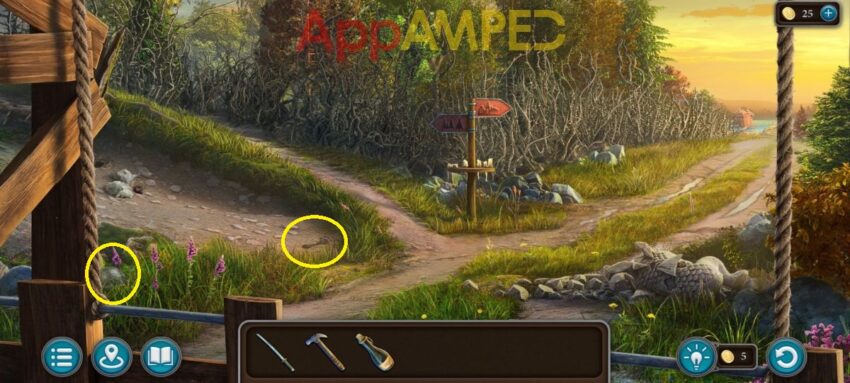
Note for collectibles: I’ve circles the morphing object and the hand print. There’s a manuscript in the barrel on the left.
Look at the bottom of the wood construction to get candles. Go to the table on the right and replace the melted candles on the candlestick with your own. Light them up using the pipe after your magic fails.
You’ll find a note about the Portal Well and a fragment. Look at the box behind the candles and open it by arranging the patterns as shown in the hint. Take the feather, snowflake, and the powder.
Talk to Dudi the Hammer about what happened and how to get to the first floor. Look inside the barrel on the left and take the saw and the crowbar. Use the crowbar to open the crates on the right and take the metal bunch and the handle.
Use the crowbar for the bottom mechanism so Dudi and yourself can move the platform over the well. Go up the wooden ladder and put the handle there and lower the platform.
Go take a lit candle from the table and put it on the platform, get on it and go low to see what happened to the well. When you get to the bottom, take the fragment then put the stones over the platform.
Remake the wall by using the stones, just like a puzzle. Use the arrows to the right to look around for the first hole, and when you find one, take the fragment then fit in the rocks:
- press the green arrow up once
- bottom piece on the left side
- press the green arrow up once
- top piece on the right
Go up to find another hole and take the shield:
- top piece on the right side
- top piece on the left side
Go up and look for the next hole to find another fragment:
- top piece on the right side up
- bottom piece on the right side down
- the leftover piece on the left
Look at the first fragment you found then add the other 3 you found in the well. Open them and remake the drawing. Go to the bottom of the well and use the candle to burn the drawing to break the curse and fill the well with water.
Put the feather and the powder in the water to activate the well and reach the top of the tower. Talk to Dudi about the incident then explore.
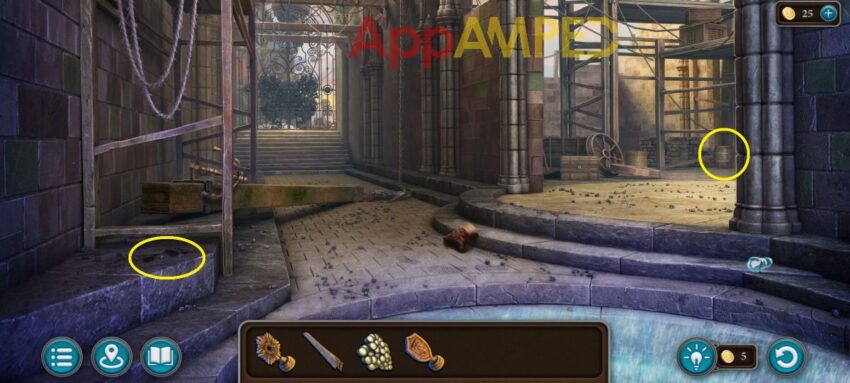
Note for collectibles: I circled a foot print and a morphing object.
Look at the boot on the ground and take the coins, notice the footprint is different from the others. Go to the wooden beam on the left, take the anchor and use the coins to unscrew the candelabrum, then check out the other end of the beam.
Use the saw to cut a piece with the chain on, pull on it to look through the hole, then use the coins to unscrew the chain and use the candelabrum on it, screw with on with the coins, and throw in the hole to pull the ladder up.
Now you can go down the ladder to the Chamber of Balance.
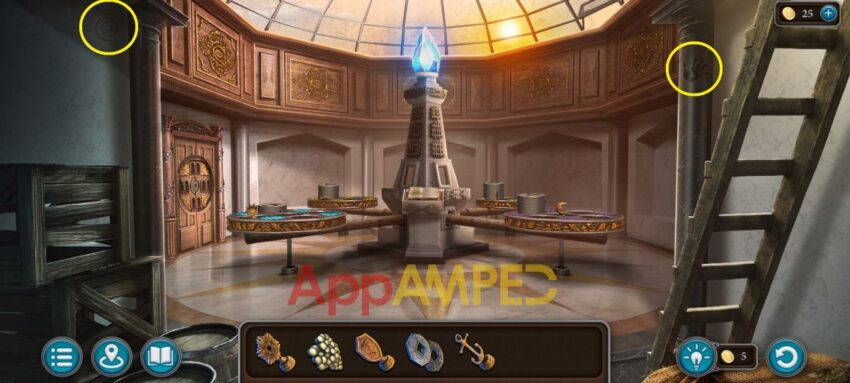
Note for Collectibles: I’ve circles a hand print and a morphing object. The book in the middle has a 2nd manuscript.
Go to the first round table on the left and take the sun. Go to the second one and take the fire, third one, on the right has a feather, and last one on the right has a moon.
Take the ladder and put it on the right side of the wall to reach the window. Take the lockpicks, then move the ladder back to get to the top of the tower.
Check out the chest on the right and use the lockpicks to open it and find another metal bunch. Go at the end of this alley to the vine gates and use the 2 metals on the gate. Guide the warrior to the flag to open the gate to the terrace.
- right – right up – right down – left up – left down – left down – right – right down – right up – right up – right down – right – left up – right up – right down – right up – right down – right down – right up
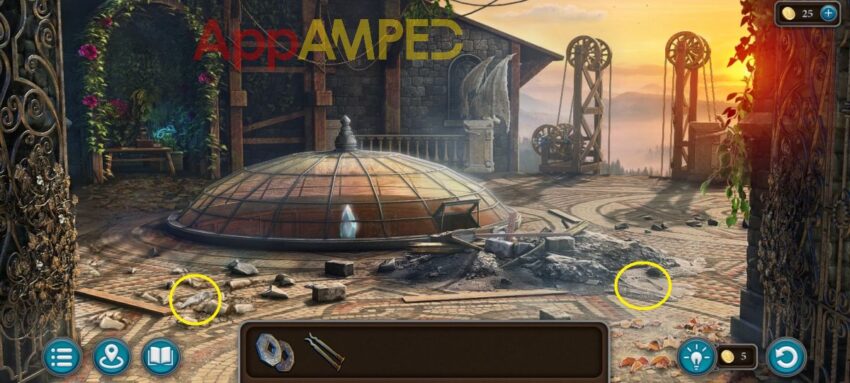
Note for collectibles: I circled a morphing object and a foot print.
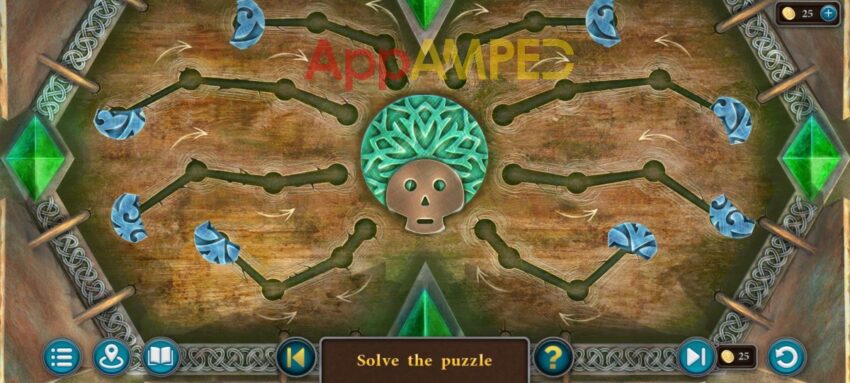
Go to the open window and look under the rubble to find a sword. Go to the Chamber of Balance and to the door on the left, put all the little statues on the door. Then match the figures into opposite pairs.
- shield – sword
- sun – moon
- anchor – feather
- snowflake – fire
Now point the arrows at the correct symbol after you look at the book in the middle and read about the Pillars of Balance to learn how to stabilize it.
- red – circle
- blue – pentagon
- green – thin triangle
- yellow – star
Enter the room and find all the hidden weights for the scale.
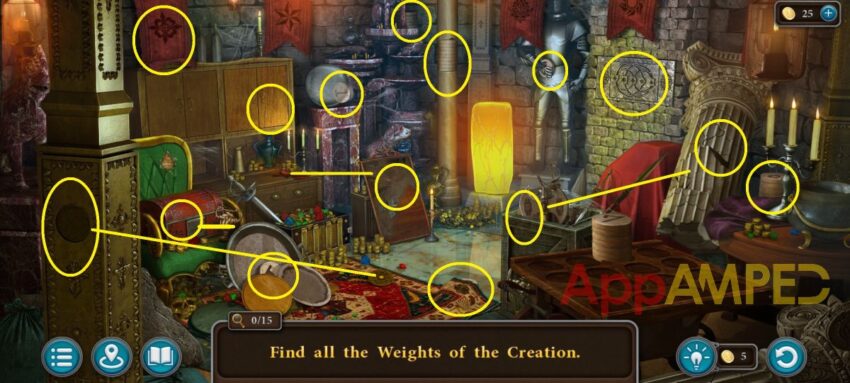
The hint for the safe in the wall is on the red flags around the room. After you gather the weights take them to the bowls around the pillar to balance them all. Take note of the weights already there:
- blue table: 3 + 9 + 6 + 4 + 1 = 23
- yellow table: 5 + 8 + 5 + 2 + 3 = 23
- green table: 8 + 6 + 5 + 3 + 1 = 23
- purple table: 5 + 7 + 5 + 4 + 2 = 23
Go back up to check out the glow and she’ll be pulled into a portal. Talk to the old woman to find out more.
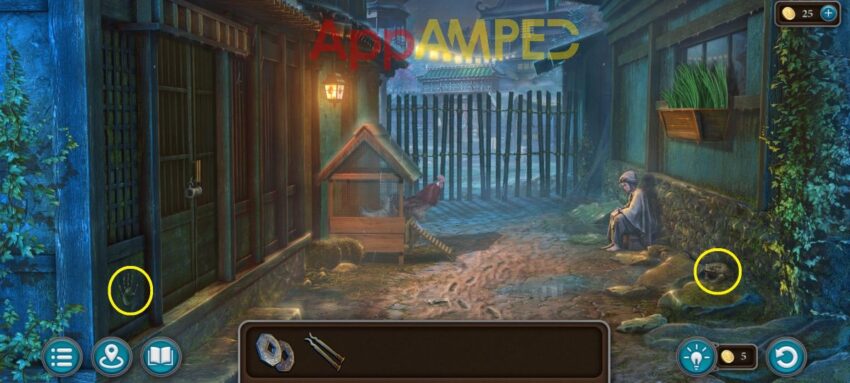
Note for collectibles: I circled a hand print and a morphing object.
Look at the footprints on the ground to find a key that opens the door on the left. Open it and take the knife. Go outside to the fence and cut the rope with the knife to get past and find the market.
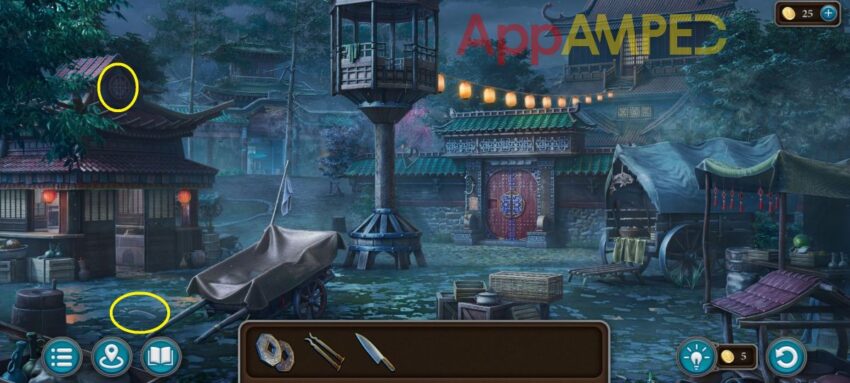
Note for collectibles: I circled a foot print and a morphing object.
Go inside the house on the left and talk to the chef there. He’s looking for a lotus flower. Go outside and take the path to the left around the kitchen to find a pond.
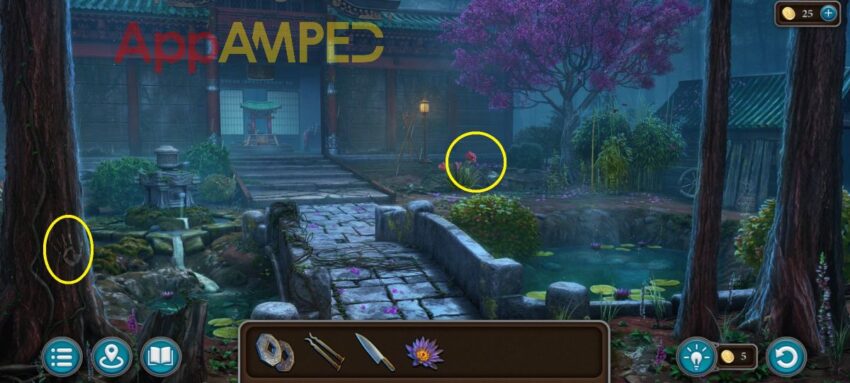
Note for collectibles: I circled a hand print and a morphing object. Inside the temple you’ll find a manuscript.
Take a lotus from the pond to your right and go back to the cook to give it to him. Look at the recipe he gives you and then look for the ingredients. Take a cauldron from the counter on the right.
Look to the left at the barrels and take the scoop. Now go outside and look under the tarp of the cart to get a carrot from the tray on the right and a potato from under the cabbage in the basket.
Go to the cart on the right and look on the ground at the rotten fish. Take a few maggots on the leaf then look at the box and put the animal chips in the correct order: fish to blue and bird to yellow.
Note: the hints for this are on the recipe and on the urgent notice at the red gates.
Now place all the chips in the animal claws like so:
You’ll find a hook and a bobber inside. Go to the pond, fill the cauldron with water from the fountain, look at the garden on the right behind the pond and cut a bamboo stick stick with the knife.
Look around the garden here to find 3 shiitake mushrooms: one behind the bush in front of the tree trunk, one behind the tree trunk, and one on the right. Go to the pond and get some kelp from the water.
Go to the street where the old lady was and take some green onion from the right window. Go inside the barn on the left and take some thread from the box here. Use the scoop to get some rice from the pot.
Go out to the chickens, give them some rice to get an egg. Go back to the pond, use the bamboo + thread + hook + bobber + maggots to make a fishing rod. Use it to catch a fish in the pond to the right.
Put all the ingredients on the recipe and go to the kitchen and put them on the counter. Check the recipe to follow the steps of making the perfect soup:
- wrap the fish in the kelp first and take it
- chop the mushrooms + potatoes + carrot + green onion
- look on the barrel on the left and take the rice and the ladle from inside the big barrel, and next to them there’s a key
- above the counter is a hand fan and under it is a locked cabinet, use the key
- take the spices and soy sauce
- go to the stove on the right, open the big pot and small pot and pour the water in
- take the skewer from the stove then put the egg in the small pot
- put the vegetables + rice + soy sauce + spices in the big pot
- go to the coals on the counter, put the fish here and use the skewer on it
- use the hand fan to get more heat then put the fish over the coals
- go to the stove and use put the fish here, use the knife to cut it and put in the bowl
- use the ladle to get the egg and crack it, then cut it in half
Take the soup to the old woman on the street and give it to her to find out how to enter through the red gates. Go to the temple and look inside at the bowl with coins. Leave one of your coins here and take the gong leaning next to the apples.
Take the gong to the gate and bang on it then talk to the guardian, you’ll be taken to prison. Tap the guard in front of your prison and recreate the pattern by connecting all the dots with rays.
Use the lock picks on the cell door to unlock it. Click on the mechanism in the center from both sides. To do this, rotate the rings with lockpicks to reach the mechanism.
Now you can go around and explore the prison to look for the workers.
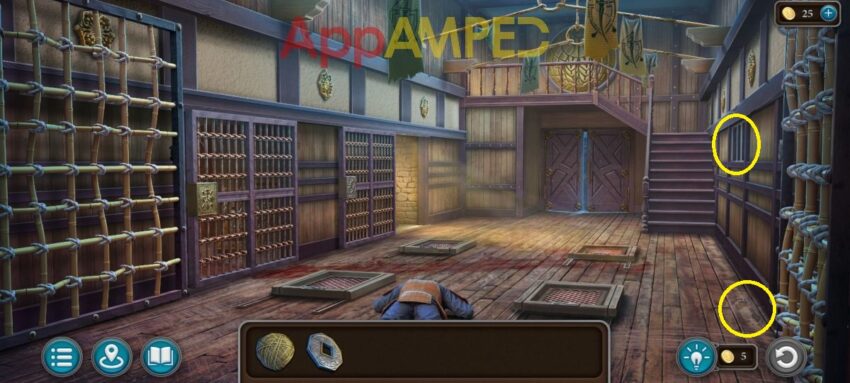
Note for collectibles: I circled a footprint and a morphing object.
Go to the fallen guard and take the wakizashi and the keyring. Use the keys to open the trap door in the floor on the left. Look at the cell where the guards are and use the keys to lock them inside.
You can look through the doors here, you’ll find that your magic doesn’t work anymore. If you open the door slightly you’ll find a red gem on the practice dummy in front of the doors. Now go up the stairs to the armory.
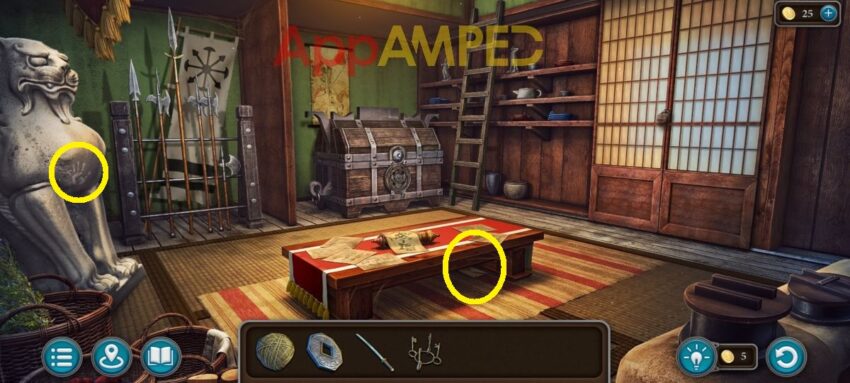
Note for collectibles: I circled a hand print and a morphing object.
Check out the papers on the table to learn more about the keys and look at the cryptex. Take the ladder and go back to the cellars. You’ll see a trail of blood and open the trap door on the floor with the keys.
Use the ladder to get down to the wounded worker. Take the green gem from his hand and you’ll see a note on the floor, then you’ll take the ladder back. Go down the first cellar in the ground and take the boot to see the footprint, then get the blue gem.
Go back up to the armory and use the note on the cryptex: “The warrior waits in the shadows, hand gripping the taut bow – the hare holds still.”
Cryptex solution: warrior mask – hand – bow – hare. You’ll find a key and some sake. Open the terrace door with the key and look outside. Take the yellow gem from the barrel on the left.
Take a spear from the armory rack and try to walk on the rope with the lanterns from the terrace. Keep your balance by tapping the spear on the opposite side it’s leaning.
There’s a ladder you can throw off the edge to get down. You can go to the temple now and look inside. Give your last coin to the coin bowl and take the key details next to the sign.
Go back to the armory and put all 4 gems on the chest here. Open the key details then put the key ring next to it, then use the T-shaped metals to hold the 4 keys in place.
Now based on the drawing on the table you need to put the shapes in this order: + symbol – flower – H symbol – 3 lines.
You can go down to the cellars and open the one on the left with this assembled key. You’ll find another worker in the torture room.
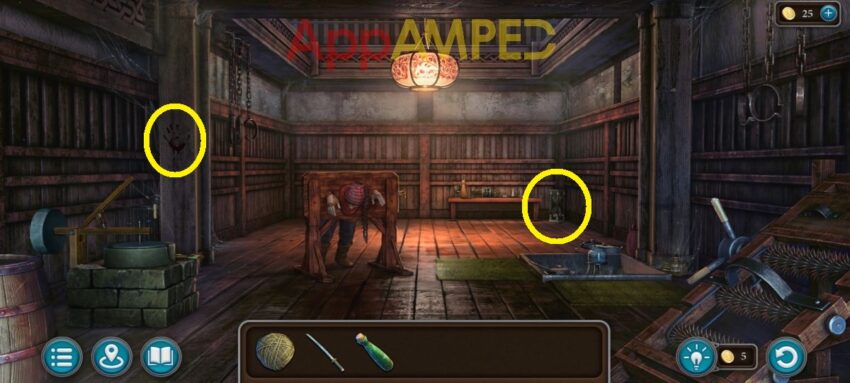
Note for collectibles: I circled a hand print and a morphing object.
Use the weapon to cut the worker free and talk to him. Take the firework notes and look for components. Look in the hole on the ground and take the poker and some coal.
Go up to the armory and take the cryptex tube from the table and open the chest using the poker. Place the gems as shown on the fireworks note in the top right corner: star – triangle, square – circle.
Look at the bottles in the chest and take the saltpeter and in the box you’ll find some sulfur. Go back to the torture room and to the table in the back. Put the coal + sulfur + saltpeter on it, then crush the coal with the mortar.
- 5 parts saltpeter – put in 4, then empty in 7, twice. You have 1 left, now put the 7 back in the container, pour the 1 part in the 7, and fill the 4 from the container. Now put the 4 into the 7 to get 5 and pour in the bottle.
- 3 parts charcoal – put charcoal in the 7 vial then empty it in the 4 vial, to get 3 parts.
- 2 parts sulfur – pour in the 7, then put the 7 in the 4. Put the 4 back in the container, and the 7 in the 4. Fill the 7 again, then the 7 into the 4 (where you have 3). Pour the 4 back in the container, and the 7 (now 6 parts) into the 4. Put the two parts in the bottle.
When you get the amount you need in the brown bottle on the left, put the cork on to get the gunpowder. Go back to the temple and to the coin bowl. As you don’t have anything to offer, go to the gate to get the gong back and take a copper coin back.
Go to the torture room and use the grinder on the left and put the coin here to get copper shavings on the white cloth next to the grinder, using the brush here.
Put all the components on the firework note, then add the gunpowder in the cryptex, then add the copper shavings, add the sake over the thread and get the fuse inside the rocket.
Go to the temple and look at the lamp outside, you can put the firework on the wood holder, then take the burner from the lamp and go to the market to use the burner to lit the fuse from here.
You’ll be going back to your world and you can talk to the workers and Dudi to find more clues about who stole the artifact.
From here you need to go to the top of the tower, move forward along the path, and check out the table on the left with roses around. Look at the book and take the ornate key.
Go back and down through the well portal, then check out the chest next to the well, and use the key to open it. Open the box inside and take the nails, then the hammer from the chest and the wine.
Go back up and to the top of the tower where you found the key. Go to the edge at the gears on the left and fix the teeth on the ground with the nails and the hammer. Now you can take the elevator down to reach the Tower Outskirts.
Note for collectibles: I circled a footprint and a morphing object.
Crawl into the bushes to get the vial. Look at the gargoyle on the ground and take the seal insert. Now move along to the right path to reach the lake.
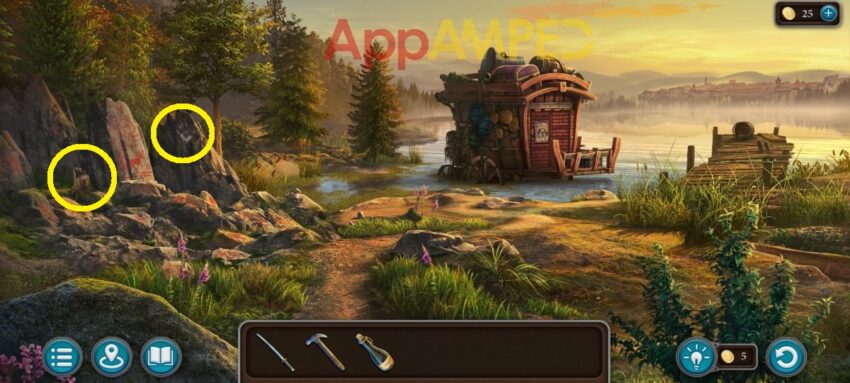
Note for collectibles: I circled a hand print and a morphing object.
Go to the pier, take the bucket and fill it with water. Use the hammer to get the board on the pier. Look at the rocks on the left to find the snake. In the water next to the rocks there’s some duckweed you need.
Use the board to reach the cart in the water.Look at the box in front and solve the puzzle. Melt all the ice cubes by moving them into the fire niches.
Take the old key from the box and use it to open the door of the cart. Take the cage and snake catcher, then look at the poster then go back to the paths.
Go to the mouse holes on the left, put the cage at one end and pour the water at the other end to catch the hamster. Go to the rocks at the lake and give the hamster to the snake, then catch it with the snake catcher and get its venom.
Go to the top of the tower at the table with the flowers. Put the wine + snake venom + duckweed on the table. Squish the duckweed and pour the juice in the sprayer, then add the wine and the venom, then some pollen from the flowers here.
Take the sprayer to the weeds where you found the vial and use it to get through and reach the forest to look for the stranger.
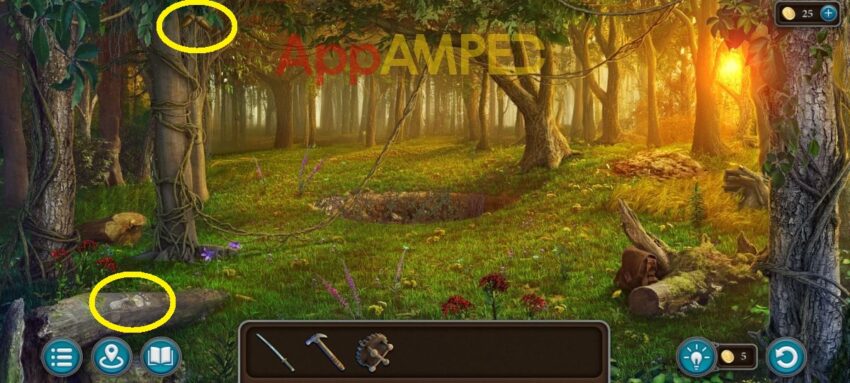
Note for collectibles: I circled a footprint and a morphing object.
Look at the tree with the vines around, use the weapon to cut them and lower yourself into the deep cave in the ground.
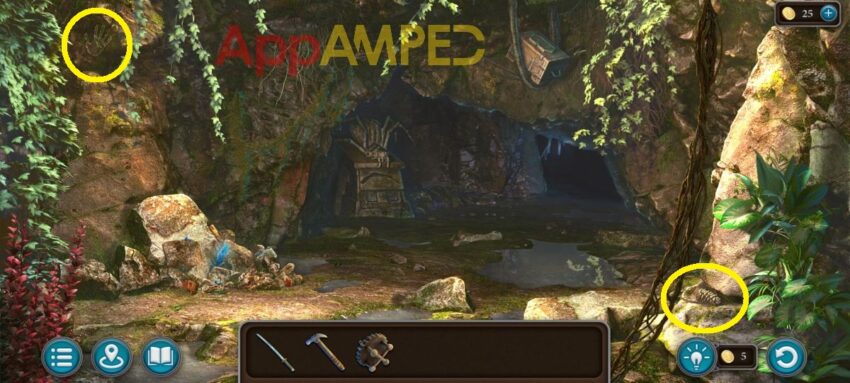
Note for collectibles: I circled a hand print and a morphing object.
Use the hammer to get a crystal from the rocks on the left. Move forward to reach the dark side of the cave and take the pendant from the spider web, then open it to get a key.
Go back to the forest, to the stranger’s backpack, and use the key to open it. Take the vial of remedy. Go back to the lake cart and take the whip. Now back into the cave and use the whip to reach the chest and pull it.
Take the metal spider and go to the top of the tower to the other gargoyle statue. Push the scale in the middle above his wings to look under it. Look on the other side where the fallen gargoyle use to be to see the symbols: X – triangle – X – O.
Go to the gargoyle and press the symbols in that order. You’ll find a metal skull that fits onto the metal spider and also needs the seal insert to get the spider key.
Go to the chest in the cave and put the spider key on it to open it after you solve the puzzle.
You’ll find a note and a crystal hidden in a cloth. Go to the backpack outside and take the silk handkerchief where the vial was.
Put one crystal in the holder, and rub it with the silk handkerchief, then the other in the other holder and do the same to wipe it. There’s another one on the ground, put it back in its holder and wipe it up.
And again, you’ll find another on the ground to put in the holder further back, then wipe it and finally see what seems to be a spider’s nest.
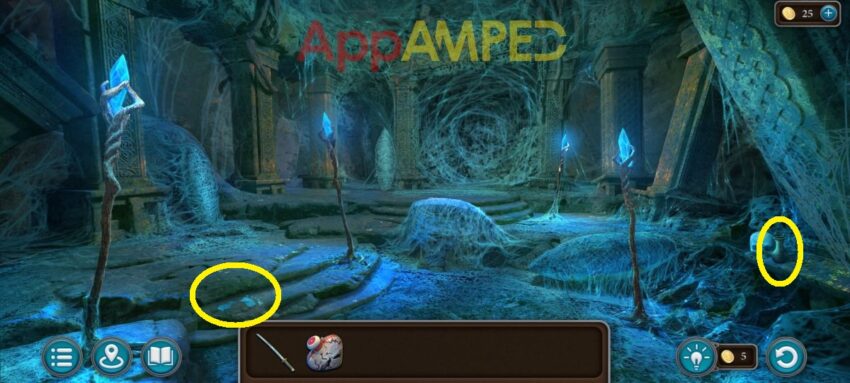
Note for collectibles: I circled a footprint and a morphing object. You’ll find the manuscript under the spider statue after you solve the puzzle.
Go to the cocoon in the middle and open it with your weapon to find the skeleton of an animal. Do the same to the other cocoon to the right to find a spider leg. There’s one cocoon standing to the left, with a bag and another spider leg inside.
Then lastly, there’s the furthest cocoon you can open, it’s moving and it has a child inside. Give him the vial to cure him from his seizure and talk to him and the spider.
Go find the treasure for the spider. First take the spider leg right in front. Go back to the first part of the cave where the spider statue is and put its legs back and make each leg the same material by using the space under the statue.
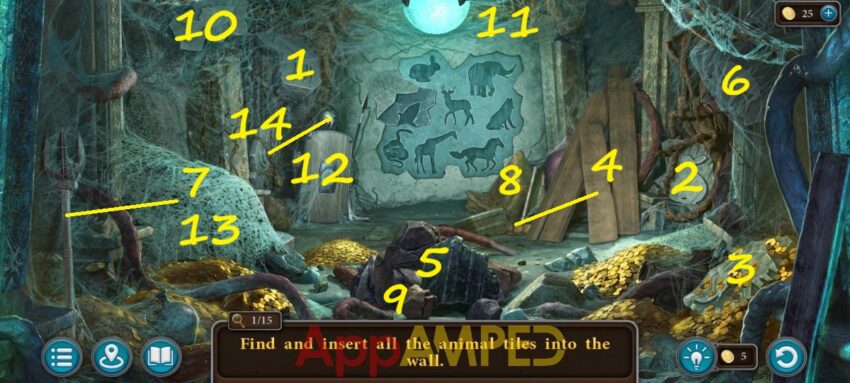
Take the glowing orb and go to find the treasure using the orb to light your way around. Now find all the animal tiles and insert into the wall.
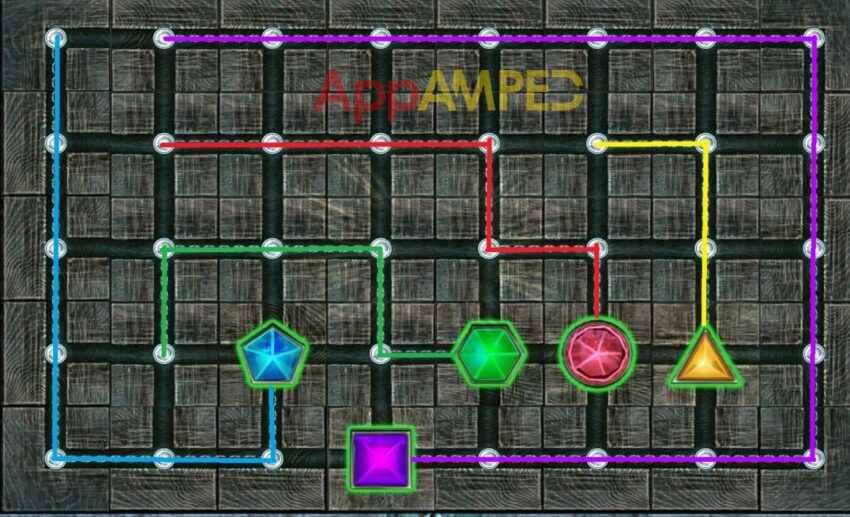
For the chest on the left, under the web, after you cut it with the fork, you need to place the chips into the slots of the same shape. The chains cannot intersect.
After you’re done, take the magic stabilizer and go back to the Chamber of Balance. Put the magic stabilizer inside under the crystal, then re-balance the scales. Make all of them 28.
If this doesn’t work the simple solution is to add all 4 numbers and then divide by 4 to find out the final number they all have to have, then rearrange the weights to get that.
Wrapping up
The first chapter of the Lost Lands 11 ends here. Here’s the next walkthrough where I make my way through all the puzzles and reveal the answers you need for Lost Lands 11 Chapter 2.
In case you want to plat another puzzle-adventure game, you can try our Legendary Tales 5 Chapter 1 or Artifact Seekers – Santa’s Manor.

Aylin is a content creator and co-founder of App Amped. She was a huge Tomb Raider fan before moving on to more casual titles. She spent way too much time tending for her FarmVille farm as well as playing text-based browser games. Now she plays and writes about mobile games, creating in-depth walkthroughs and useful guides.
Having trouble rebalancing the scale at the end. Have a total of 119?
Hi. Can you send me a photo, and I can try to help you out with the numbers.
[email protected]
My chest puzzle is completely different from everyone else’s and it doesn’t work. I know I’m not this stupid.
Can you send me a picture of it? Maybe we can figure it out together.
We have only one weight of 1…so it’s impossible to balance… at 23 each ! Please 🙏 help me !
07
08
5
533
03
07
Résous le puzzle
?
25
If you can send me a screenshot or a list of all the weights you have I can help you out. Also make sure they haven’t changed the request, heard a player say the tables should be balanced only in pairs of 2, not necessarily all 4, so let me know if that’s the case as well.
Ok ! If I had read with more attention. 🙄 Thanks
Nice detailed walkthrough with collectible locations included. The puzzle solutions with pictures are exactly what I look for when I get stuck on a level and don’t want to rewatch a whole video. This kind of format works great for puzzle-adventure games.