

Our suspects gather up again in this chapter 3 walkthrough for AE Mysteries Cluedo, and I’m here to give you a hand to finish up strong.
My last walkthrough for chapter 2 AE Mysteries Cluedo ended with finding some interesting evidence about all Mr. Black guests.
Follow my next walkthrough for chapter 3 AE Mysteries Cluedo to find out who did it, who killed Mr. Black, and what was the murder weapon.
AE Mysteries Cluedo Chapter 3 Walkthrough

- You’ll talk with the suspects for a bit about the evidence you found.
- Professor Plum found another fuse box that you need to sort out.
- Move Miss Scarlet to the left so you can take a twig from behind her and use it to get the fuse from under the drawer.
- Put it back in place in the fuse box and sort the sparkling fuses in their places again.
- Solving the final fuse box will make it possible to go to the Ballroom.
- Open the door by moving the towels on the right to get a lightbulb.
- Put it back in the missing spot on the lamp on the wall.
- The order in which to turn the lights on is drawn on the wall under each lamp.
- One circle under the second lamp – 2 under first – 3 under fourth – 4 under third.
- So go with 2 1 4 3
- This will open a secret location on the left and give you a key to open the door.
- Check the floor and take the matchbox. You’ll need to find 4 missing tiles.
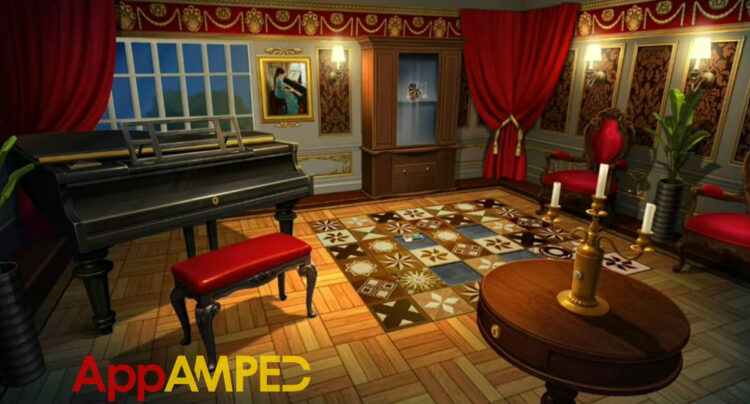
- Find a tile on the piano under the lid.
- Take the tile in the far right corner behind the red curtain.
- Use the matches to light all three candles on the table. You’ll get a key.
- Use the key to open the drawer under the candle and take the glove inside.
- Look at the glass cabinet in front, you’ll find a sparkle on the candlestick.
- The other candlestick might’ve been taken by Professor Plum, his hand was bandaged.
- Use the glove to break the glass and take the tile.
- Another tile is under the glass cabinet in the drawer.
- Now fill the floor gaps with the tiles you found.
- The piano chair will open up and reveal a dance book.
- Look inside and take the key and notice the dance moves.
- Use the key to open the piano and the symbols on the piano keys.
- Looking at the design on the floor and at the dance moves you should take notes of the symbol pattern.
- Starting point – Sun
- 3 up + 4 left = hourglass symbol
- 3 left diagonal down + 2 right + 2 right diagonal up = rhombus symbol
- Second Starting point – Moon
- 3 up + 4 left diagonal down + 5 right = flower symbol
- 2 up + 6 left + 3 up + 2 right diagonal down + 2 right diagonal up + 2 right = X symbol
- Now go press the piano keys in this order: hourglass – rhombus – flower – X
- This will open the painting next to the glass cabinet and give you the kitchen keys.
- You can now move to the kitchen and take the knife from the plates in front of the door.
- Take the keys and open the drawer under the flower vase.
- Take the duct tape and remove the painting on the left.
- With the duct tape fix the wire that leads to the panel behind the painting.
- Use the knife to remove the screws from the panel.
- Pull the lever and the locks that hold the door will open.
- Now you can use the second key to enter the kitchen.

- Open the door under the cookbook and take the toolbox out.
- Open the cabinet above the cookbook and notice the pills and take them as evidence.
- Take the handle from the cabinet too.
- Put the handle on the drawer under the cookbook that’s missing it.
- Take the keycard from inside and look at the map.
- Move the fridge to the side and use the keycard to open the secret door.
- Open the fridge and take the mug from inside.
- Go down into the hidden passage to go through the maze you need enough candle for each step.
- Right – Right – Use lever – Down – Take candle – Left – Take candle
- Left – Left down – Use lever – Right – Take candle – Take key
- Left – Use lever – Down – Right – Take candle – Right – Open door
- Right – Up – Take candle – Left – Use lever – Up – Take candle – Up – Take key
- Right down – Use lever – Left down – Take candle – Up right – Down – Open door
- Down and up the ladder.
- This will get you to Mr. Black’s Study Room where you will find more blood and evidence.

- Put the telephone back on and remove the lid from the pot on the table and take the frozen pyramid from the inside.
- Open the cupboard under the flickering lamp and take the glass cabinet and take the step ladder.
- Take a look at the phone and grab the keys.
- Open the glass cabinet with the keys and take the model car from there.
- Go to the shelves in front and put the mug and the car on the shelves.
- Go back to the kitchen through the maze and use the keys to open the toolbox.
- You’ll get one more pyramid.
- Put the frozen pyramid in the pot on the stove and turn it on to melt the ice.
- Collect the pyramid then use the step ladder to get to the bloodied panel on the ceiling.
- You’ll find a bloodied wrench as evidence for your case and a third pyramid.
- Go back to the Study Room and open the painting next to the glass cabinet.
- Put the three pyramids in their spot and take the missing chalice and the blueprints
- The blueprints will show you how the rooms are connected and give you a brass horse.
- Take the chalice in the kitchen and put it on the fireplace so the hidden passage opens.
- Solve the puzzle before you can go through it.
How to solve the fireplace puzzle
- The cookbook has a drawing of a mug, a car, and a clock on. That’s the order you need to follow.
- Now notice the positions of the mug, car, and clock on the shelves in the study room.
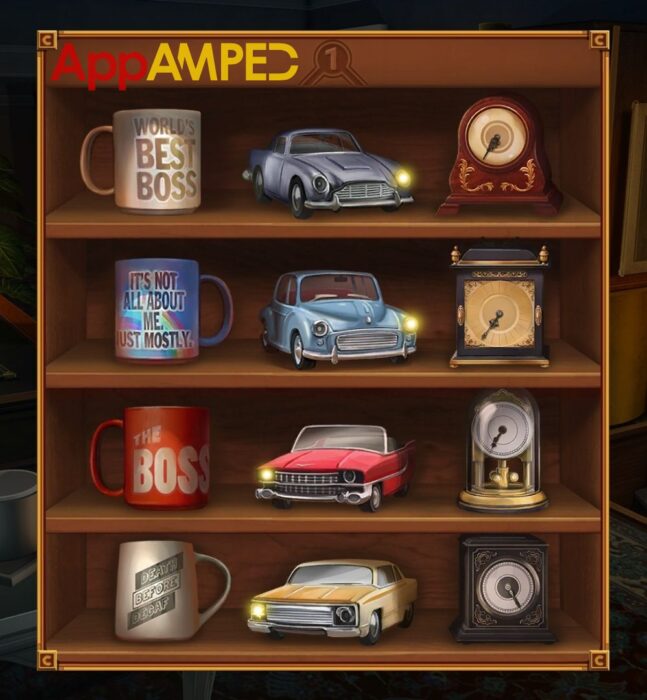
- Mug: left – right – left – right
- Car: right – right – left – left
- Clock: left – left – left – right

- Following the directions from the shelves, these are the number for each one.
- Mug: 18261
- Car: 14822
- Clock: 18653
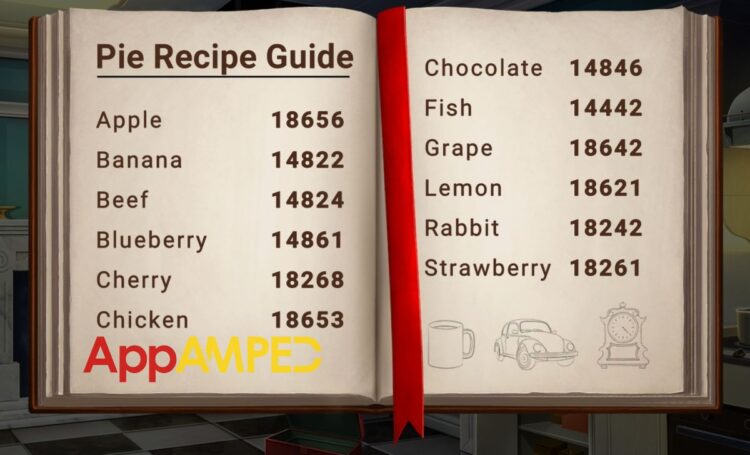
- For each corresponding set of numbers there’s a matching ingredient:
- 18261 – Strawberry
- 14822 – Banana
- 18653 – Chicken
- Now you can go to the fireplace puzzle and press the buttons in this order: strawberry – banana – chicken
- Entering through the fireplace you’ll see a torn paper in the ashes.
- Put the brass horse on top of the fireplace in the Dining room.
- The mirror will open and give you an Address book.
- Go to the phone in the Study room, check the address book and torn paper.
- Figure out which number you have to dial.
- Looks like HALARIE: 959 – 4139
- Dial the number and tell the name when the other person answers.
- The girl on the other line will tell you she talked about Chef White with Mr. Black.
- After talking with all the suspects again, you can summarise that: Chef White killed Mr. Black with the wrench in the Study room.
The End
I enjoyed writing the walkthrough for the Adventure Escape Mysteries Cluedo event for you. I don’t know about you, but I’m sad it ended.
Chef White got 20 years in prison, Plum got fined for stealing and went back to study, Mustard admitted to not being the hero, and they took his medal, Scarlet started her news agency, Peacock got punished for her crimes, and Green is aiming to become a state senator.
I believe AE Mysteries will come up with new events once this one is finished, or maybe they can even do Cluedo again and change the characters and storyline. That would be fun.
You can check other mystery games in the meantime, Adventure Escape Mysteries have a few more other fun stories you can try out. Good luck!

Aylin is a content creator and co-founder of App Amped. She was a huge Tomb Raider fan before moving on to more casual titles. She spent way too much time tending for her FarmVille farm as well as playing text-based browser games. Now she plays and writes about mobile games, creating in-depth walkthroughs and useful guides.