I’m back with the next walkthrough for chapter 2 Adventure Escape Mysteries – Cluedo because there are more suspects to question and more rooms to open to find the clues.
If you saw my last walkthrough for chapter 1 Adventure Escape Mysteries – Cluedo, you noticed some clues are a bit tricky. But thankfully I’m here to tell you all the details and help you solve this mystery.
Follow my every step in solving this mysterious adventure in chapter 2 Cluedo, to see who killed Mr. Black.
AE Mysteries Cluedo Chapter 2 Walkthrough

- The first thing you have to do is follow Miss Scarlet’s testimony and look for the dagger.
- You’ll find it on Mr.Black’s body, with a stab wound and a pink fuse in his pocket.
- Check the other fuse box and put the pink fuse there.
- And again you need to move the sparkling fuses to their appropriate color spot.
- Yellow right – Green down – Green right – Purple left – Purple up – Pink left – Pink up – Purple down – Purple left – Pink down
- Purple right – Yellow left – Yellow down – Purple up
- Green left – Yellow right – Yellow up
- Green down
- The Library is your next stop, where you can hear someone trapped there.
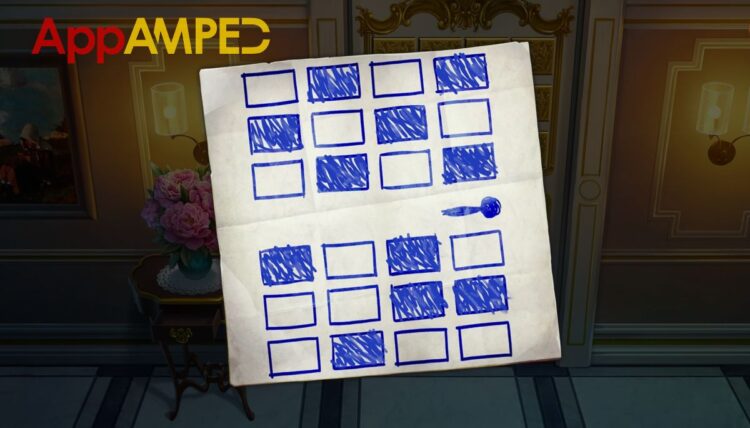
- In order to open the door you need to take the note in the flower vase.
- Open the drawer from the little stand under the flowers and take the pen.
- Send the paper and the pen under the door to the woman on the other side.
- She’ll draw you the pattern on the other side of the door, so you can use it to open the door.
- Using the magnifying glass to look better at the clue, notice where the door handle is.
- So you have to do the pattern in the mirror and push the squares on the door.

- Now you can go inside to meet Solicitor Peacock and tell her to go into the Hall to the others.

- Tap the rolled paper from the table. Looks like a scheme for a safe and a hex key you can take.
- Move the flower pot on the table to the side, and take the keycard.
- Push the handle on the armchair to the left and you’ll find under it another hex key.
- The lamp next to the armchair has a sparkle.
- Look by the golden books and take the hex key there.
- Move the ladder to take the golden book that sits on top of the bookshelves.
- Pick up the family crest that was behind the ladder.
- Move back the ladder and place the family crest on its spot on the wall.
- The secret drawer will give you a rope ladder.
- Look out the window and take the key from the pot.
- Place the rope ladder here on the window to reach the gun and another hex key.
- Get the suitcase from under the couch and open it with the key you found in the pot.
- You’ll get a golden book from inside.
- Now you can open the safe, the metal door under the red blinking light.
- Run the keycard in the panel next to the safe.
- Now you can try opening the safe with the 4 hex keys you found.
- In order to fully open the safe you need to play this ball maze game.
- Rotate the maze so the ball moves through it and press the blue or red switch to open different colored doors.
It’s a bit difficult to explain, so I’ll show you how I did it:
- The red ball proved to be a bit more difficult than the blue, but in the end, I managed to bring both in the right holes.
- Inside the safe, you’ll find a lot of evidence that Mr. Black used to blackmail his guests.
- Look through the paper about the suspects to gather evidence.
- Under all those notes you’ll find another golden book.
- Now go to the bookshelf with the golden books and put the three from your inventory there.
- Now a secret space behind them will open and you’ll find slides, an audio tape, and papers about an award Colonel Mustard received.
- The next stop is the Lounge where you will meet Colonel Mustard after he breaks the door.

- He will leave a rope behind him that you’ll gather as evidence.
- Fix the curtain with the rope he dropped and you’ll find a Star Symbols Note and a blinds wand from the window.
- Use the blinds wand on the rolled screen above the big painting frame.
- Move the magazine to the side and take the key.
- Move the blanket on the couch and take the star.
- Use the key on the drawers in front of the screen.
- You’ll find a triangle pendant that you can use on the box by the window.
- Pick up the lens inside the box and use it on the telescope.
- Look through it, notice the star constellation shown
- In your star symbols note the three symbols on the constellation stand for the letter V.
- Lens number 2 offers you another 3 symbols that stand for letter I.
- The 3 symbols on lens number 3 stand for letter E.
- Symbols on lens number 4 stand for the letter W.
- Now go to the wardrobe next to the statue and enter the code VIEW.
- Take the projector from inside, open the drawer under it, and take another star.
- Put the projector on the table, and the slides in it.
- This will give you evidence against Mayor Green.
- Once finished, Colonel Mustard will give you a third star.
- Take all 3 and go to the statue, put them on the base.
- It moves and reveals a ladder to a secret passage toward the garden.

- You’ll meet Mayor Green here and have an interesting talk.
- After he leaves you can grab the pipe for your evidence files.
- Move the plants closest to your left and take the valve.
- Put the valve on the leaking pipe and turn the water on.
- Now go to the sink, you’ll find a tile and you’ll see a key down the drain.
- Turn the water on to the sink so the key goes down, and it will leak on the floor where you can grab it.
- Use the key on the bloody cabinet.
- Grab the trowel and the tile from inside.
- Go solve the puzzle on the wall with the three tiles.
- Notice each bush shape and color. Use these to fill in the pattern for the cupboard above the sink:
- purple round – blue rhombus – yellow rectangle – red oval – white square – pink triangle
- Look at the drawing and take the battery.
- Move the carpet to the side and use the trowel on the loose tile.
- Dig a hole to find the hidden money and a screwdriver.
- Check the table, grab the sparkle, and use the screwdriver on the back of the toy bear.
- Take the other battery, and put both in the cassette player on the table.
- Insert the audio tape in the cassette player and hear more evidence about Solicitor Peacock.
Conclusion
Another chapter on Adventure Escape Mysteries – Cluedo finished, and there’s one more to go. Keep an eye out for my next article on AE Mysteries Cluedo chapter 3 walkthrough and you’ll be able to finish it like a pro.
Make sure you come back here for the next chapter, and I’ll try to have it ready for you as soon as possible.
