
Here is another chapter to find a new adventure in Lost Lands 11 and I’m gonna help you solve all the mysteries in Chapter 3 – The Mountain of Challenges.
The Minotaur is searching for a way to board a ship that could take him back to his homeland. But passage comes at a price: he must find the captain’s daughter, who has gone missing in the big city.
Chapter 3 – The Mountain of Challenges Walkthrough
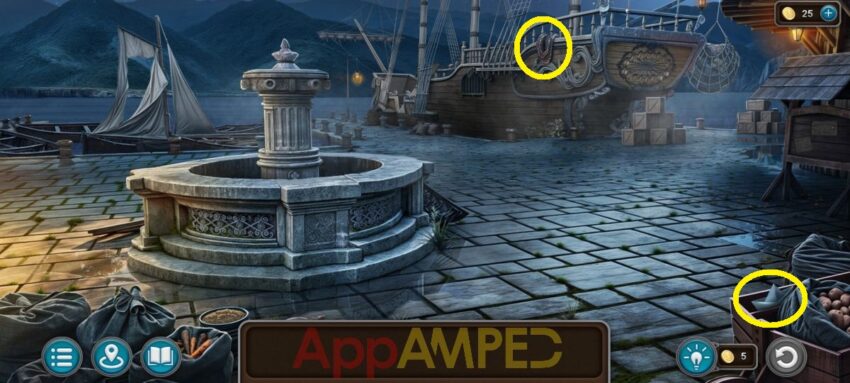
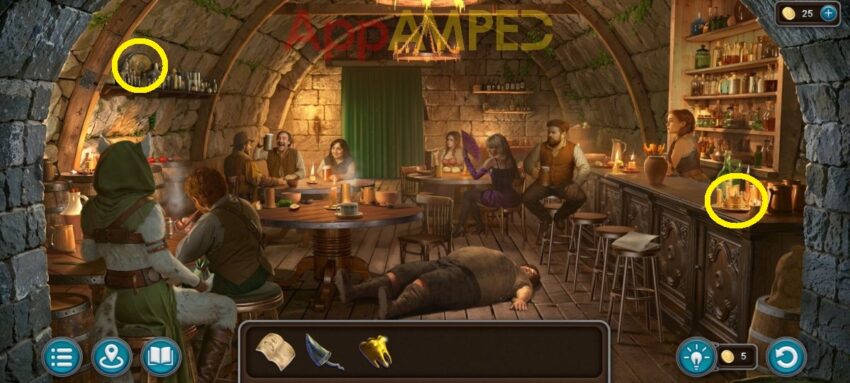
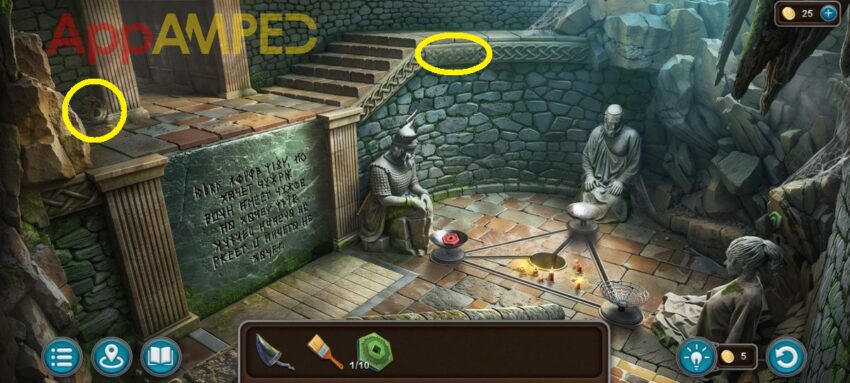
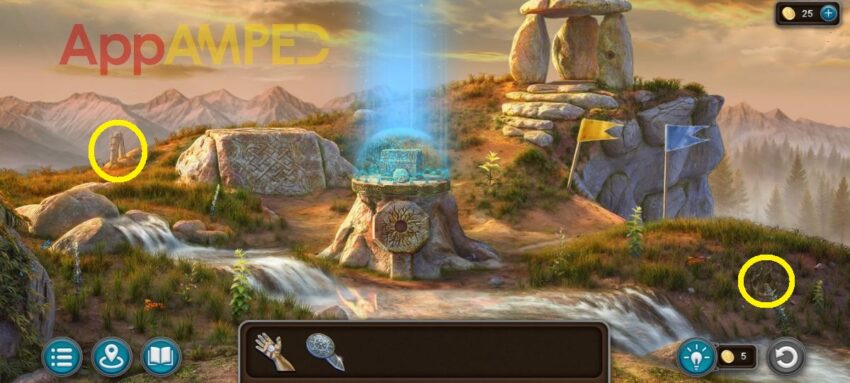
Note for collectibles: I’ve circled a morphing object and a paper boat for you.
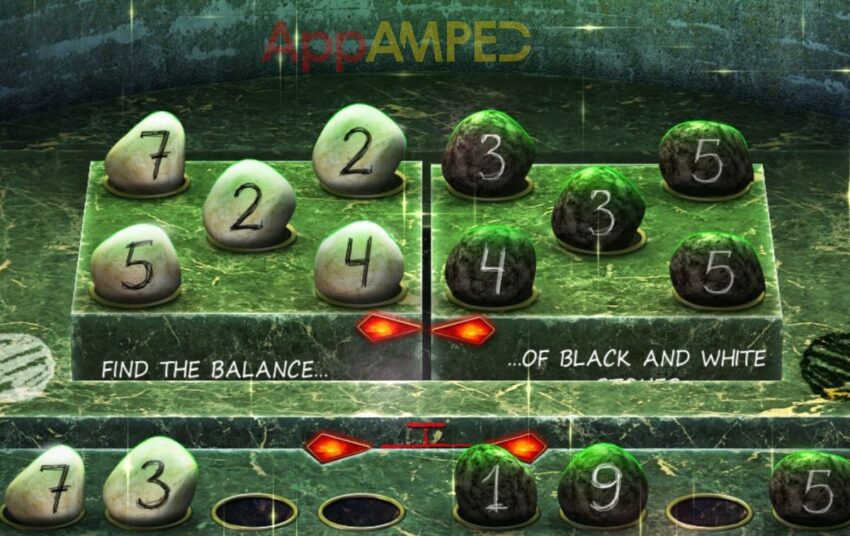
Look at the fountain, push the button, it will open to a game and you need to find all the pebbles first. Look at the top of the fountain and take the black pebble (1/10) and the 2 white pebbles (2/10). You’ll find a measuring arc in the water.
Go to the ship near the crates and look closer to the edge of the water, you’ll find a white pebble (3/10) and a black pebble (2/10). Go to the boat on the left and take another white pebble (4/10) and a black pebble (3/10) from the shore.
Look inside the boat to get a harpoon. Go to the entrance of the ship, take the black pebble (4/10) from the barrel. Now use the harpoon to get the rope, tie it to it then throw it at the wooden plank to lower it over the board and go on the ship.
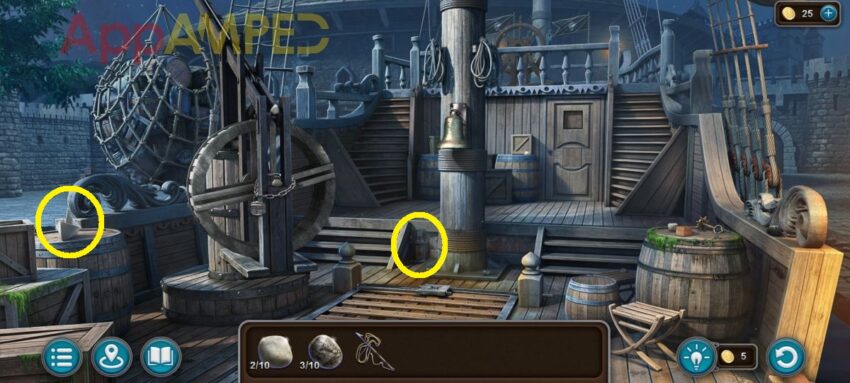
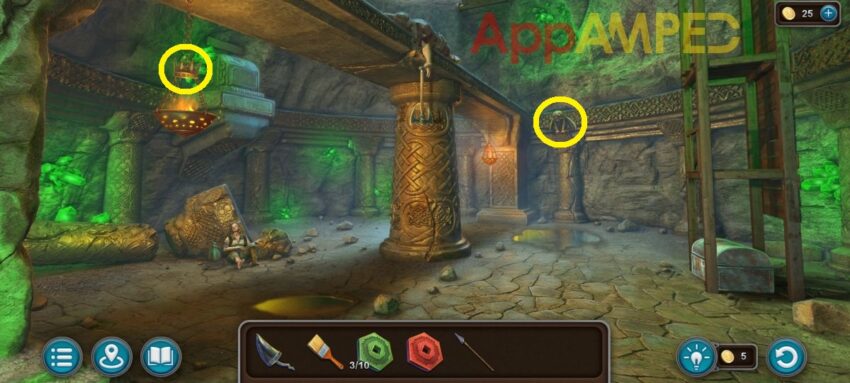
Note for collectibles: I’ve circled a morphing object and a paper boat for you.
Look on the barrel to the right, take the black pebble (5/10) from the ship’s railing then take the helm key and white pebble (5/10) from it. Go to the device holding the cargo in the air and take the 2 white pebbles (7/10).
Go up the stairs and to the front to find one white pebble (8/10) and a black pebble (6/10). Get down and to the door in the back. take the white pebble (9/10) next to it. Try the door and get the bell clapper that falls when you do that.
Go to the bell on the pole in the middle and put the clapper on then use it to wake the crew up and talk to the captain. He’ll give you a new task before he takes you on the ship. You’ll get the captain’s scroll and hold key.
Look on the ground and use the hold key to open the grates and get inside, down the stairs inside the ship.
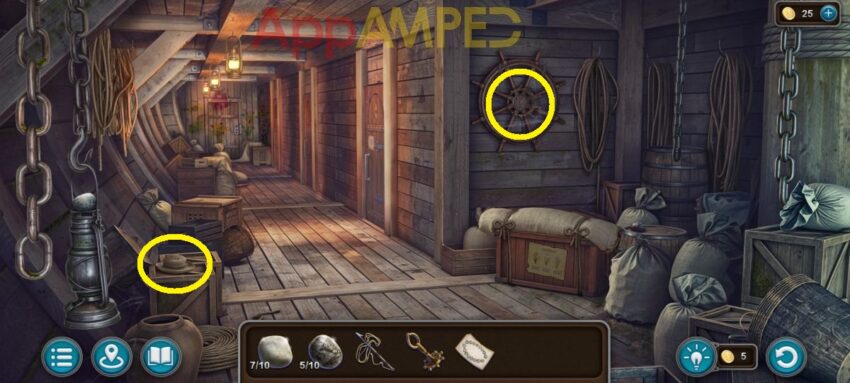
Note for collectibles: I’ve circled a morphing object and a crown for you. You’ll find a manuscript on the tray from the goblin later on.
Take the white pebble (10/10) from the lamp on the left and a black pebble (7/10) from the barrel on the right. Untie the rope and take the sailcloth, the anchor key, and the black pebble (8/10) from the crate.
Look at the herbalist note on the crate then go look at note on the first door. Go back up on the deck, to the front of the ship where the flags are and tie the sailcloth to them.
Now you can go up at the writing on the ship and put the scroll next to it to solve the puzzle. You need to arrange the letters to say “Grey Flounder” by moving them. Take the paper with order.
Go on the ship to talk to the captain and convince him to take you with them. He’ll give you the rose key and you can go down the stairs and to the door with the drawings at the end of the hallway. Put all 3 keys in the door to open it and go inside.
Take the monocular, open the crate to find a golden ticket and the incomplete sextant. Go knock on the first door to talk to the goblin about the crystal. Check out the cart, pour the vinegar over the cleaver and take it.
Take the black pebble (9/10) on the cart and the other black pebble (10/10) under the cart. Go to the crate on the right and use the cleaver to cut the ropes. Go to the side of the boat where the shells are and open a few with the cleaver.
Go back to the boat and look at the lock keeping the crane and use the lockpick in the horn to open it. Now that the cargo dropped lower, go down to look at the shells again and use the cleaver to find 3 pearls.
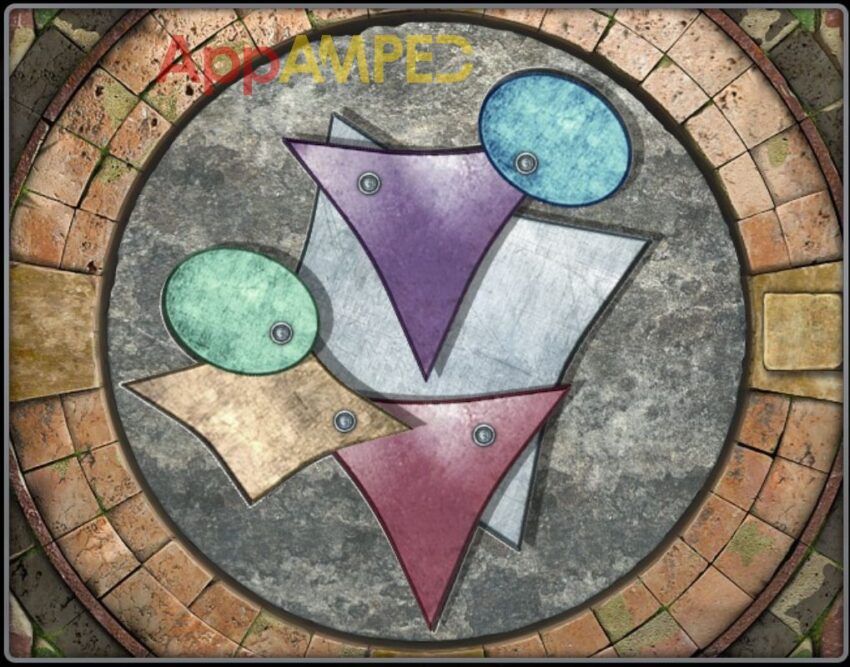
Go give them to the goblin so he gives you the crystal. Go back up and to the fountain to use all the pebbles then balance them.
Now put the sextant together with: measuring arc + monocular + crystal. Put it on the fountain to look through it and use the ticket to find all 16 objects.
- Spider constellation: 45 – 235
- Nest: 0 – 190
- Fishing rod: -5 – 240
- Tricorn: 5 – 260
- Horse: -40 – 265
- Sailor: 35 – 315
- Watering can: 10 – 340
- Gear: 30 – 170
- Trident: 20 – 360
- Playing card: -40 – 20 (lift the tile with the rake)
- Kite: 35 – 90
- Dream catcher: 0 – 70
- Scissors: -20 – 70
- Glove: -20 – 80
- Goldfish: -15 – 160 (open the crate with the chain cutter_
- Queen: -50 – 170
The fountain will give you some stairs to get to the forge underground and talk to the blacksmith.
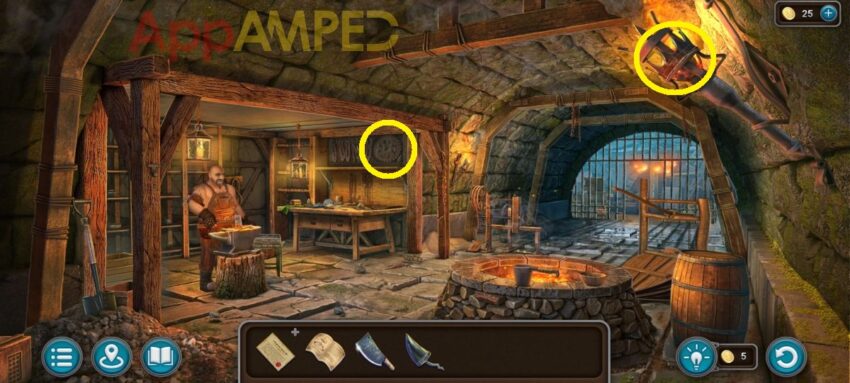
Note for collectibles: I’ve circled a morphing object and a crown for you.
Look at the workbench next to the blacksmith and read the Minting kyolls note. You can go through the gates at the end to find the underground district.
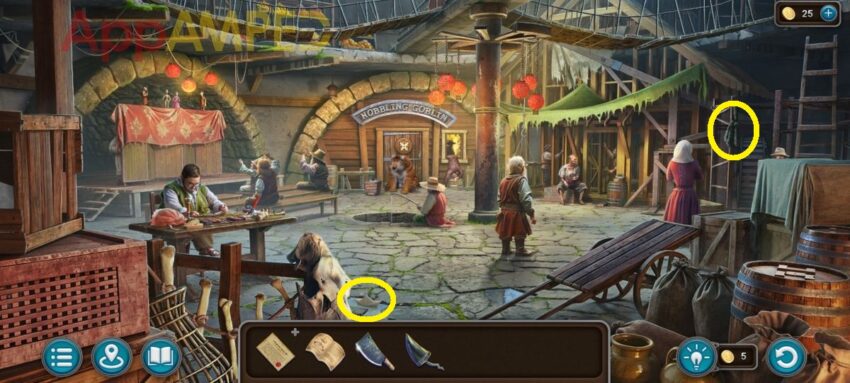
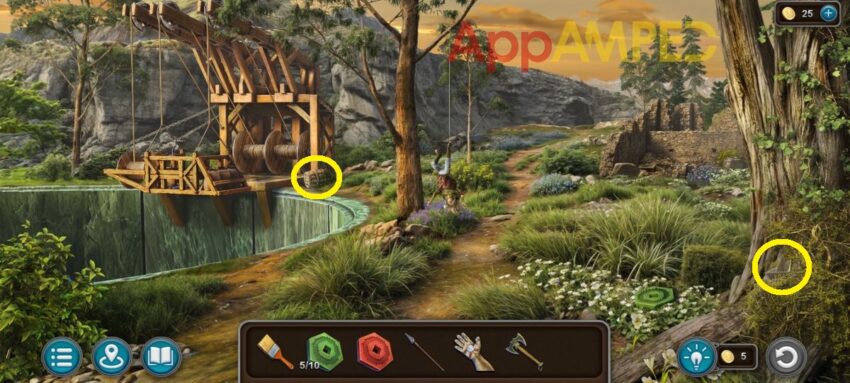
Note for collectibles: I’ve circled a morphing object and a paper boat for you.
You can ask the man sitting on the right near the wooden beams about the little girl, and you can talk to the man at the table on the left, making dolls. Go at the Hobbling Goblin and then back to the man sitting on the right.
He can tell you how to go pass the bear if you get him some nails. Take the nail box and go to the blacksmith and ask him for nails. Take the tobacco box and go ask the man that wants nails for some tobacco.
Go to the puppeteer and talk to him. You have a paper with a seal in your inventory, go to the boat, in the front to the cargo load. Use the cleaver to cut the rope and the harpoon to pry open the box and take a lemon.
Look at the sealed document, use the cleaver to cut up the lemon and squeeze it on the document. Go back to the puppeteer and ask him to use his tools and take the screwdriver.
Go back to the boat, down inside of it where the crate is and use the screwdriver to open it and find a secret box. Open that and solve the puzzle:
You know you’ll need the soda herb based on the information on the crate. Go to the blacksmith, to the fire, put the herb on the fire, and take the soda ash. Put that on the document and the ink will clean up leaving you with a blank form.
Go give that to the puppeteer and then sign your name, take the inkpot before giving the contract to the man on the right first, and the pen then put some tobacco in the tobacco box.
Now go to the blacksmith with the contract and the pen, give the tobacco to him then fill the nail box with nails. Go to the man needing them and give them to him. He’ll tell you about a book that will help you go past the bear.
Go to the puppeteer and give the contract and the pen and read the book on his table to find what the bear eats. Go to the bear, take the bucket then go to the boat, on the side where the shells are and use the cleaver to fill the bucket with oysters.
Go give that to the bear. When he leaves go to the man sitting out the window, take the golden tooth near him. Look at the door and remove the gold cap, then align the matching images to be able to enter the Tavern.
Note for collectibles: I’ve circled a morphing object and a crown for you. There’s a manuscript on the chair at the bar, closest to you.
Talk to the bartender about Kaira and take a caramel candy from the bar. Give her the ticket. Look on the table, next to the fallen man and put the candy in the hot beverage to make it sticky.
Look at the fallen man, when you’re trying to get the coin it will fall. Go to the goblin’s door inside the ship and take the smelly book. Go back to the tavern and put it over the fallen big guy on the floor to move him.
Look at the crack in the floor and use the sticky candy to get the gold kyoll (1/3). Go to the blacksmith, look at the anvil and read the note, then follow the steps to make a kyoll.
Put the gold tooth on the anvil, use the hammer to flatten it and take it. Look inside the blacksmith’s apron and take the key. Check out the workbench and use the key to open the drawer.
Take the red box lout and open it then get the coin die for the gold kyoll, then the blade from inside the drawer. Go to the machine near the workbench and put the new blade in.
Put the flatten gold in the machine then make a blank coin with it. Take the gold shavings as well. Go to the fire pit, press the air blower, and put the gold shavings in the pot and on the fire to melt it into crucible.
Move to the anvil, put the coin die on it, then add the blank coin then use the hammer to make another gold kyoll (2/3). Put the crucible on the anvil, use the hammer to get the gold out, then to get it flat.
Go to the machine and repeat the process of making a blank coin then again to make another gold kyoll (3/3) using the anvil and the hammer. Go back to the tavern and give the bartender the 3 gold kyolls.
Take the key and look behind the green drapes, open the door using the key. Talk to the Blacksmith and go to the ship, at the barrels on the deck to get the dice. Give the Blacksmith your dice then shake them in the mug and pick 3 dice to play the game.
After you win, you will be taken away, waking up in a tent in the morning. Go gather information around the camp.
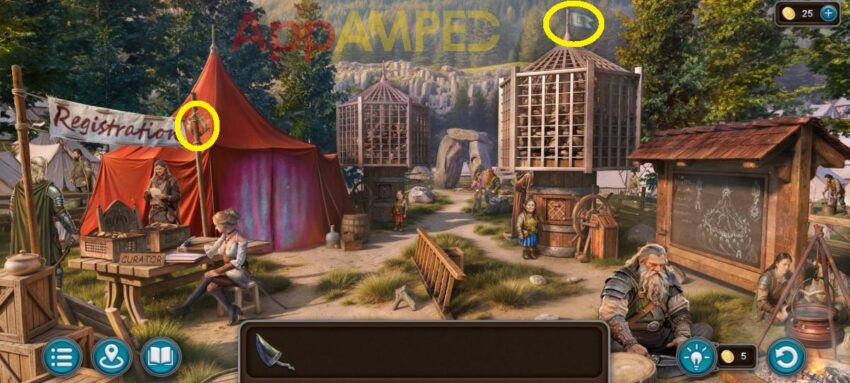
Note for collectibles: I’ve circled a morphing object and a crown for you.
Go to the Registration table first and tell them your name. Take a rune token and a device token. After the crow drops the note, help the lady out by bringing 15 more rune tokens. She’ll give you a magical mark for the tent and a list of runes she needs.
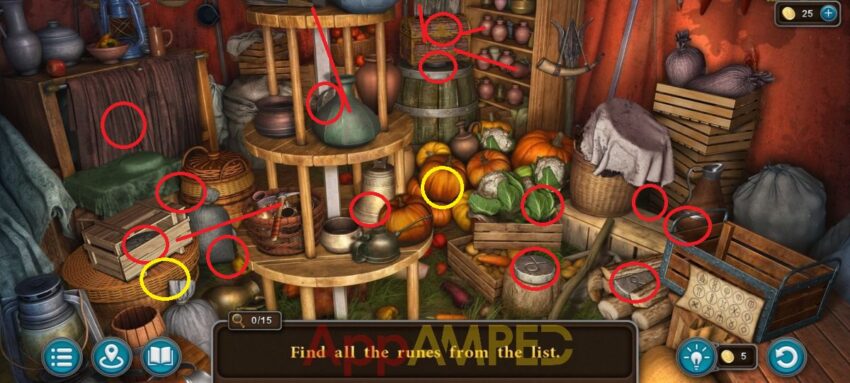
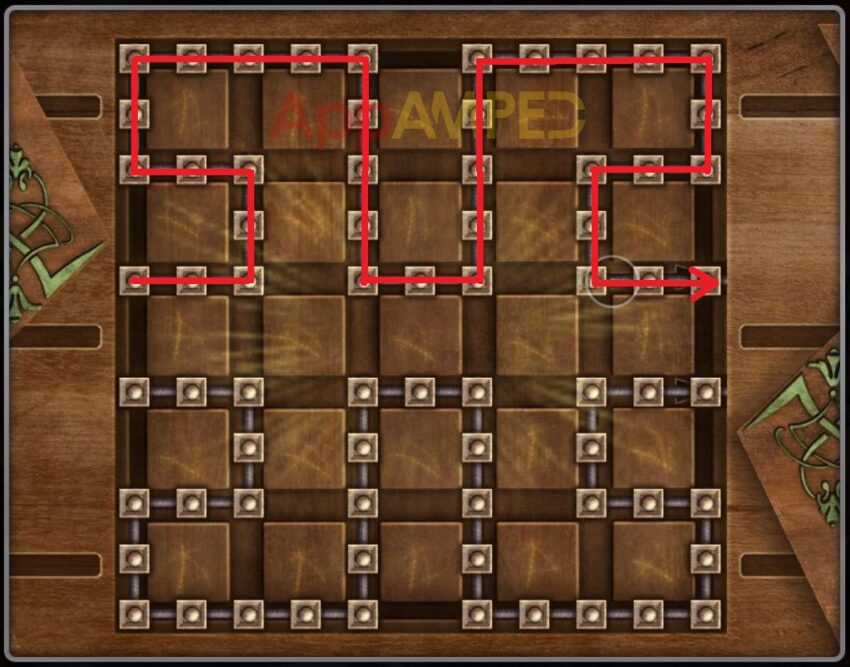
Go to the red tent and put the magical mark on the front entrance. Connect all the dots with beams to enter the tent. Put the list of runes on the side to gather all 15 runes on it.
For the crate under the cupboard with the brown drapes, this is the solution:
After you get the runes go up the ladder on the right, open the door and dump the runes inside. Tap the registry lady to find out what the challenge is. Before the race starts, go to the small lady on the left and insert the device token to get a paintbrush.
Now go to the other lady on the right and spin the wheel to get a runestone. Go to the portal and put that runestone in to get transported to the first trial. Pair up the crystals.
Now you’re in the first room, facing the first riddle “The door will open when both eyes see each other”. Take the valve put it in the wall to your left. Move it 2 times and you’ll see another valve on the left wall. Take the rusty valve and move the right valve again.
Go to the lit up corner and take the flame block from the wall. Turn the valve again so it lights up the ground. Check it out and put the rusty valve in the oil stain next to the circle on the ground.
Now turn the valve until you see the left wall again and put the oily valve back in. Turn the left valve until you see the right corner where you’ll find a paper boat. Check out the corner and take the sun block at the bottom.
Put the flame block in its place and rotate the cylinders to complete the pattern. After the click rotate the left valve again to see the right valve then rotate that again to see the left corner and notice the locks there.
Now move the right valve to see the ground once more, insert the sun block and solve the puzzle here after you get the water block.
Move the right valve until you see the left corner and insert the water block next to the gold locks in the wall. Take the green stone disc (1/10) and solve the puzzle.
Now that the water flooded the floor, when you move the light bean, from the right valve, to the ground, it will give you more light and you’ll see a morphing object next to the left beam of light.
Move both valves so that the beams both face down to the ground to see each other in the reflection. Press the eye on the door to get a new puzzle and open the door to find the temple room.
Note for collectibles: I’ve circled a morphing object and a crown for you.
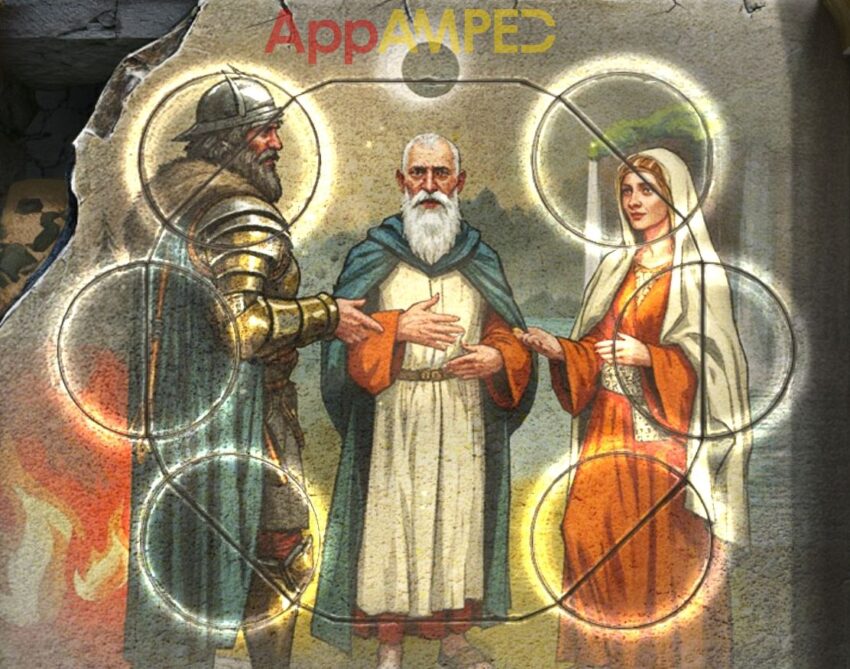
The riddle: “The maiden has her own but desires another’s. The warrior has another’s but desires his own. The sage has nothing and desires nothing.”
Take the green stone disc (2/10) from behind the maiden and the forged bowl in front of her. In front of the sage there’s a leaky bowl, and in front of the warrior is a red stone disc and a solid bowl.
Look at the warrior’s head and take the spear then go back to the room you came from. Fill the solid bowl with water from the circle in the middle.
There’s another green stone disc (3/10) on the right next to you. Go to the right corner and fill the forged bowl with coals.
Go back to the temple room and put the coal bowl in front of the maiden, then try to light them up with the candle. Go back to the room before and throw the coals in the oil next to the puddle, then go back and try again.
Use the spear on the green wall with the riddle on it. Fill the leaky bowl with sand and then put it in front of the sage. Turn the bowls in front of the correct statues:
- Put the fire in front of the warrior.
- Put the water in front of the maiden and her gaze towards the fire (warrior).
- Put the sand in the middle and the warrior’s gaze to it.
- Put sage’s gaze towards the sky and solve the puzzle.
Now you can go up the stairs and through the tunnel to find another room. You’ll find a wounded competitor and you can talk to them before exploring.
Note for collectibles: I’ve circled a morphing object and a crown for you. There’s a manuscript inside the chest after you open it.
Look at the chest under the tower and use the lockpick to open it. Take the scoop, key, and green stone disc (4/10). Use the spear to get to the axe and take it.
Now use the axe to cut through the wooden legs of the tower and go up to the man there. Take the green stone disc (5/10), the cloth wraps and the empty flask on the fallen man.
Look at the rubble of wood and take a few wooden bars, use the spear to move some wooden boards around and secure them with the axe to make a ladder.
Go put the wooden bars on the leg of the injured competitor and use the wraps to keep them secure. Go back to the temple room and use the flask to get some water from the water bowl in front of the maiden.
Then put the spear in the fire to get it heated. Go and give the water to the injured person and use the heated spear to disinfect their wounds, then use the wraps to keep them safe.
After you 2 talk you can look into their bag and take the auxiliary device and the lever. Give a closer look at the device, open the straps all the way and put your hand instead.
Go up the ladder and put the lever in the missing spot and you’ll activate a bridge. Now go on the other side and use the key to find your next puzzle. Go back to the temple room and grab some sand with your scoop to put in the hourglass.
Flip them all and then start them off from the key once. Then flip the first and the second hourglass, then start them again. Another bridge will pop up so you can go there and start climbing. You can choose the brackets that are highlighted.
- After the first: right – left – right – left – right – middle – right
After you talk to Kaira, you need to get out of the trap by using the magnetic glove to reach your axe then use it to cut the ropes.
Note for collectibles: I’ve circled a morphing object and a paper boat for you.
Take the green stone disc (6/10) in front then look through the wood next to the ruins on the right. Use the spear to move the debris and the axe to get the dirty stone disc.
Go to the mechanism on the left, you’ll need to fix the gear for it when you find what you need. Now move through the hole in the mountain to reach the bridge.

Note for collectibles: I’ve circled a morphing object and a paper boat for you.
Look at the bottom of the stream and take the green stone disc (7/10) next to the water. Then wash off the dirty stone disc in the water to get another green stone disc (8/10).
Go to the middle of the bridge to the orc lady and play the game with her. Give her the axe for the pliers. Now go to the little colorful cave on the left and put the red stone disc on the ground.
Put some yellow paint in the bowl, then some blue and mix it with the stick. Use the paintbrush to color the red disc into a green stone disc (9/10). Go to the little girl and use the pliers to cut her chain then cut some more wire from the chain and take it.
Go to the mechanism and use the wire to fix the gear then lower yourself in the mountain. Go to the temple room, next to the stairs there’s a hole. Ask Kaira to help you get the green stone disc (10/10) from inside.
You can go back up to the orc lady and use the green discs to play the game. Flip the coin, then play rock/paper/scissors to see who goes first. Maybe choose rock, you might win fast.
After you save the orc lady and get stabbed in the back by her. You fall into a pile of bones and need to find your way out.
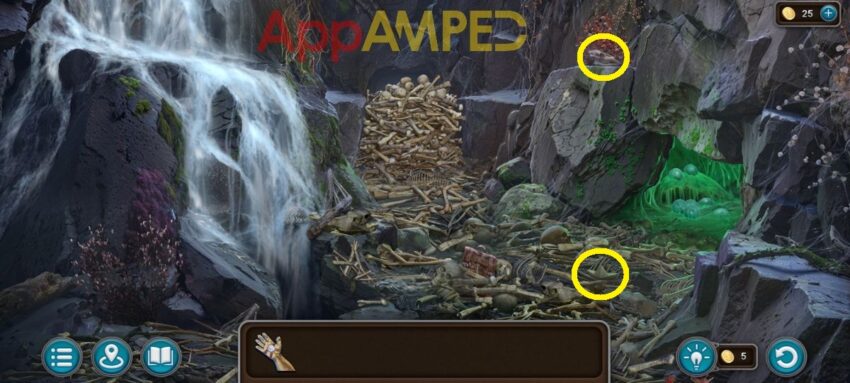
Note for collectibles: I’ve circled a morphing object and a paper boat for you.
Look at the pile of bones in front and get them out of the way to reach the snare pole. Now go through the tunel to reach a cave inside the mountain.
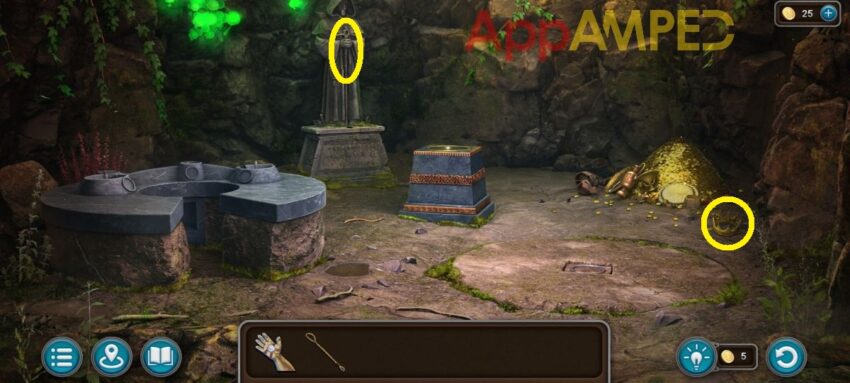
Note for collectibles: I’ve circled a morphing object and a crown for you. Next to the pile of gold you’ll find the last manuscript.
Take the alchemist’s scroll from the round table on the left and the stone bowl then go find the ingredients. Use the snare pole to grab a phosphorescent mushroom from the left wall.
Go to the gold pile and take the silver spoon and the gold hairpin. Go back to the bone graveyard and look through the backpack and take the wooden bowl.
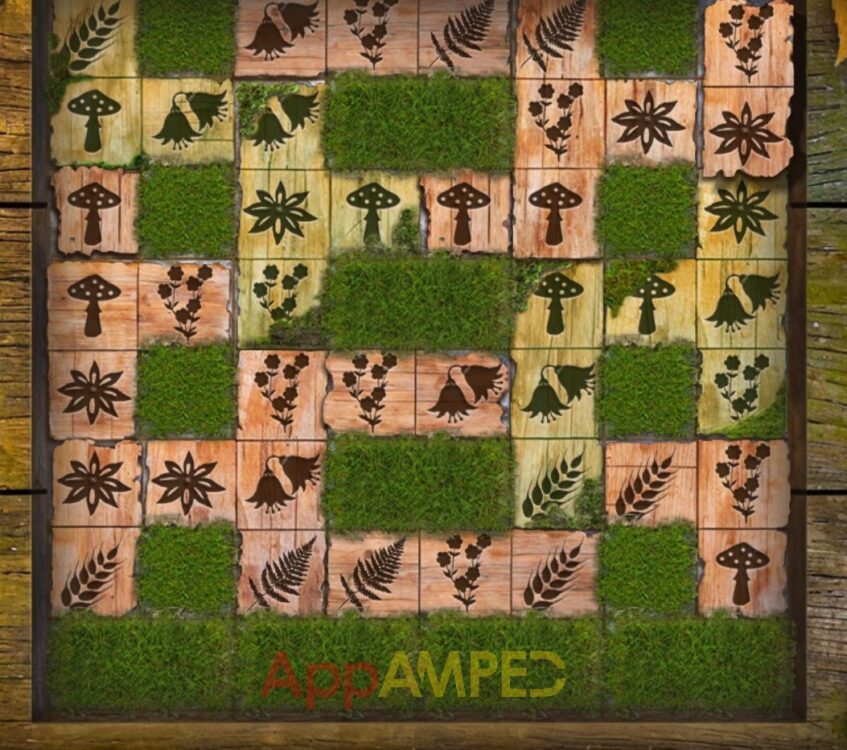
Use the stone bowl to get some centipede eggs from the right. Now go to the cave, at the table, and put all the ingredients on the recipe first to get the reagents. Put them on the table and then find all the hidden objects and put all the items in the right place.
The code for the chest is found on the stone under the rag.
After you put the 2 crystals under the table, start with the egg valve, then gold dust valve and silver dust, then the mushroom, and put the flask on the hot spot to get all the mana essence into the little bottle.
Go pour the mana into the hole at the bottom of the statue to get another riddle “When the arrow flies north and the west smells of death, salvation will come from the east.”
Use the magnetic hand to find the kyoll in the pile of bones. Go back into the cave and take the jug from the gold pile, then go back out and fill the jug with water from the stream.
Go inside to the bowl in the middle, pour the water into it, then put the wooden bowl in the water and the magnetized blade in the bowl. Knock out the wall in front, to the east of where the compass is pointing then push the runes in the order the bowl has them.
- Upside down A
- M-like symbol
- Upside down Y
- Upside down V and .
Before you press the big button, you need to get back the magnetized blade. You’ll be taken back up and reach the final trial.
Note for collectibles: I’ve circled a morphing object and a crown for you.
Look at the 2 flags and take the totem next to the yellow one. Another totem is next to the prize. on the right side. And a third totem is behind the rocks where the stream is starting.
Look for the fourth totem by the dolmen on the ground to the right. Put all the totems on the stone table to the left. Play the game and place the animals in their own space.
Take the goblet and fill it with water from the stream. Go pour the water on the plant coming out from the middle of the totem board. Take the key from the tree and go talk to Kaira.
Put the key on the stone under the prize and restore the image. Save Kaira from the orc lady and you will be transported back to the city missing the ship by seconds.
Wrapping up
With the final obstacle cleared and the peak of the Mountain of Challenges reached, the unlikely duo of the Minotaur Mini and Kaira have proven that strength is nothing without a bit of puzzle-solving wits.
We’re looking forward to more Lost Lands adventures and you can play more mini-games if you gathered all the collectibles I highlighted for you.
Or you can try out other puzzle-adventure games like Artifact Seekers – Haunted Theater or even Legendary Tales 5. See you next time!

Aylin is a content creator and co-founder of App Amped. She was a huge Tomb Raider fan before moving on to more casual titles. She spent way too much time tending for her FarmVille farm as well as playing text-based browser games. Now she plays and writes about mobile games, creating in-depth walkthroughs and useful guides.
Fantastic walkthrough. Thank you for the precise locations on the sextant search. I couldn’t find the playing card!
The board for the totem puzzle is set up differently than what your board shows