

Come with me on another Chapter of Legendary Tales 5 and I’ll show you in this walkthrough how to reach the end of the Ancient Technologies story.
This is an adventure game in the Hidden Objects genre, with unforgettable characters and complicated quests. Solve puzzles and play mini-games to put your wits to the test. Examine locations carefully and find every collectible.
If you finished the first chapter, in my Legendary Tales 5 Chapter 1 Walkthrough you can find all the collectibles and where they are located for extra mini-games.
Follow all my steps and let me help you find all the mysteries and solutions for every puzzle and mini-game you encounter on your journey.
Ancient Technologies – Chapter 2 Walkthrough
Many use the device of the Ancients, but no one knows how they work or how to fix them. Except for the Ancients themselves.

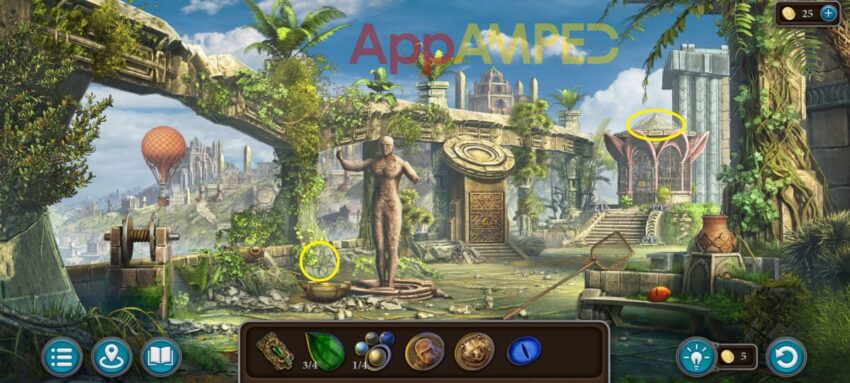
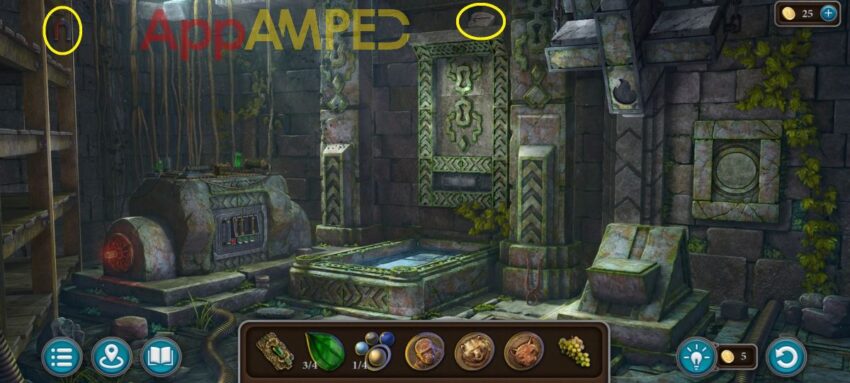
First thing you need to do is go inside the house and talk to Egil. Then you can explore the surroundings and find a disguise before going to the port.
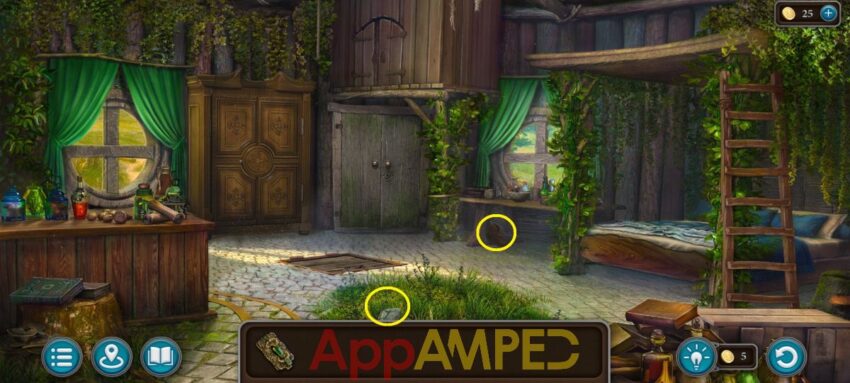
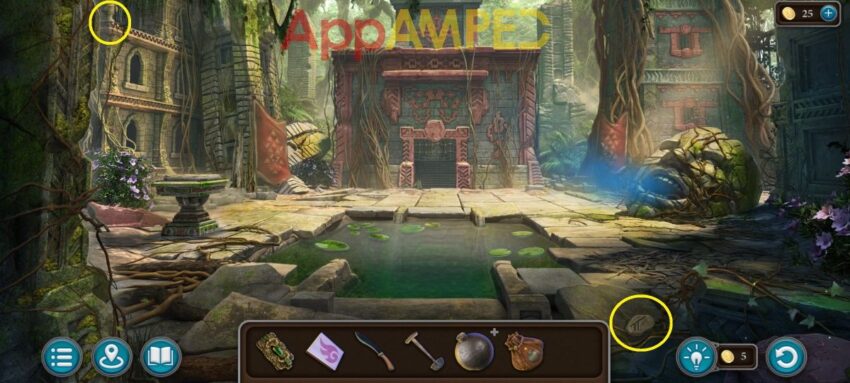
Take the ladder off the side of the bed and go outside. Put it to reach the roof, take the carved flower (1/4) from there then take the pot hook from the stove.
Go inside the house and use the pot hook to look under the bed and take another carved flower (2/4). Now go outside and take the path through the forest.
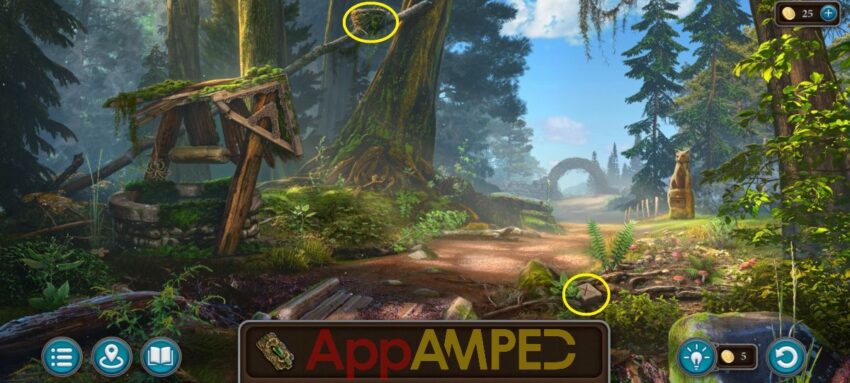
Look next to the broken well and take the carved flower (3/4). Advance along the road and take the last carved flower (4/4) from the left side of the path.
Go back to Egil’s house, look at the closet and use all carved flowers to open it after you solve the puzzle by arranging the symbols to complete the animal shapes highlighted.
Take the wooden leaf (1/2) and dress with the clothes there. Now you can go down the forest road to the port and talk to the captain.
Look next to the chest on the ground to get a wooden leaf (2/2). Go back outside Egil’s house and take a look at the box on the bench. Put the 2 leaves to open the box and get the key and the matches.
Go inside the house and use the key to open the storage cupboard to find a handle and the green book to find out what you need for the potion. Use the handle on the trap door in the floor.
Take the basket, cabbage, and axe. Go outside and give the cabbage to the goat, then look in those bushes to get lemon balm and a steering wheel.
Take the cauldron from the stove, open the door and insert the wood and sticks then go look for more ingredients.
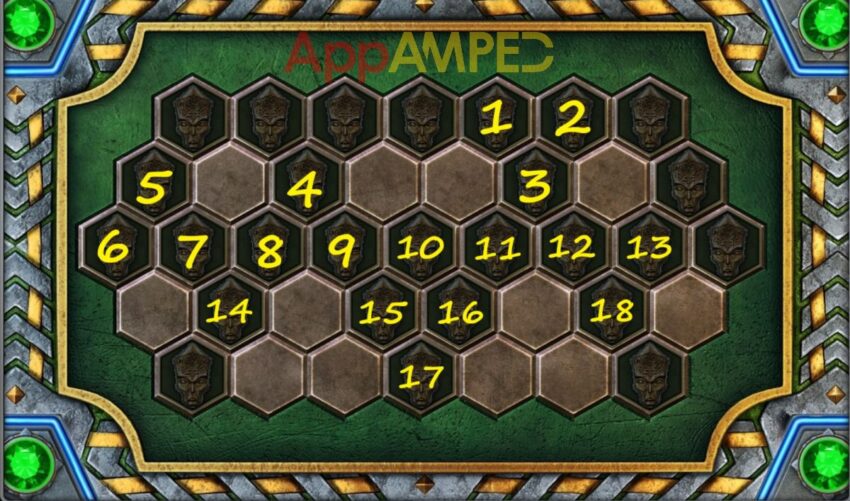
Go on the forest road, at the base of the tree, there’s something behind the roots. Use the axe to cut the roots and take the fox. Use it on the fox totem on the right. Create an empty row from left to right to activate all buttons.
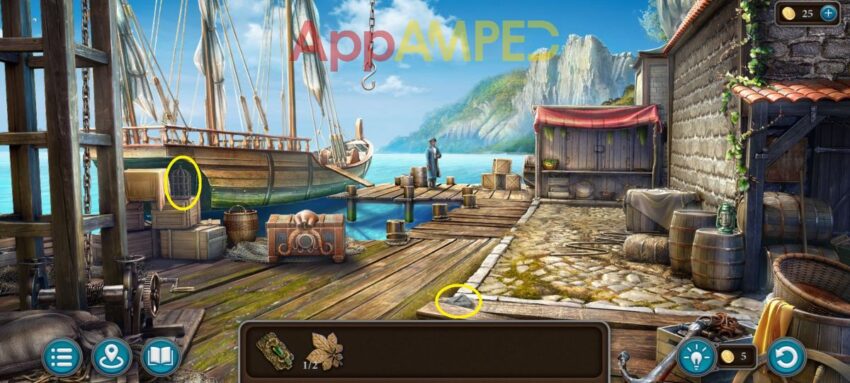
Take the machete and go to the port. Use the steering wheel on the lamp to the right and get the gear inside. Next use the machete on the rope on the ground and take it.
Look at the lever on the left and put the gear to make it work and lower the hook then take that. Go to the forest road and use the basket on the right where the mushrooms are and then the ones shown in the book.

Note: They all look the same, and are scattered around the grass, behind different mushrooms and under different plants and leaves.
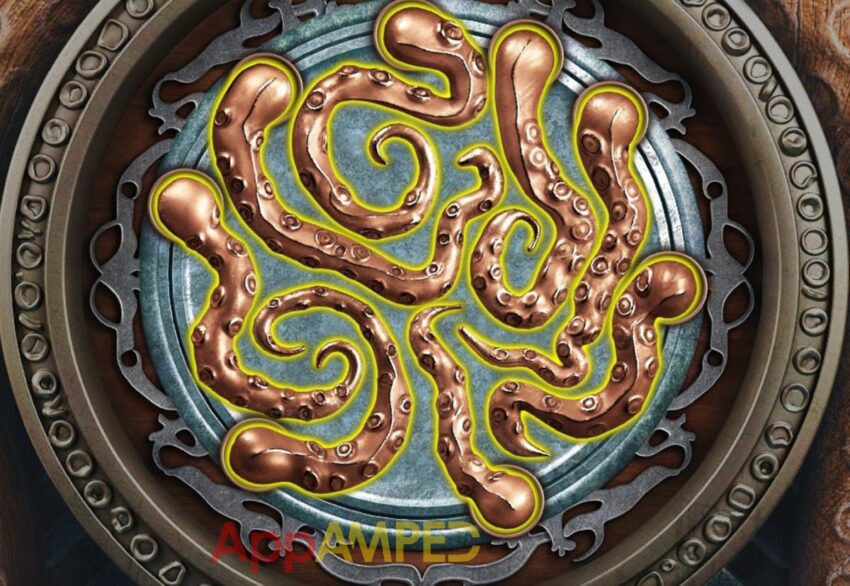
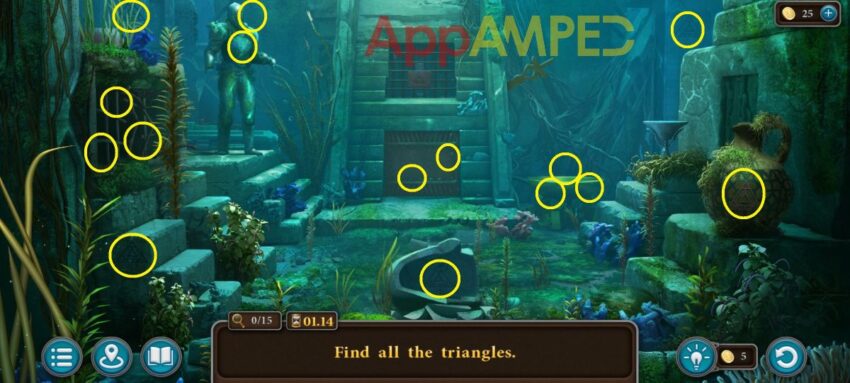
Go to the broken well and use the rope + hook to get the octopus from inside then go to the port to open the chest with it. Make sure the tentacles do not overlap.
Take the glove and the fisherman token. Put the token on the cupboard with a red tarp to open it and find all items.
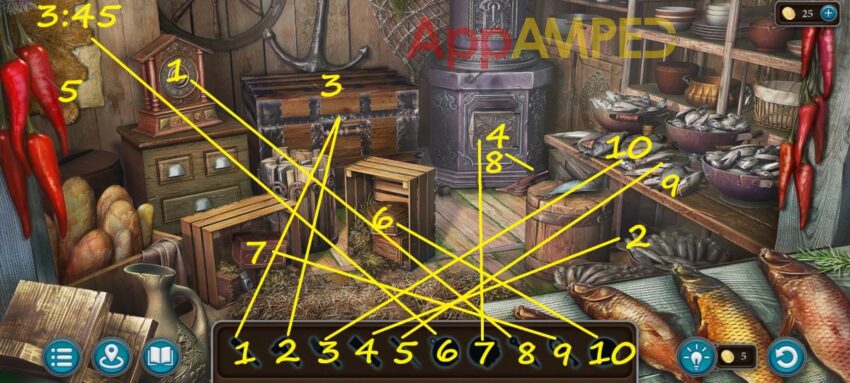
Get the fork (3) from on top of the chest. Look through the fishes on the right to find the clam and use the fork to open it and get the pearl (10).
Look at the hexagonal box in the crate in the middle of the storage room and put the pearl here to get the compass (6). On the far left side there’s a map under the furs, you can put the compass here and take the spoke (5)
Use that on the table with the fishes to get the key (9), and use the key to open the box under the other crate to get the knob (7). Use it on the stove to get the handle (4) and the blower to find a clock hand (8).
Find the handle‘s missing piece under the fish table to make it a hammer (2). Go to the clock and put its hand back and now use the compass coordinates and map to get the right numbers: 3:45.
Go to the clock and arrange the hands to get that and get the chisel (1). Use the chisel and the hammer to open the chest and get the fish oil.
Go outside Egil’s house, next to the goat there’s a sloes bush. Use the glove to gather some sloes then go inside and turn the sloes into a smushie by using the pistil and mortar on the table to the right.
Take the crushed sloes and add all the ingredients shown in the book: Sloes + fish oil + lemon balm + mushrooms. Go outside and fill the cauldron with water from the barrel in front.
Go to the stove and use the matches to light the fire, put the cauldron on and the ingredients and get the remedy. Go to the port and give it to the captain and he’ll take you on the boat to the island you need to go.
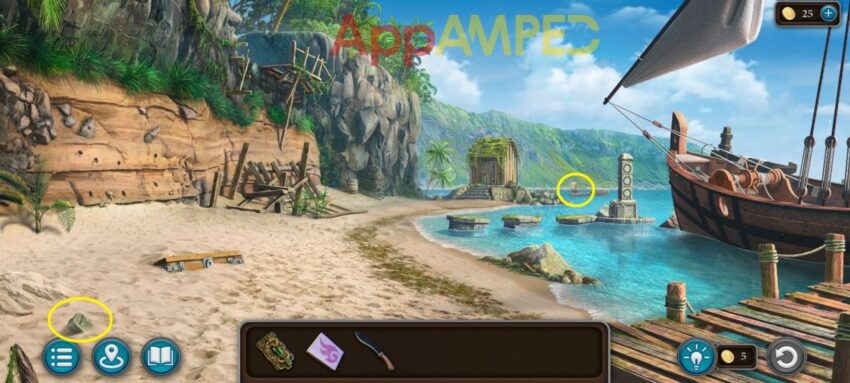
Look at the rock on the shore closest to you and take the button. then use the machete to clean the the rock. Go to the hut in the back and put the button on the lock then match the correct shell as the one drawn on the rock.
The green shell with the star shape is the correct answer to open the door. Take the poker, shovel and the cast-iron ball. Use the poker on the third top hole on the rock wall to your left, and get the key.
Use the shovel to dig out the chest in the sand and use the key to open it. Take the gun powder and climbing picks. Use the climbing picks on the rock wall above the barrel.
- middle – middle – left – left – top middle – top middle – top left – bottom left – top middle
In front of the rock gates to the left there’s a bit of raised dirt, so use the shovel to dig and get the head. Use the machete to cut the weeds that grew and covered the rock gates then pass through to reach Kainbekh.
After you explore this place, remember the patterns on the two tables under the stone arms, then you can go back and take the path to your right to reach a jungle manor or something similar to that.
You can check out the door of this mansion and open it by pulling all the bars without getting any stuck:
- 6th vertical
- 6th horizontal
- 4th vertical
- 5th horizontal
- 1st vertical
- 1st horizontal
- 2nd vertical
- 3rd horizontal
- 5th vertical
- 2nd horizontal
- 3rd vertical
- 4th horizontal
Take the cord and before you leave remember the patterns on the red flags. You can go up the stairs now to get to the city gates.
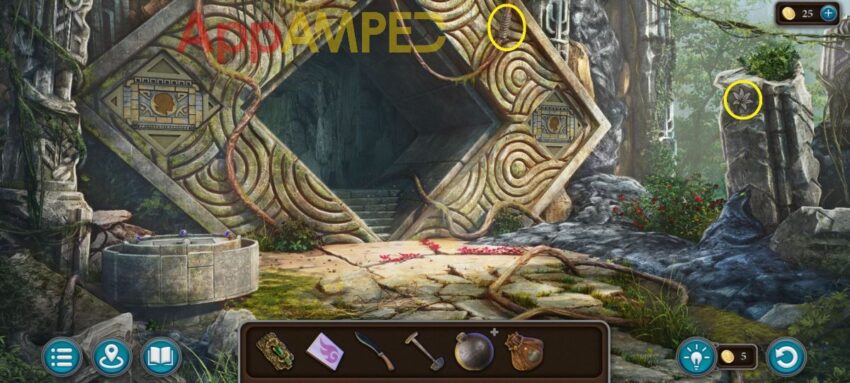
Put the head on the right side of the gate, based on the symbols on the 2 tables at the Kainbekh, count them to get the right code: 8433. Now you can take the other head, the emerald leaf (1/4) and the planet (1/4).
Put the other head on the left side and count the symbols from the 2 red flags: 6624. Get the valve and the swords and remember the pattern at the back of this box. Go inside and use the matches on the right to light up the room.

Go to the stone wall in the back and take the seahorse (1/2) from it. Go to the manor, use the machete to cut the vines on the stone head on the right and put the valve in to get to the stone ring from inside the mouth.
Come back to the city gates and put the stone ring on the circle on the ground, guide the ball from start to finish with the arrows:
- up – up – down – down – down – down – down – down – down – down – up
- down – up – down – up – up – up – down – down
Take the pickaxe, the bracelet which will give you a navigation system, and the seahorse (2/2) after you talk to NUR. Go outside the gate and to the stone pillar on the right. Use the pickaxe to get the emerald leaf (2/4) from the black stone.
Go to the beach and use the two seahorses on the totem in the water. The code for the geometric symbols is found at the city gates, inside the second box in the stone to the left: square – circle – triangle.
Take the oil and gorilla medallion. Go inside the city gates to the stone wall at the back, fill the cast-iron ball with gun powder then use the cord and oil to create a bomb and use it on the wall. Use the matches to light up the fuel near you.
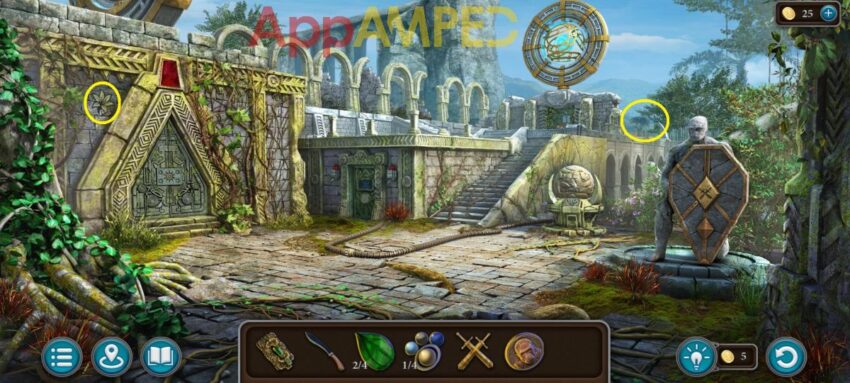
Put the swords into the statue’s shield and get the emerald leaf (3/4). Look at the door on the left and take the gear, then go up the stairs to the closed gate and put the gear here.
Position the pattern of the gears as you can see under the mechanism of the door at the bottom of the stairs:
- triangle – square
- circle – rhombus
The gate opens to find the Alley of Light.
Look at the stone totem between the stairs and the arch and take the bear medallion. Then use the machete to cut off the weeds at the top of the stairs to find the energy crystal.
Get a closer look at the crystal and take the blue eye and remove the broken crystal. Move through the arch to get a better view of the city.
Take the orange eye and the net. Look at the vase and take the puma medallion. Go to the pavilion and take the grapes from the gate.
Now go to where the crystal was held, in the cave. Look at the two stone hands and put the orange eye on the left and light up all the chips with faces.
Now go to the right hand and put the blue eye on here. Remove all the chips from the board. leaving only one.
Get the energy crystal, now go back to the jungle and up the stairs to the city gates. Go inside and use the net to clean up the water and remember the symbols. Go to the Alley of Light, up the stairs to put the energy crystal in the device and arrange the mirrors.
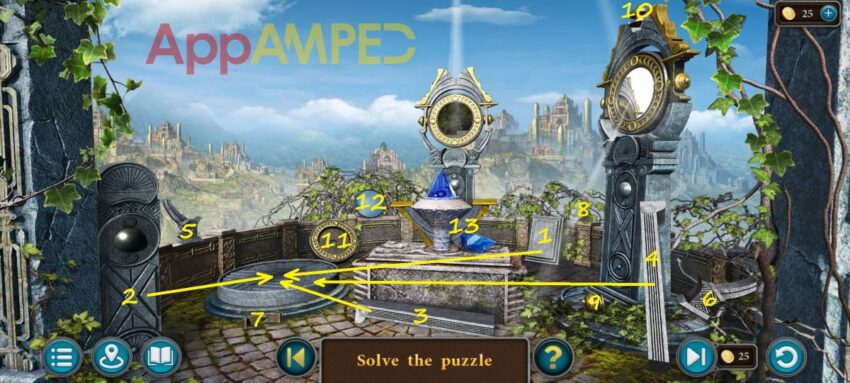
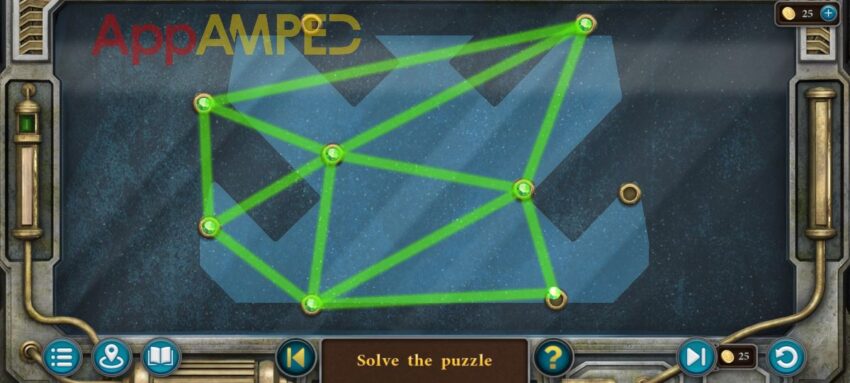
Put the third mirror back together following each step above, then turn each mirror 3 times to focus the beam where you need it. Go back to the City square at the door next to the stairs and arrange the gems so the beams do not intersect.
Now you can enter the workshop and explore.
You can solve the puzzle with angular symbols if you remember them from the water inside the city gates, the one you cleaned with the net.
Take a crystal then take a look at the machine on the left. Take the small sun key (1/4) and small scissors. Now put the broken artifact here and the crystal in the hatch to the left.
Go to the jungle where the lemur is sitting on a chest and offer it your grapes to get access to the chest and get the wine vinegar.
Go to the Alley of Light and pour the vinegar over the rusted plate on the totem here, use the cloth next to it to wipe it out and remember the symbols:
- snowflake (4 arms) – 2
- rhombus letter – 8
- M – 4
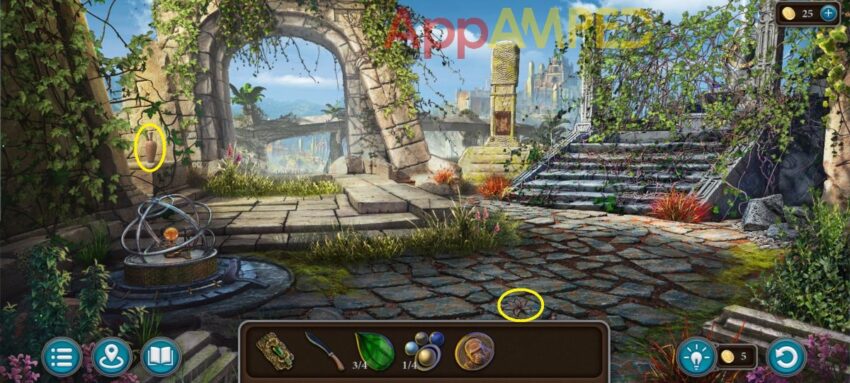
Now go to the pavilion where the balloon is and enter that code 284 to open the gate and find an iron petal (1/4). Go in front of the city gates and use the small scissors to get another emerald leaf (4/4) from the pavement in front.
Go to the jungle and put the leaves on the railing at the bottom of the stairs. Move the stones to arrange the gems in ascending order.
- bottom left – bottom left – top middle – top right – top right – top right – top middle – top left – bottom right – top middle – bottom left – top middle – bottom right – top right – top middle – top left – bottom left – top middle – bottom right – top right – top middle – bottom left – top middle – bottom right – top middle – top left – bottom left – top middle – top right – bottom right.
You’ll find a stone key. Go to the manor and inside the gate then put the stone key on the stone mechanism here. Get the diving helmet, the planet (2/4) and the lever. Use the helmet on the pond here to find all triangle to open the gate within the time limit.
Note: there is a lever on the side of the wall that opens the gate underneath.
You’ll find a neocube behind the gate. Go to the city gates and put the neocube on the stone table then place all the blocks on the sides and don’t leave any empty space.
You’ll find a planet (3/4) and a flask. Go to the workshop and put the flask in the machine replacing the broken one. Adjust the liquid to reach the red mark.
- Put the one with 6 first, then fill the one with 2, then the one with 1, and lastly the one with 3.
Push the button of the machine to fix the artifact, take it when it comes up, you’ll also find a snake medallion next to it and find a way to charge the artifact.
Go inside the city gates, put the lever on the left wall in its place and push. Go to the lowered platform and take the iron petal (2/4). Go to the manor at the stone table and put all 4 medallions here.
Move the warrior to remove all animals: diagonal left up – down – right – diagonal up – diagonal up – right – down – diagonal up – right – diagonal down – up. Take the iron petal (3/4) and the planet (4/4).
Go to the Alley of light and put all the planets on the system to the left. Read the decree, then take the wire, small sun (2/4) and palm tree. Go to the gates where the balloon is and put the palm tree here to open it.
Take the casting mold and the last iron petal (4/4). Look under the vase on the left to get a fish. Put all iron petal on the vase to the right and remember the symbol inside.
Take a closer look at the broken bowl on the ground, use the wire to fix the chain then take the stick behind it and push the other bowl over the edge to get a handle. Use the handle to pull over the balloon and get the small sun (3/4)
Go back to the jungle, take the left path to the crystal place and put the fish in its spot in front of the pond. Tap the dots to create the pattern in the vase.
Walk over the steps that pop up, push the red button on the table in front of you and move the flowers and place them in the same shapes.
- yellow 4 down then green moves right in its place.
- red pushes yellow 4 times.
- yellow moves up 2 spaces then blue moves left 1 space.
- red moves left 2 times, and yellow pushes blue down 1 tile.
- red pushes blue 3 tiles to the right and yellow goes down 2 tiles.
- red moves left 2 tiles and yellow pushes it one tile up.
- red moves right 3 tiles so that blue pushes it up in its place.
- yellow goes all the way up in its place, then blue goes left all the way under yellow.
- yellow then pushes blue down in front of its place, and blue goes 1 left in there.
- lastly yellow moves all the way up in its place.
You’ll find a small sun (4/4) and a fire symbol. Go to the workshop and place the fire symbol in its place to light up the machine. Put the casting mold on the table under and push the button in the wall.
Break the mold and use the tongs next to the machine to get the big sun key. Go outside and use it and the small suns on the door in the city square on the left.
Rotate the frame and align the chips so they are next to their matching colors and get to the Reactor Hall.
- left – left – right – right – right – right – left – right – right – right – right – left – right – right – left – right – right – right – right – left – left – left – left – left – left – left – right – right – left – left – right – right – right – right – right – right – right – left – right – left
On the device to the left you can put the artifact, then go to the levers on the right and pull them up and go find another fuse. Take the control glove from the skeleton on the ground when you’re looking at the fuse.
Go outside and put the control hand on the stone globe in the city square and take the lightning. Go to the Reactor Hall and put it on the right wall in its place. Take the fuse and replace it with the broken one.
Pull the levers again and look on the monitor to stabilize the parameters. Align the waves using the controls on the panel.
- 1st wave lights: 4 yellow – 7 pinks – 6 blues
- 2nd wave: 3 yellow – 6 pinks – 2 blues
- 3rd wave: 3 yellow – 9 pinks – 6 blues
- 4th wave: 8 yellow – 3 pinks – 6 blues
Once the artifact is recharged, the chapter ends.
Collectible
I circled most collectibles in each area to be easier to spot.
Runes:
- In the grass in the middle of Egil’s house.
- On the path through the forest that leads to the port.
- At the port, on the wooden planks forward.
- At the beach on the island in the bottom left corner.
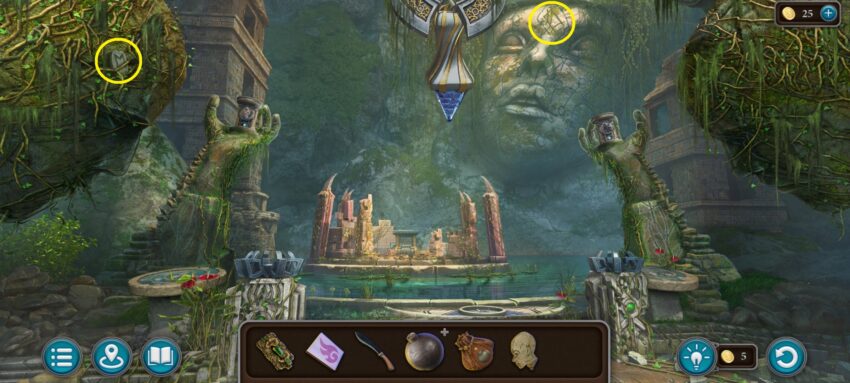
- Between the vines of the head to the left at the Kainbekh.
- At the manor on the island, on the bottom right, on the ground.
- In the water in the room inside the city gates.
- In the workshop above the puzzle.
- On the right when you enter the Reactor Hall.
Lilies:
- On the chimney of the outside stove of Egil’s house.
- On the rock wall in the jungle above the chest.
- On the stone to the right at the city gates.
- On the wall to the left at the city square.
- At the Alley of Light, on the pavement right in front of you.
- On a stone near a statue on the city street, where the balloon is.
Manuscripts:
- Under the trap door in the floor inside Egil’s house.
- At the beach on the island, inside the hut.
- At the Crystal room after you solve the flower puzzle over the piranha pond.
- Inside the Reactor Hall behind the lightning.
Morphing Objects:
- A bell/kettle next to Egil’s house.
- Under the table to the right there’s a boot.
- A nest on a fallen tree to the left on the path that leads to the port.
- A cage on the left on the crates at the port.
- The tiny boat on the sea, when you arrive at the beach on the island.
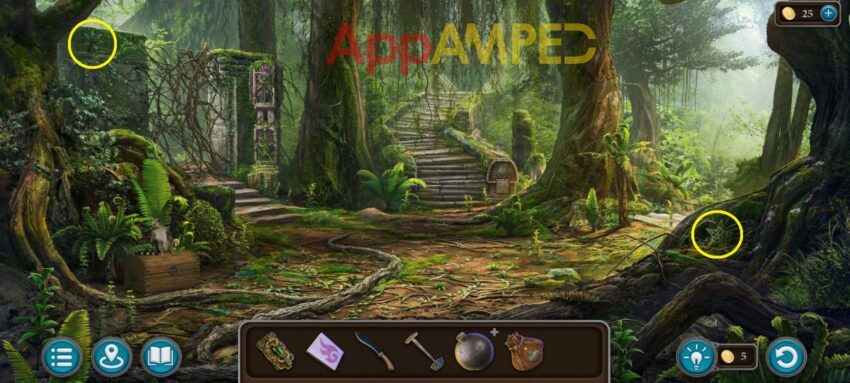
- Star/heart at the base of the roots on the right in the jungle.
- Symbol in the forehead of the giant stone head at the Kainbekh.
- At the balcony on the left, at the manor in the jungle.
- A spring on the vines around the City Gates on the island.
- Pipe/spoon on the ground to the left inside the city gates.
- A vase/hourglass at the Alley of Light on the left.
- The roof of the pavilion on the city street, where the balloon is.
- Inside the workshop in the top left corner there’s a horseshoe/magnet hanging.
- Next to the stairs after you enter the Reactor Hall.
Wrapping up
2nd chapter of Legendary Tales 5 is finished and the story is getting better and better. Don’t miss out on my next walkthrough article for Legendary Tales 5 Chapter 3 – Downfall.
In the meantime you can also have a look at other Five BN games and the walkthroughs I wrote for Artifact Seekers – Santa’s Manor or Pirate Bay.

Aylin is a content creator and co-founder of App Amped. She was a huge Tomb Raider fan before moving on to more casual titles. She spent way too much time tending for her FarmVille farm as well as playing text-based browser games. Now she plays and writes about mobile games, creating in-depth walkthroughs and useful guides.
Anytime soon? 🙄😊
Uh oh! Working on it. Hang in there! If not today, I’ll finish it tomorrow for certain! Sowwy!
I appreciate it. I’m sure it takes so much time doing the written ‘narration’. But the videos can ruin it if you are just checking for something you’re stuck on!
I love Five-BN and jump on them when they have something new out!
Thank you!
Oh definitely! I could simply give the codes or the solutions for the puzzles, but sometimes I just need to find the easy solution and the best way to explain it. Then maybe half-way through you decide you can handle it and finish the mini-game yourself. I find videos harder to follow as well. In a written walkthrough you can use the search function and find the puzzle you’re stuck on, videos don’t have that.
Came here to say that! Thanks so much for this!
Hey! I appreciate you for stopping by! You’re great! Thank you for reading my walkthroughs! <3
Thank you!!