
Navigate every stage of Artifact Seekers: Poltergeist House with ease using this walkthrough that has all riddle solutions and challenge codes.
“Reach out to the other side and restore peace to the troubled suburb.”
Investigating an estate overrun by vengeful phantoms can quickly become overwhelming, but order can be restored to the neighborhood with the proper approach.
Lean on these instructions to overcome every brain-teaser and spatial obstacle encountered during this supernatural investigation.
Poltergeist House Walkthrough
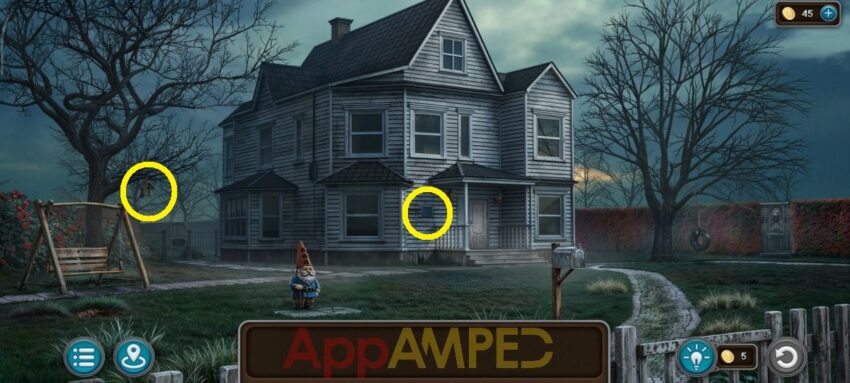
Note for collectibles: There’s a morphing object and a necklace behind the blue panel on the house. I circled them for you. There’s a bell* under the swing in the mud pad that I found later in the game.
Check out the swing on the left to find the Ouija Board and a leaf (1/2). Go to the tire swing by the tree to get a flashlight.
Use the flashlight in the hole under the blue panel on the house. You’ll find a key you can use to open the front door after you get the lion (1/5). Now you can go inside into the lobby.
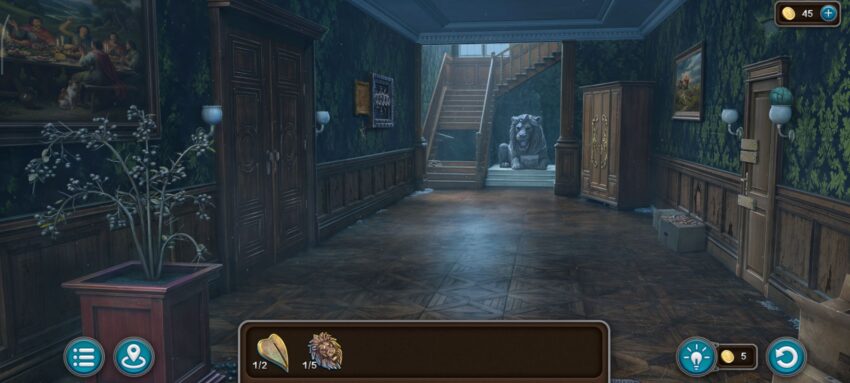
Note for collectibles: There’s a morphing object, a yarn, and a bell* inside the wall under the painting. I circled them for you.
Go to the stairs, move the cloth to find another lion (2/5). Check out the door on the left, open it, and go inside to talk to a resident about the ghosts here.
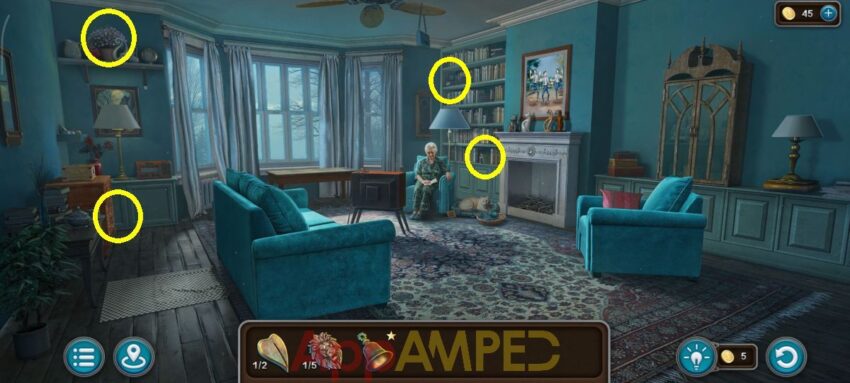
Note for collectibles: There’s a morphing object, a yarn, a bell*, and a flower*. I circled them for you.
Open the glass case behind the armchair and take the lion (3/5) and shield (1/3). Look over on top of the TV and take the other lion (4/5). The last lion (5/5) is on the fireplace next to the cat statues.
Go outside to the gate on the left, and use the lions to open it after you solve the puzzle. Place the tiles so that the number of dots on their touching sides matches. Tiles with arrows can only move in the indicated direction.
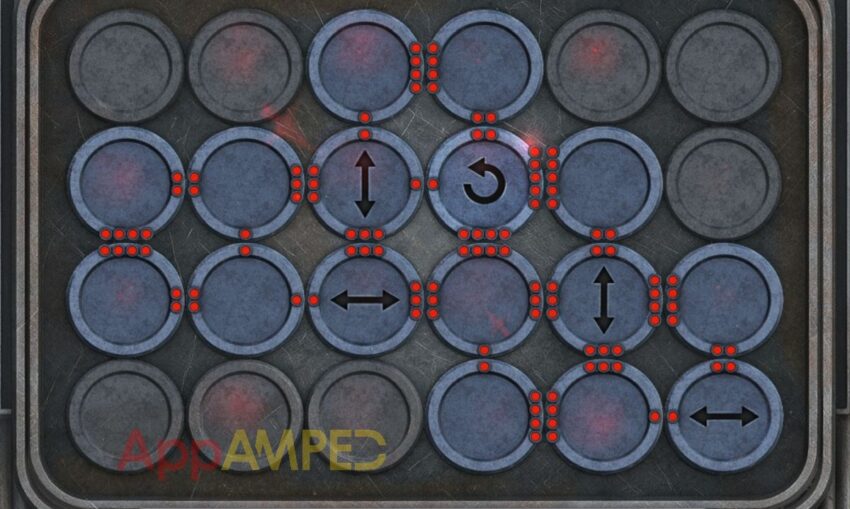
Once you open the gate, you can go through to reach the backyard and explore your surroundings.
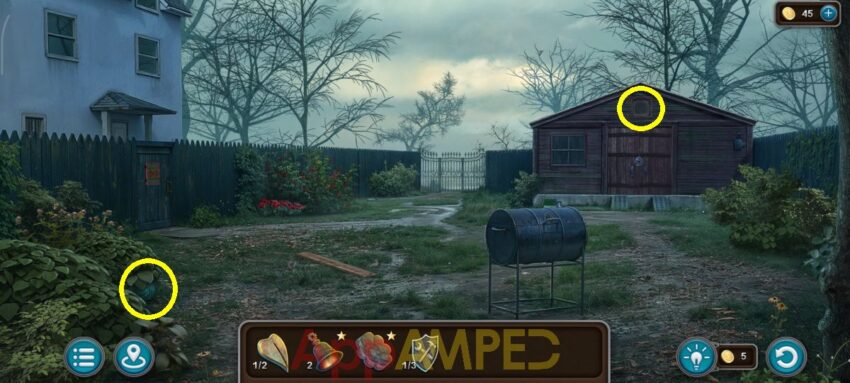
Note for collectibles: There’s a morphing object and a yarn. I circled them for you. There’s a ring* in the coals inside the barbecue.
Take the board (1/2) on the ground and the shield (2/3) under the barbecue. Check out the gate in the back and take the leaf (2/2). Now go back inside the living room and use the leaves on the box on the left.
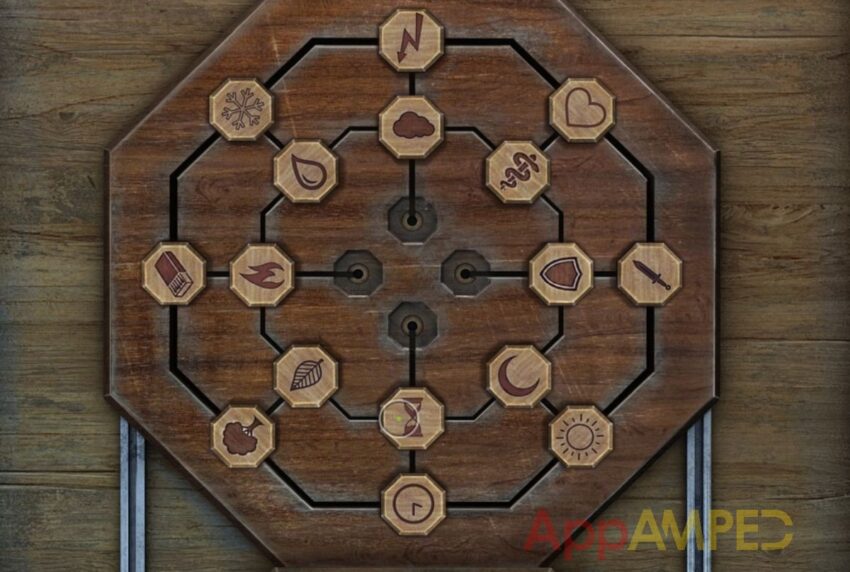
Place the chips so that their sharp ends point to the matching symbol opposite them. Use the mechanism in the center to rotate the tiles.
Take the key and the powder. Go to the backyard and use the key to open the shed, then go inside to explore.
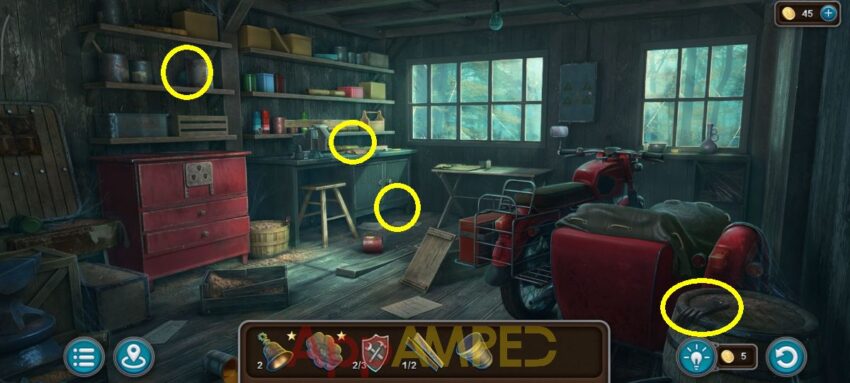
Note for collectibles: There’s a morphing object, a flower*, a bell* and a yarn. I circled them for you.
Go to the workbench, take the nails and the shield (3/3). Use the shields on the red cabinet on the left. Place the numbers between the inequality signs to obtain correct equations:
- 2 5 4
1 6 3
7 9 8
Take the wire cutter and hammer. Use the hammer on the loose board on the floor to find a symbol (1/4). Go into the lobby and use the hammer on the door to the right to remove the nails and take the handle.
Go to the shed and use the handle on the vice to get the board (2/2). Go back to the lobby, use the boards, nails, and hammer to fix the hole in the stairs and be able to go upstairs.
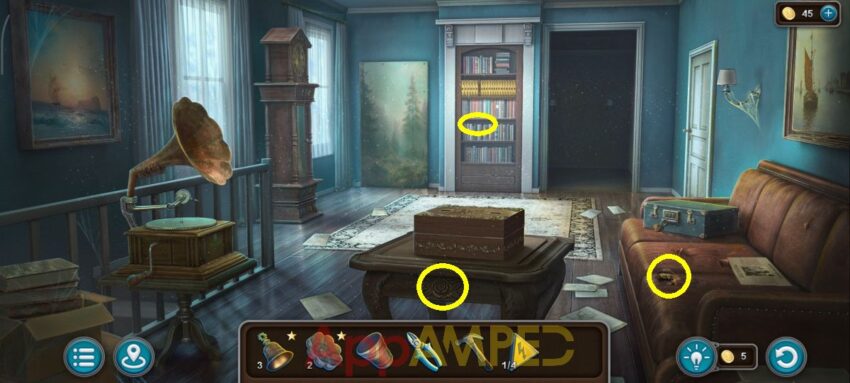
Note for collectibles: There’s a morphing object, a ring*, and a necklace. I circled them for you.
Use the wire cutters on the suitcase on the couch to get the planchette. Go outside to the garden and to the Ouija board, and it will spell 3 letters: RET. This is the code for the suitcase.
Take the flame and the symbol (2/4). Go to the backyard and use the flame on the barbecue. You will find dog food that you can open at the mouth and a knife.
Go inside the shed and use the knife to cut the cover over the motorcycle. You’ll find a glove and a symbol (3/4). Go outside to the rose bush and use the glove to get the dice (1/2). Go to the garden in the front and use the knife to cut the rope of the tire swing.
Go upstairs and look at the big painting, use the knife to cut the canvas, and find a dice (2/2) on the door behind it. Put the dice on the box on the table, move the animals, and place them in the indicated places. Do it fast to get a star.
Take the symbol (4/4) and the sphere (1/2). Go inside the shed and put the 4 symbols on the electric panel. Take the handle and go to the living room. Look under the carpet behind the couch, put the handle on the trap door to open it, and restore the pictures.
Take the oil and the button (1/3). Go to the backyard and use the oil on the gate to open it. Go to the edge of the lake, take the sphere (2/2), and pike pole. Go to the living room and use the pole to get the bag from the ceiling fan. You’ll find a flag.
Go outside to the garden and use the flag on the mailbox to open it. Take the flower (1/2) and read the letter. Go into the hallway and put the spheres on the lion. Make sure there are only circles left on the board.
Take the key from the drawer, then go upstairs, and use it to open the door on the right. Go inside to explore the bedroom.
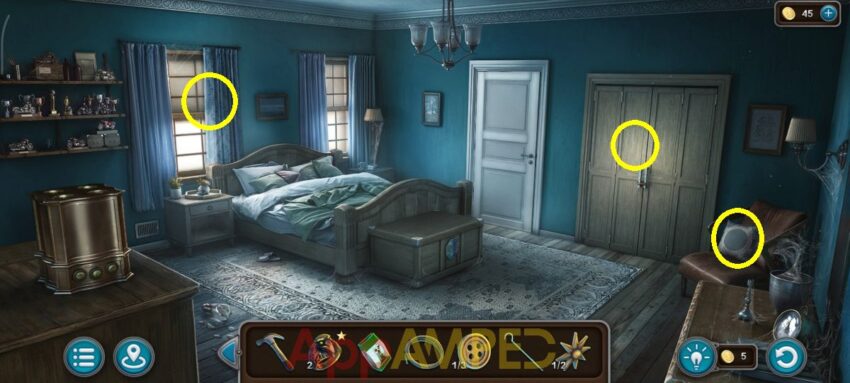
Note for collectibles: There’s a morphing object, a flower*, and a yarn. I circled them for you.
Use the wire cutters on the closet door. You’ll find a fuse and a bucket inside. Go to the shed and change the burned fuse with the new one, then pull the lever to turn on the power.
Go to the lobby and take the door on the right that leads to the basement.
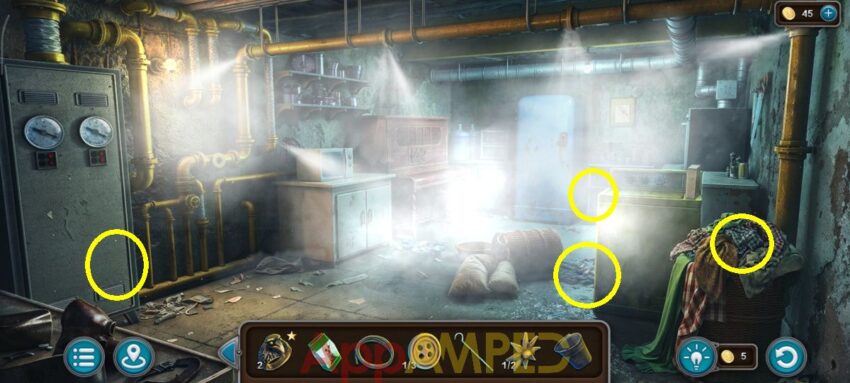
Note for collectibles: There’s a morphing object, a flower*, a ring*, and a necklace after the steam stops. I circled them for you.
Look at the pipes on the left and take the boot (1/2) from them. Go upstairs and look at the newly lit area, then use the pole to open the attic door to go up the ladder.
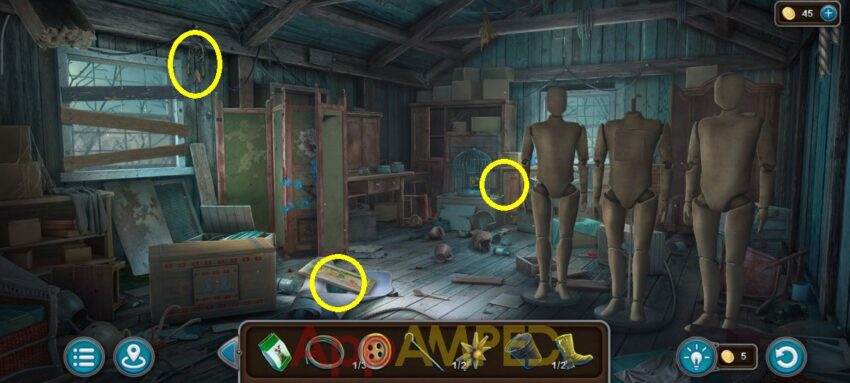
Note for collectibles: There’s a morphing object, a ring*, and a yarn. I circled them for you.
Use the hammer on the boards at the window to open it, and reach the cable with the pole to get the antenna. Take the token (1/3) next to the bird cage.
Go to the living room and put it on the TV to turn it on. The lady will give you a flower (2/2).
Go to the backyard and put the flowers on the door on the fence to your left. Move the plates and assemble a complete picture in the frame. Give the dog inside dog food and you’ll find a boot on his house.
Knock on the door to talk to the neighbor. Take the token (2/3) from the ritual instructions she gives you. Go back to the attic and put the boots on the crate there. Guide the patterned plate to the exit.
Take the valve and the fuel can. Go to the basement and use the valve to stop the steam. Look under the piano, on the chair, to find a fleur-de-lis (1/4). Look behind the bird painting and use the hammer to get the brick down and reach the plunger.
Go to the bedroom, open the bathroom door, check out the tub, and use the plunger to empty it. Take the knob and the screwdriver. Back into the bedroom at the vent near the bed, you can use the screwdriver to open it.
You’ll find a decoration (1/3) and a handle. Back to the basement to use the handle to open the fridge, take the chip (1/4), and monogram (1/3). Put the knob on the washing machine and turn them as drawn on the wall behind the pipes.
- 3 o’clock – 10 o’clock – 6 o’clock
Take the token (3/3), open the tumble, take the button (2/3). Use the screwdriver to open the hose and take it. Go to the shed at the motorcycle. Open the fuel tank, put the fuel can next to it, and put the hose in to get some gas.
Go upstairs and use the tokens on the door behind the painting. Form a pyramid on any of the side rods. A larger piece cannot be placed on a smaller one.
Go inside the office and explore.
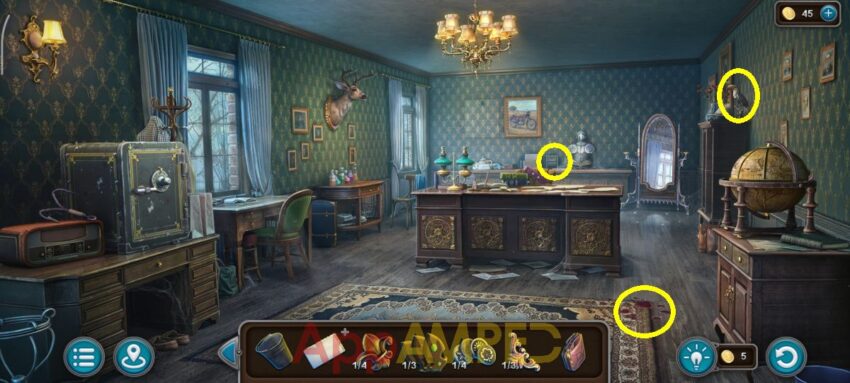
Note for collectibles: There’s a morphing object, a flower*, and a necklace. I circled them for you.
There’s a desk on the left and a paperclip inside the agenda. Take the hook next to the safe. Add the rope to the hook. Go to the backyard and then to the boat. Use the grappling hook to pull the boat closer and look inside.
Take the duck and Fleur-de-lis (2/4). Put gas in the tank to start the boat and go on the other side to the cemetery.
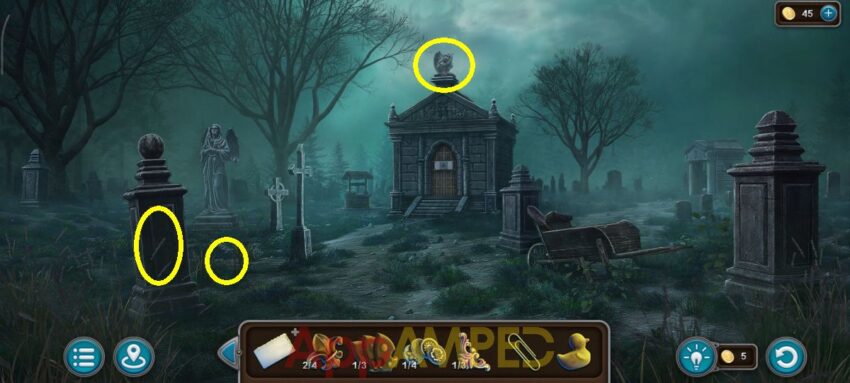
Note for collectibles: There’s a morphing object, a necklace, and a ring*. I circled them for you.
Take the shovel from the cart. Check out the tree behind the crypt and take the button (3/3) using the pole. Go to the garden and use the buttons on the hat of the dwarf and make sure all the spotlights point towards the center.
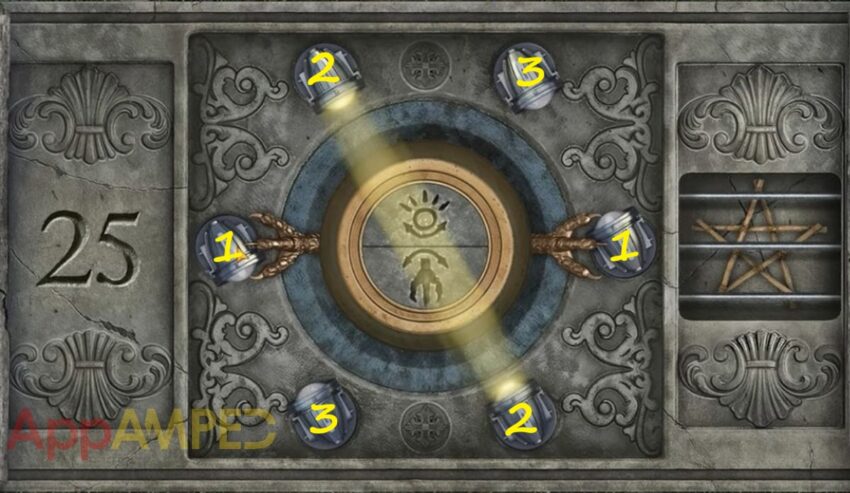
- Keep the 1s still and turn the lights once
- Keep the 3s still and turn the lights to get it done quickly.
You’ll get a star if you do it within 25 moves. Take the handle and the knob. Go to the living room and use the paper clip to open the red bag on the armchair to find a Fleur-de-lis (3/4).
Go to the well and tie the bucket on the rope there, then put the handle to lower the bucket and get some water in the cup. Go to the bedroom and put the duck on the cupboard in the bathroom, you’ll find a soap.
Go to the attic, use the pole to get the thyme from the ceiling. Check out the desk on the left to find a recipe for making candles.
- Put the soap here, open the cupboard, and put the pot on the little stove.
- There’s a gas can in the cupboard that you need on the stove to turn it on.
- Put the soap into melt.
- Use the salt on the bottom left corner and put over the melted soap.
- Take the file on the shelf and get some powder of the circle on the bottom left corner.
- On the table behind the box is the handle for the drawer where you’ll find a can opener.
- Use it to open the garlic jar and put some in the mortar, then find the pestle to crush it and put that in the pot.
- Behind the herbs on the shelf there is a bottle that has a thread you need.
- Find a pair of pliers behind the bottles on the first shelf to use to open the box and get the other side of the candle shape.
- Put the thread in the candle shape, close, make it stand, pour the liquid candle, take out the candle, and repeat.
Take the 2 candles and go to the shed. Use the knob to open the cupboard on the workbench. You’ll find one last Fleur-de-lis (4/4) and some chalk. Put all the ingredients in the ritual recipe.
Go to the office at the knight armor in the back. Put the Fleur-de-lis on the chest and remove all the chips from the board. Chips can only move by jumping over each other.
You’ll find a lighter. Look at the mirror in the back and use the ritual items. Draw a picture using one line according to the hint.
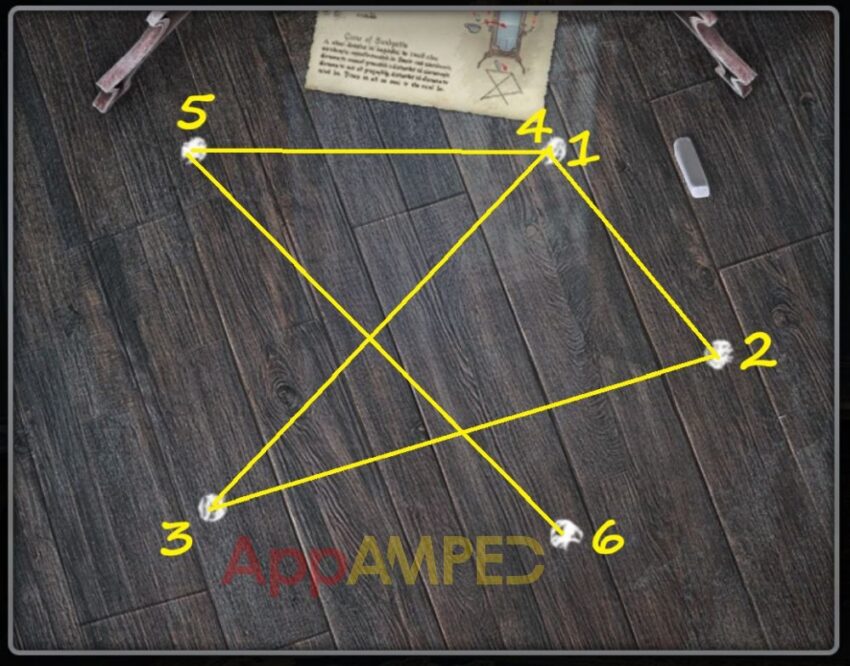
- Put the candles on each side of the mirror and light them with the lighter
- Add the thyme to the water
- Pour the thyme water over the mirror
Talk to Reginald and then take the decoration (2/3) after the mirror is broken and you open the back of it. Check out the bottles on the desk under the reindeer head. Use the powder to put on the space in front of them, then sort them out by shape.
Take the gem and go to the cemetery. Put the gem in the hands of the angel to show you where to dig with your shovel to find a decoration (3/3). Put the decorations on the door of the crypt. Arrange the tiles so that they form the symbols shown.
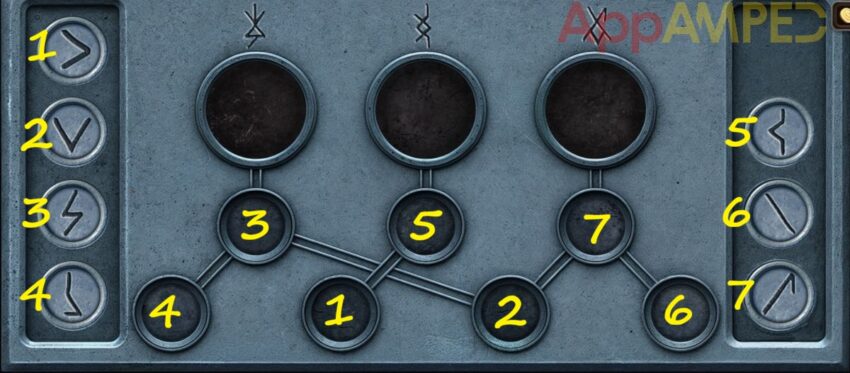
Enter the crypt and use the lighter to light the candles on the sides, then explore.
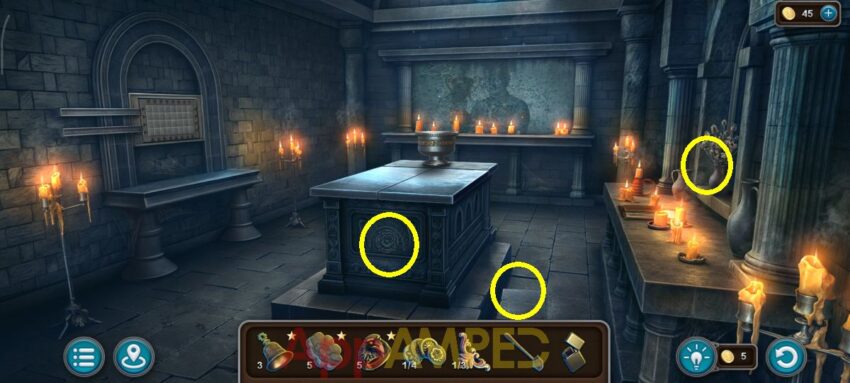
Note for collectibles: There’s a morphing object, a necklace, and a bell*. I circled them for you.
Read the book on the table to the right, then take the painting. Go talk to the neighbor again, she’ll need her crystal ball. Go to the office and put the painting next to the other one and find the 10 differences.
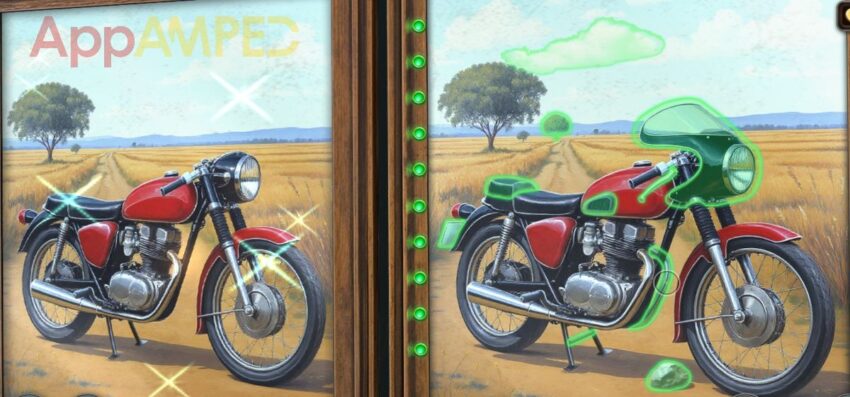
Take the treble clef and cat figurine. Go to the living room and get the crystal ball from the armchair in front of the TV. Put the figurine over the fireplace and take the book.
Go to the basement, use the treble clef on the piano to find another monogram (2/3). Go upstairs and put the book in the bookcase in front of the stairs; you’ll find a note and a bird.
Go to the attic, put the bird on the cage, take the ship, and go into the office at the globe. Put the ship here, take the chip (2/4), and the stencil. Go to the lobby and use the shovel to dig up the pendant from the potted tree.
Go and give the neighbor the crystal ball so she will give you the powder. Go to the crypt and put the stencil over the puzzle on the left wall. Move the rows of shapes using the arrows and place them as shown in the hint.
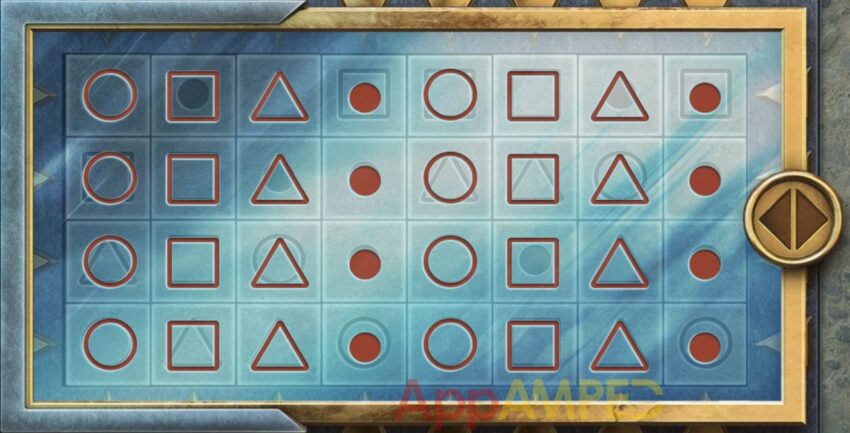
Take the key, go to the motorcycle in the shed, at the box on the left, and use the key to open it. Take the goggles, brush, and monogram (3/3). Go to the lobby and check out the closet, then use the monograms to open it.
Take the patch, move the clothes to the side to find the weights for the clock upstairs. After you open the clock, you’ll find a head and a sun.
Go to the attic and put the head on the mannequin. Position the limbs as you’ve seen in the painting on top of the fireplace in the living room.
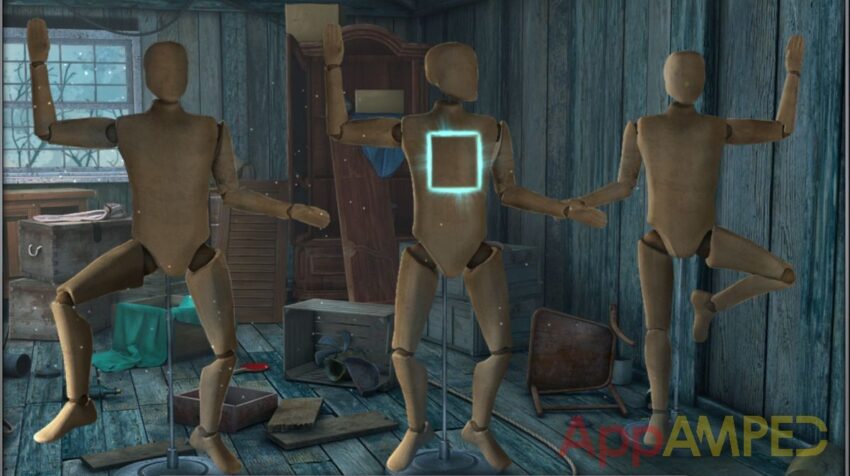
Take the chip (3/4) and the moon. Go to the bedroom and use the sun and the moon on the crate at the foot of the bed. Distribute the chips into logical pairs. The central circle must remain empty.
Take the record and the wrench. Go outside in the hallway and put the record on the gramophone, put the needle on, and make it play to find the last chip (4/4). Go to the office and use the wrench to take down the deer head to find the code 37954.
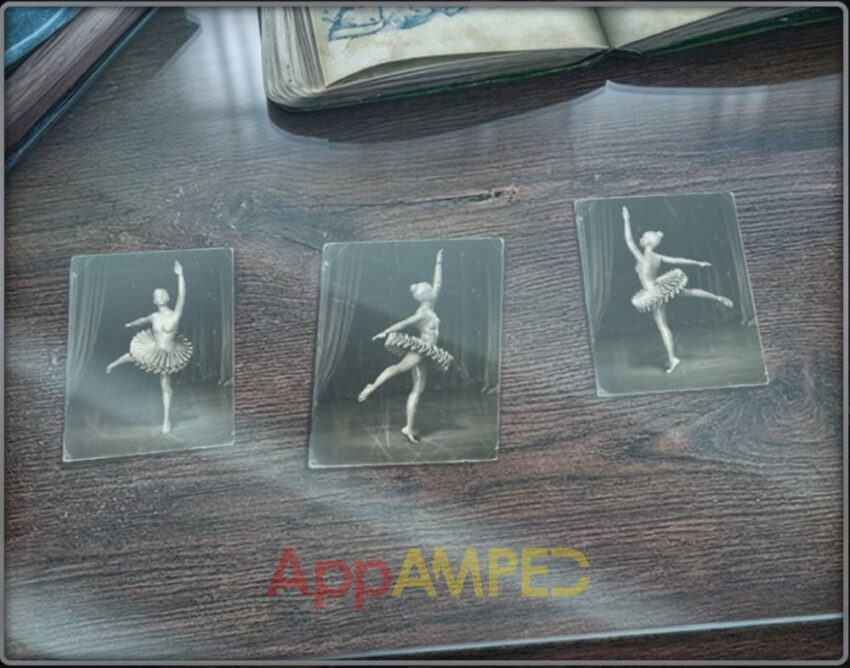
Use the code on the safe on the table and stop on each digit to open it and get the cup inside. Go to the bedroom and use the chips on the device on the table. Position the ballerina in the three correct positions as you seen in the office at the desk on the left.
Go to the crypt and use the brush to scrape the picture of Reginald and see him clearly. Then put all the items you gathered in bowl: pendant + goggles + patch + cup + watch + powder + lighter
He’ll give you the star to win the game. You can get the other 7 stars from the collectibles you’ve gathered, and another one once you find your way into the Secret level.
Poltergeist House – Yarn Star
You’ll find the yarn station with the cat in the living room to get your star.
Poltergeist House – Morphing Objects Star
You can find the morphing object station in the attic to get a star.
Poltergeist House – Necklace Star
You can find the star for the necklaces you gathered behind the dog’s cage in the neighbor’s yard.
Poltergeist House – Flower Minigame Star
The Flower Minigame stars can be found in the lobby on the wall. Move the watering can and rotate the maze with the arrows to reach the flower. You lose a life if the watering can lands on a cactus cell.
Flower Minigame Star – Level 1
Flower Minigame Star – Level 2
Flower Minigame Star – Level 3
Flower Minigame Star – Level 4
Flower Minigame Star – Level 5
Poltergeist House – Ring Minigame Star
The Ring Minigame stars can be found in the basement, on the wall in front. Place the indicated number of balls next to each bead.
Ring Minigame Star – Level 1
Ring Minigame Star – Level 2
Ring Minigame Star – Level 3
Ring Minigame Star – Level 4
Ring Minigame Star – Level 5
Poltergeist House – Bell Minigame Star
The Bell Minigame stars can be found in the cemetery, the monument stone on the right.
Bell Minigame Star – Level 1
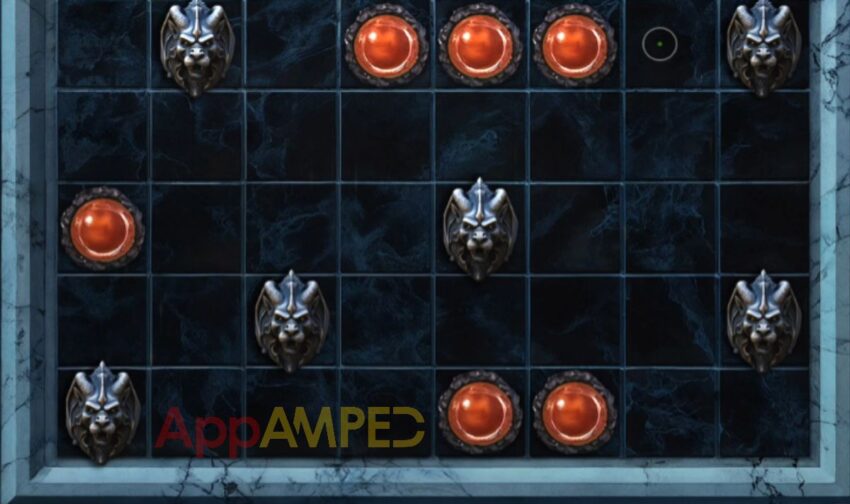
Bell Minigame Star – Level 2
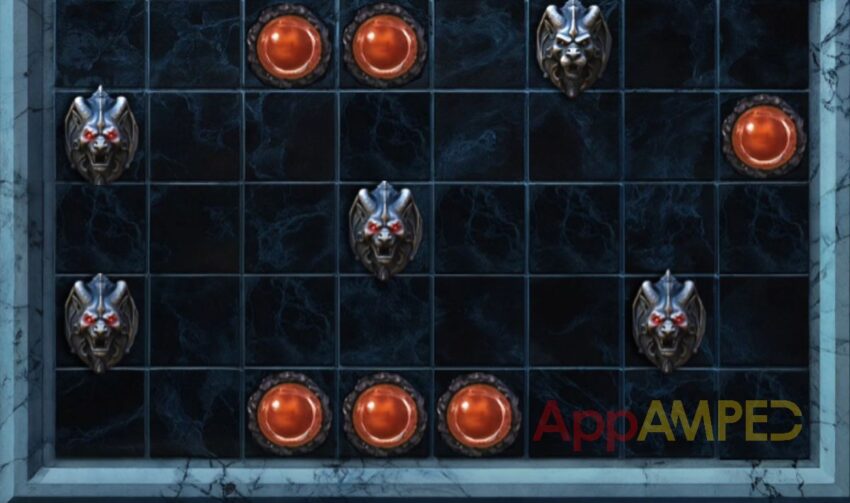
Bell Minigame Star – Level 3
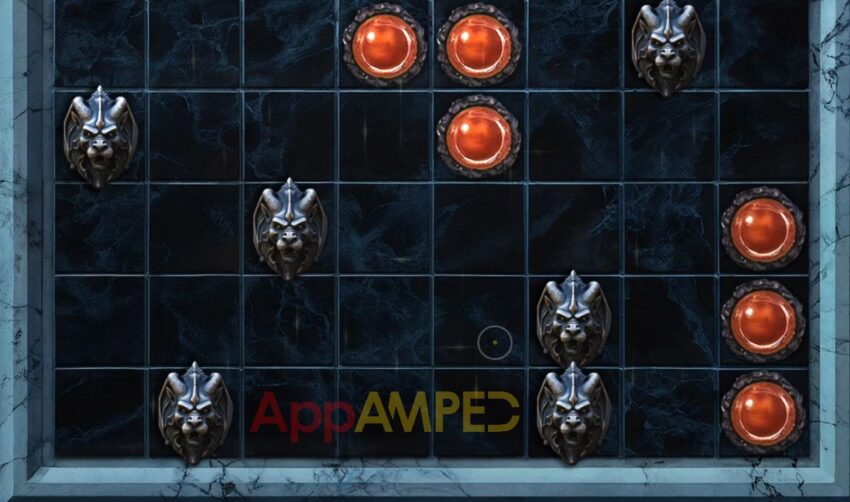
Bell Minigame Star – Level 4
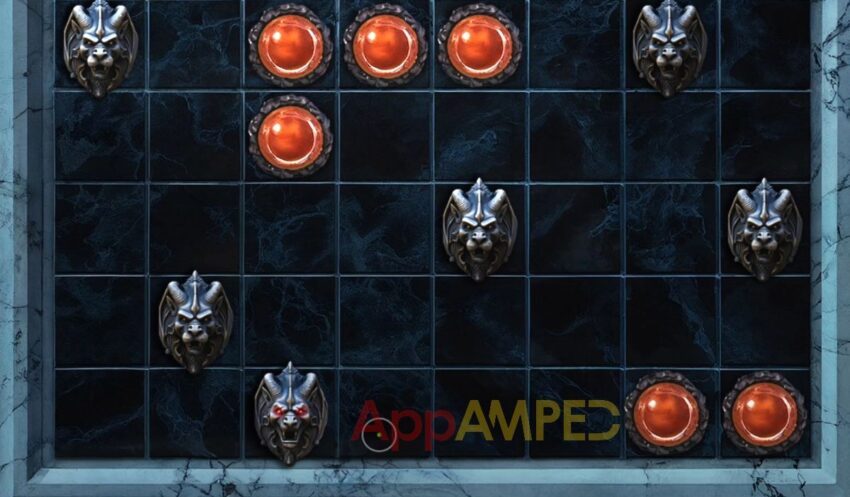
Bell Minigame Star – Level 5
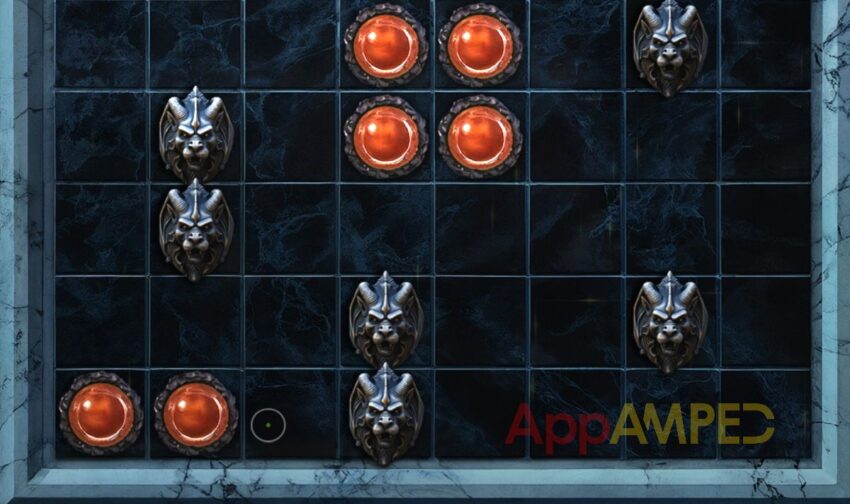
Poltergeist House – Secret Level Star
The Secret level can be opened with a clue from the TV in the living room and the lion on the fence in the garden. Change the channel on the TV to 4 and remember the numbers and their location.
43
26
Go to the lion in the garden and press each button on its side the number of times you saw on TV, then go through the maze. Find all 10 medals and reach the star at the end of the maze.
The medals are hidden in the green fence throughout the maze, on the ground, at each dead end you find. Once you find all 10 medals, you find your way to the star and put them there to get it.
Wrapping up
Ending another story in Artifact Seekers with all collectibles found is definitely a nice accomplishment in the HOPA game world. Looking forward to more episodes for this game with interesting puzzles and logic games.
If you’re looking for more challenges, try some of the previous episodes like Artifact Seekers – Witch Wood or maybe Artifact Seekers – Dragon’s Castle. See you next time!

Aylin is a content creator and co-founder of App Amped. She was a huge Tomb Raider fan before moving on to more casual titles. She spent way too much time tending for her FarmVille farm as well as playing text-based browser games. Now she plays and writes about mobile games, creating in-depth walkthroughs and useful guides.