
Get a good look at 50 Tiny Room Escape Level 20 walkthrough with all the clues to help you escape and get the character out for good.
In my last walkthrough for 50 Tiny Room Escape level 19, we encountered more puzzles and patterns we had to solve to find our way out.
Follow my walkthrough below to help her get out of the final level. Here is how to open all the safes in this room.
50 Tiny Room Escape Level 20 Unlock – Walkthrough
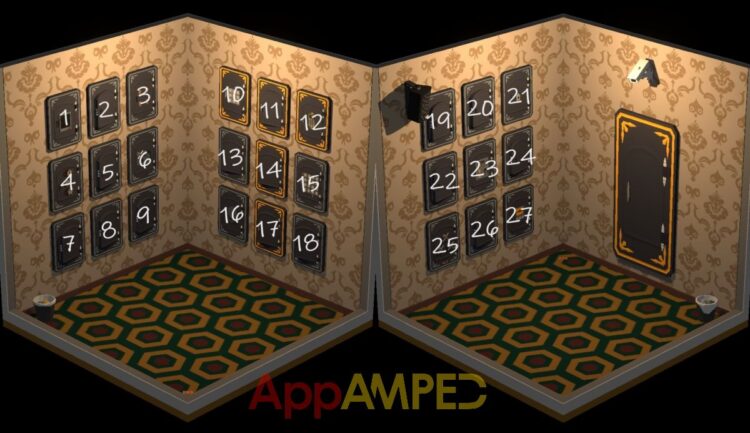
- You need to open all 27 safes.
- There are 9 safes on each wall so I’m going to give all numbers so it’s easier to guide you through the puzzles.
- Actually, 15 of them are already opened, so only 12 to go.
- Go to number 10 and press the buttons to make a T shape, like the golden safes positioned on this wall.
- Inside you’ll find a key that opens number 21.
- There you’ll find a book about safe locks.
- Safe number 25 has the same locks as the last version of the book.
- You need to enter var. 5 to open the lock, each row and column has 1 plus, 2 circles, and 2 triangles: plus – circle – triangle – circle – triangle
- Inside you’ll find a note with numbers.
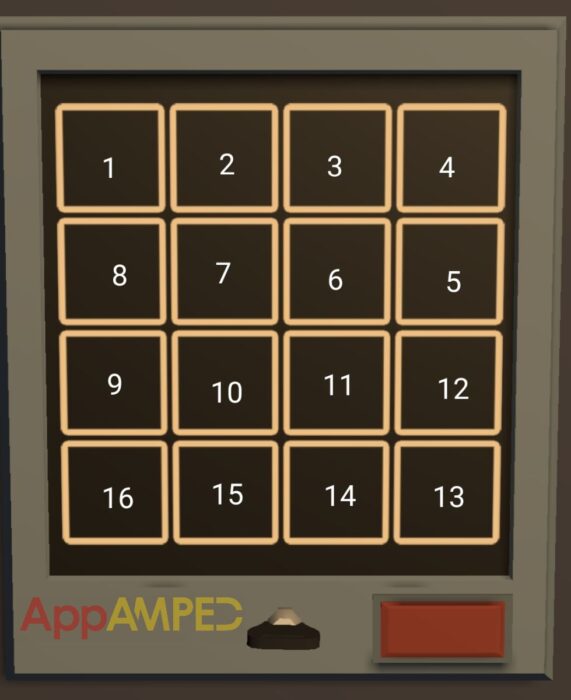
- Go to number 12 and start pressing the numbers in this order: 5 – 1 – 4 – 2 – 3
- Here you’ll find 5 books with letters and lines.
- Underneath this safe is number 15 and you will see here which buttons to press according to the books.
- A III – B I – C II – D III – D I

- Take the 3 gears and go at number 6.
- Put them in this position and twist the lever.

- The clue inside is for safe number 4:
- Y < R < X
- X = 2Y
- So looking at number 4 we can see that if X is the biggest and double Y, means:
- X = 6
- Y = 3
- R = 4
- Take the gizmo from inside and go to number 3.
- Make all the arrows here to point down to open the safe.
- Here’s a switch, and after you turn the lights off you’ll see number 16 light up.
- Put the puzzle back together by pressing the buttons, to open the safe.
- You’ll find a screen inside that goes to number 23.
- Switch the first two red levers down, and the 5th. Turn on the first yellow knob till the green light goes as far as it can, then the other yellow knob until it is fully filled.
- Now move the two green levers, first to ATT, and second to TGA.
- The note inside will help you open safe number 27.
- Shark head, middle camel, and snake tail, and here you’ll find a key for number 1.
- Press all the buttons in this order to open the safe:
- When all the doors to all the safes are open you’ll be able to escape.
Wrapping up
This was the last level for Camila, but there are more levels ahead. Follow me closely for more walkthroughs on 50 Tiny Room levels.
Next stop we’ll meet on the walkthrough for Level 21 on 50 Tiny Room Act 3 Richard. We’ll need to free him and help him reach the last level.

Aylin is a content creator and co-founder of App Amped. She was a huge Tomb Raider fan before moving on to more casual titles. She spent way too much time tending for her FarmVille farm as well as playing text-based browser games. Now she plays and writes about mobile games, creating in-depth walkthroughs and useful guides.