

Join me for a new adventure in Lost Lands X and follow my walkthrough for Chapter 1 to find all the answers and solutions to the riddles and puzzles this game has to offer.
Lost Lands X is an adventure game in the genre of Hidden Objects, with plenty of mini-games and puzzles, unforgettable characters and complicated quests.
Lost Lands X Walkthrough Chapter 1 – The Manor

You’ll start with the first task of the Mysterious Mansion and find out who its owner is. Go to the shed on the left and take the mask from the windowsill.
Look inside the crate and take the octopus key and go to the door of the mansion. Put the key there to open the door and get in.

Tap the keys hanging from the ceiling on the right and you’ll find the workshop key. and now tap the keys on the floor and in the top left corner you’ll find the basement key.
Go outside and use the workshop key on the shed to the left and go inside. Find another mask on the table to your left. Go outside and open the basement with the key left and go inside.

Pull down the crates to look under and find the toolbox where you’ll find a clamp (1/8) and a metal box containing a patterned washer.
Go to the shelves ahead and take the mask on the right and the clamp (2/8) on the left. Uncover the items under the red blanket and take a closer look to find another clamp (3/8) on the right.
Now solve the puzzle between the two statues to get Folnur’s hammer, like in the video below.
Now you can go to the Lobby of the Manor and use the hammer to break open the wooden pieces that block the passage to the living room to find Kiana.

Check out the fireplace and find another mask under the ashes. Now look on the desk to find another mask and a journal. Look through the journal to find a clue for a puzzle.
Look at the cabinet on the right and go back to the lobby to find the key for it on the red wall to the left, with another clamp (4/8) next to it.
You can find another clamp (5/8) hanging from the ceiling next to the other keys, and two more clamps (7/8) on the floor among the keys.
Use the key to open the cabinet and now solve the puzzle using the clue like in the video below.
You’ll find a drawing in the frame, a clamp (8/8), and a mask under the manuscript. There’s also a fireplace sketch you can study a little.
Now go outside and to the workshop. Use the drawing on the key-making-machine and search for all the items in the hidden object mini-game in the entire workshop room to make a new key.
When it’s done put a key holder from the box on the right side and take the key. Now take a look at the Crypt. Put all the masks (6) in the right place on the door and use the key to open it.
Take the valve and the fuel tank and notice the symbols on the wall, yours are different than mine. Go to the basement and look at the bean on the other end of the room. Enter the symbols you’ve seen in the Crypt to release the barrels.
To solve the barrel puzzle, you need to fill the bottom barrel to the top by rotating the other barrels and pouring their contents down in a chain like in the video below.
Now fill the fuel tank with the flammable liquid and then put the clamps on the ladder, then take it with you.
Go to the crypt and put the flammable liquid back in its place then turn the lever on. Go back outside and use the ladder to get on the roof and open the hatch there using the patterned washer.
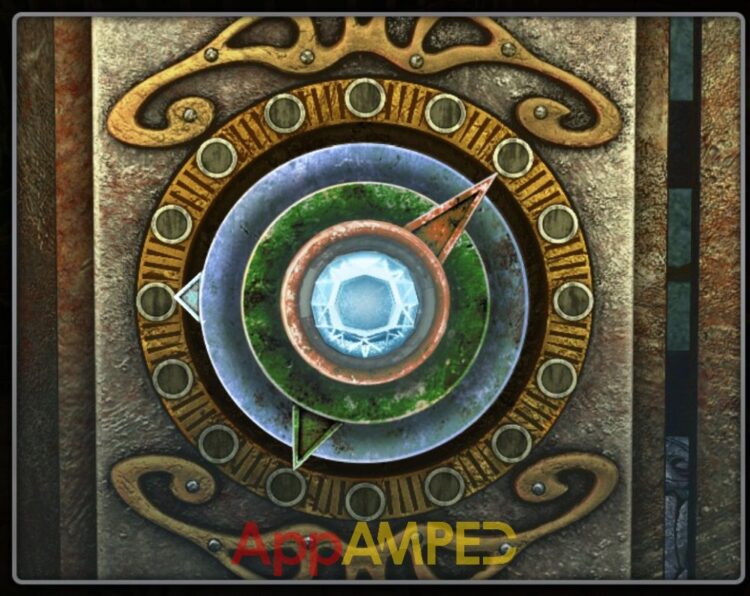
Rotate the medallion and make the parts of the rays match to open it. Go back down and use the valve on the winch right in front of you and rotate it to get the antenna in. Now rotate the other lever to get the antenna up and pull on it to make the mechanism work.
Go inside and use the hammer to break the chair further and take one of its legs to use as a torch. Go to the crypt and pour some flammable liquid onto the torch.
Go to the fireplace and put the soaked torch inside, if it doesn’t lit on the spot, just go outside and rotate the valve again, a lightning will lit the torch so get it and go to the crypt.
Use that to lit up the place and go down the stairs to look for Folnur.

Take the crystal from the robot, then move the crates away and remove the green tarp to find the chest. At a closer inspection you’ll see it is missing something. Look inside the cell and notice the medallion sitting there.
Go inside the manor, to the fireplace and take the scoop-poker, then get back here. Use that to get part of the medallion. Put it on the chest to start solving the puzzle.
Change the position of the plates to make a path and guide the chips to their places like in my video below.
You’ll find a manuscript, a hexagon of Time, and an energy core. Go inside the manor in the room with the fireplace and check out the pedestal on the left.
Put the crystal on, press the button on the left, add the energy core, press the button again to get the crystal down, rotate the lever in the front to charge the crystal and take it.
Go back to the crypt and put the charged crystal on the robot. Open the robot’s mouth to find a key and use it on his chest to open it. Put the voice box to his mouth to hear the recording and find your next task.
The code to the cell is: Red northeast – Green south-southwest – Blue west.
Use the scoop and get some Folnur ashes. Take a look at the hexagon of time and put the ashes inside to get a charged hexagon.
Go in front of the Manor and use the hexagon on the side where the ladder is to make your way to the past and find Folnur.
Conclusion
With Folnur’s fate hanging in the balance, your journey through time is just beginning. The challenges ahead will test your wits as you unravel more mysteries and face puzzles that only the bravest adventurers can solve.
Don’t stop now—the story is far from over! Follow my next walkthrough to get step-by-step help with the upcoming twists and turns, ensuring you stay on the right track.
Let’s tackle the mysteries ahead together and make sure no clue gets left behind. See you in the next walkthrough for chapter 2 of Lost Lands X – Back in Time.

Aylin is a content creator and co-founder of App Amped. She was a huge Tomb Raider fan before moving on to more casual titles. She spent way too much time tending for her FarmVille farm as well as playing text-based browser games. Now she plays and writes about mobile games, creating in-depth walkthroughs and useful guides.
Great walkthrough. Now need the same for lost lands 11
Agree! Working on it! :))