

This walkthrough for Escape Room: Ally’s Adventure Level 1 has all the answers and clues explained for you to solve it.
Ally’s Adventure is a game that keeps changing and offers many surprises. Move through lots of challenges, figure out tricky puzzles, and beat smart enemies. Each level brings new problems to solve, making the game so fun that you can’t stop playing.
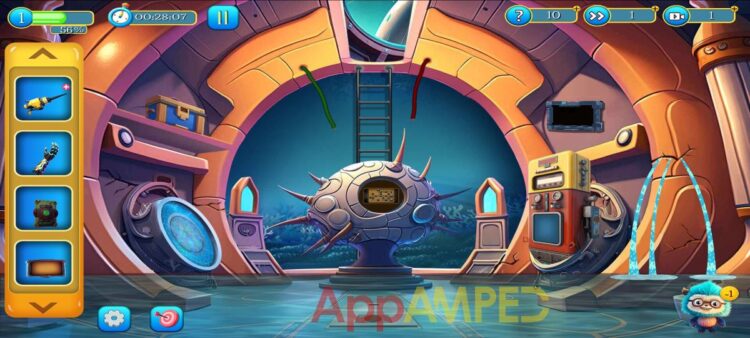
Ally’s Adventure Level 1 Walkthrough
Objective: Get inside the ship

- Check the object on the right, it’s a power cell you can take.
- There’s a bag right in front of you that you can take and look through.
- Inside there’s a poison gun that requires the power cell.
- Drag it to the gun to make it functional.
- Use the poison gun on the carnivorous plants and take the shield projector.
- Activate the shield projector over the lake so you can each the rock on the left and take the chip.
- Then the object on the rock to the right and add the chip to it.
- It will show you a bunch of symbols.

- Now you can go to the ship in the middle of the lake and arrange the symbols the same way as shown above to enter the ship.
Objective: Fix the ship

- Check the globe on the left, open it and take the metal piece.
- Look at the shelf above the astronaut suit and take the metal orb.
- Above the pink sphere, there’s a spanner you can take.
- Now go to the command cabin in front and look around.

- There’s a screwdriver on the floor, a tab next to the chair on the right, and a access key on the small box on the wall to the right.
- There’s a screen next to the chair to the left.
- Push the button to open and you’ll see a grid and a few marked places on it:
- Z9-X2-R6-A0-H7
- To the left there’s another screen with red and green buttons.

- Go back to the first room, check the screen with green and red buttons, and make the same pattern by using the nubs under it.
- As it opens you’ll find a robotic hand inside.
- Go to the electric panel on the left and use the screwdriver to open it and take the sealing gun.
- Go down through the hole and look around.
- Take the ship monitor from the wall on the right, high off the ground, and press play to see the code:
- GF09T7
- Check the tool box on the shelf to the left and drag the access key to open it.
- Swap the symbols and place them in the appropriate place.
- When it opens you’ll find a motor.
- Use the robotic hand to go through the portal, the blue circle under the toolbox.
- Take the spacesuit glass.
- Put the motor on the big machine near the leaking water.
- Go back to the command cabin and enter that code on the keys to your right.
- It will give you another metal piece that goes with the other metal piece and form a metal disk together.
- Put the metal disk on the metal orb in your inventory to find the seal liquid.
- Use that on the sealing gun to be able to use it.
- Go to the first room and put the spacesuit glass on the space suit.
- Take the pipe and go downstairs to the crack under the cabin.
- Use the sealing gun on the crack where water is coming from.
- Put the pipes on the motor and use the spanner to tighten them.
Objective: Activate weapons system
- Look at the hatch on the floor and find the matching symbols.
- If you touch unrelated symbols the board will shuffle.
- You’ll get an access card from here.
- Go to the command cabin and use the access card on the back of the chair.
- Go down once more and pout the tab on the support on the wall, then connect the wires next to it.
- There’s another set of numbers and letters on a grid:
- X9-R2-Z6-A0-H7
- Go up and on the screen above the other stairs.
- Look at the two codes and see which letters are the same in both:
- Z9-X2-R6-A0-H7
- X9-R2-Z6-A0-H7
- Write A0H7 to open it and get connector cables.
- Go down and connect those to the system.
- Look at the panel on the big sphere and solve the puzzle.
- Send the target voltage to each end, but each symbol divides the power by a specific number.

- Go to the control cabin and switch on the lever on the chair to finish your last objective.
Wrapping up
Now that we’ve finished the first level of Ally’s Adventures, we have a good feel of how the game is going to be.
I’ll see you back here for more Escape Room: Ally’s Adventure walkthroughs, I’m sure of it, as I know you had as much fun as me with this casual and cute game.

Aylin is a content creator and co-founder of App Amped. She was a huge Tomb Raider fan before moving on to more casual titles. She spent way too much time tending for her FarmVille farm as well as playing text-based browser games. Now she plays and writes about mobile games, creating in-depth walkthroughs and useful guides.