

This is the best walkthrough for Connected Hearts Season 1 Episode 3, where you’ll find all the answers and solutions you need to finish it.
Connected Hearts Episode 3 is a hidden objects game filled with adventure, where love and courage help defeat the wicked witch and preserve the purity of the kingdom.
Connected Hearts Episode 3 – Cost of Beauty Walkthrough
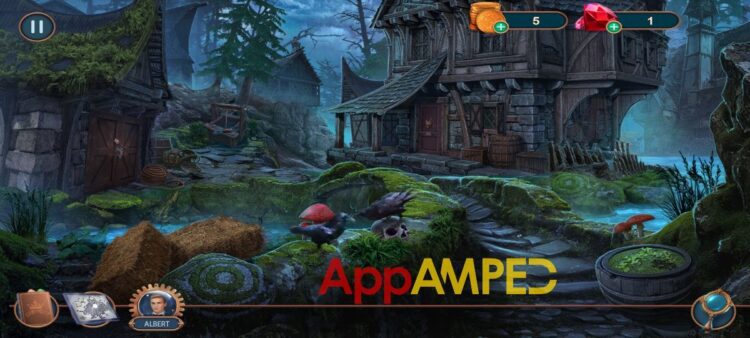
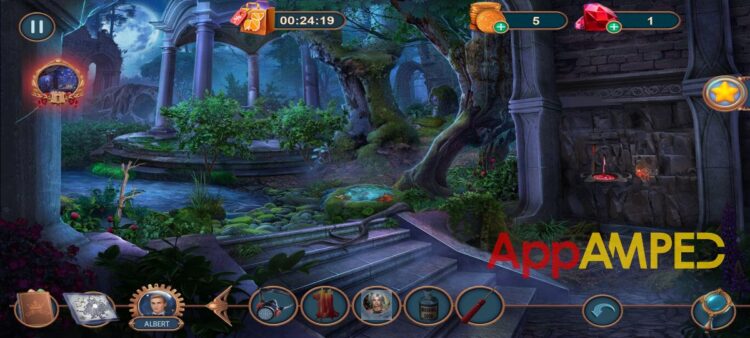
Task – Get information on Rachel’s current location.
- Move the hay away, look at the wooden planks, and take the matchbox.
- Look at the well and take the candle and the bolt cutter.
- Check the doors of the toolshed and get the weather vane and respirator.
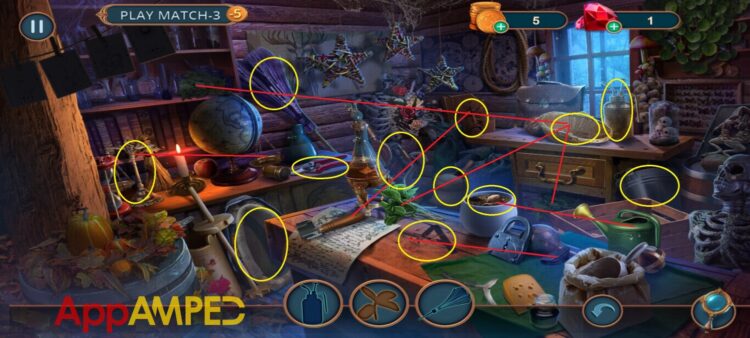
- Use the bolt cutter to cut the chain and go inside to play a hidden objects game.
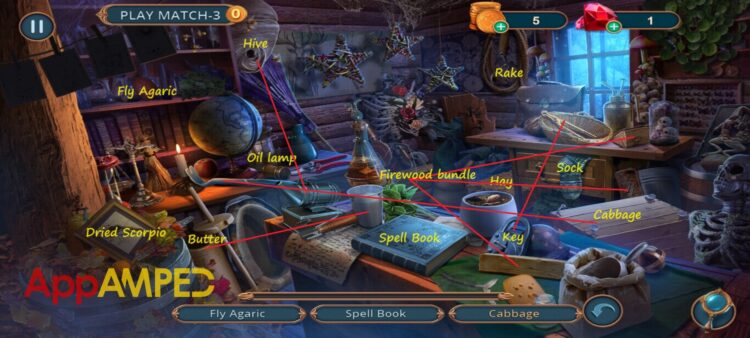
- Drag all three wood pieces to the firewood bundle.
- Use the crowbar to open the crate and take the cabbage.
- Use the smoker to settle the bees and take the hive.
- Put the milk into the butter maker to make butter.
- Use the pliers to get the key out.
- You’ve found a barrel.
- Use it like a wheel to move the wooden planks out of the way.
- Take the septum ring and use it on the door of the house to the right to knock.
- Here you can go inside and talk to the lady inside about Rachel.
- Ask if something happened before she disappeared.
- And where she might go.
- Ask the woman to show you Rachel’s room or move out if you don’t have the money.
- Take Rachel’s picture.
- Look on the table and take the washing soda and the screwdriver.
- Use the screwdriver to unscrew the fallen chair and take the spindle.
- Use the spindle on the yarn tool to the left and take the yarn.
- You can read the note telling you how strong the yarn is.
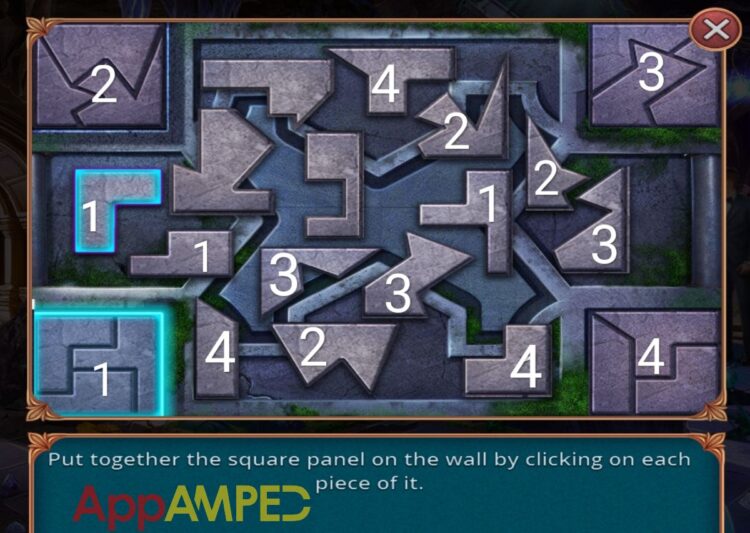
Task – See the memories kept on the altar.
- Behind the fireplace to the right, there’s a hole.
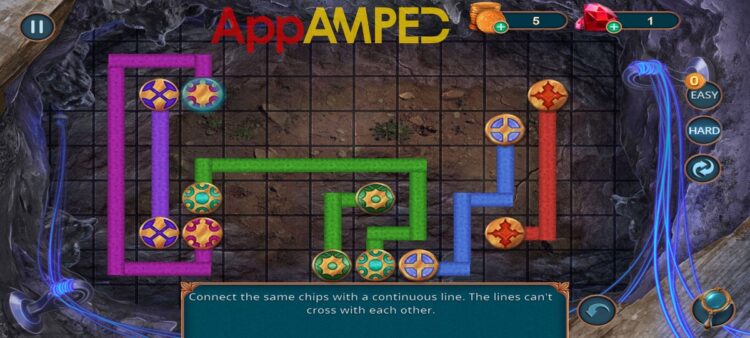
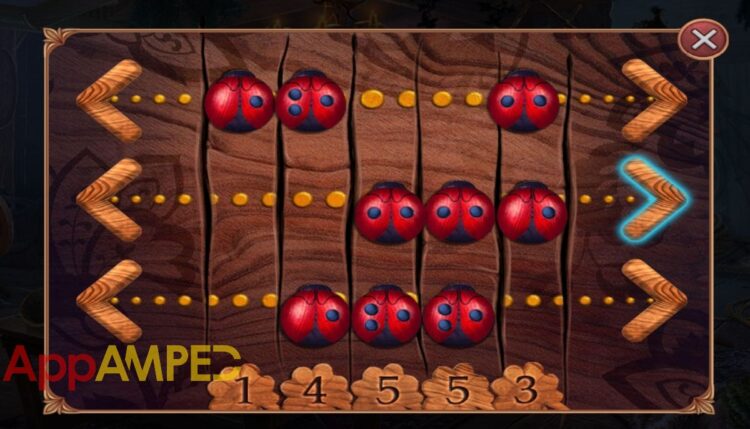
- Use the yarn to get down there and solve the game.
- Connect the same chips with a continuous line. The lines can’t cross each other.
- Now that you managed to go through, search this place for clues.
- In the back, by the gate to the right, you can use the screwdriver to get a piece of moss from the ground and reveal some gears.
- Check the bushes right ahead, take the ladybug (1/2) and the cork.
- Now check the red liquid on your right.
- Stop the flow with the moss and look at the note.
- Take the axe and put the candle on the right side, the washing soda on the edge, the respirator next to it, and light up the candle with the matchbox.
- Go to the water and use the axe to cut a piece of wood from that tree.
- Take the wedge and go back to the well.
- Use it and the weather vane to pull the bucket up and read the note about rust.
- Take the ritual stone (1/3)
- Go back to the shed again and find the objects shown on the bottom.
- Make a mask from the wooden plank.
- Put the missing taller on the scale.
- Water the pot to get the plant.
- Put the herbs in the basket.
- Wipe the desk to see the sign drawn there.
- You’ll find a pickaxe.
- Go with it where you found the matchbox and use it to get the tweezers.
- Go inside the house and use them to get a blue flower (thistle) and a glove.
- Go inside the house where you made the yarn and use the glove and the cork to get phosphoric acid.
- Go in the garden and where the blood water was running.
- Put the phosphoric acid here and the recipe with what you have to do to clean the rust.
- You’ll have a ritual knife and you can go to the center area where you found the ladybug.
- Put Rachel’s photo on one of the circles and the thistle on the other.
- The ritual knife in the middle and play the hidden object game by dragging each object on the bottom to the pictures above.

- You’ll find a witch figurine.
Task – Meet with Rachel
- Go to the gears in the back and put the witch figurine on the stone circle.
- Underneath you’ll find a trident fork.
- Go to the well and use the trident to pull the nails and get another ladybug (2/2)
- Go inside the house to the fallen chair and put the ladybugs there to start another game.
- You’ll find a diamond drill.
- Use it on the drawer of the desk here to find another ritual stone (2/3)
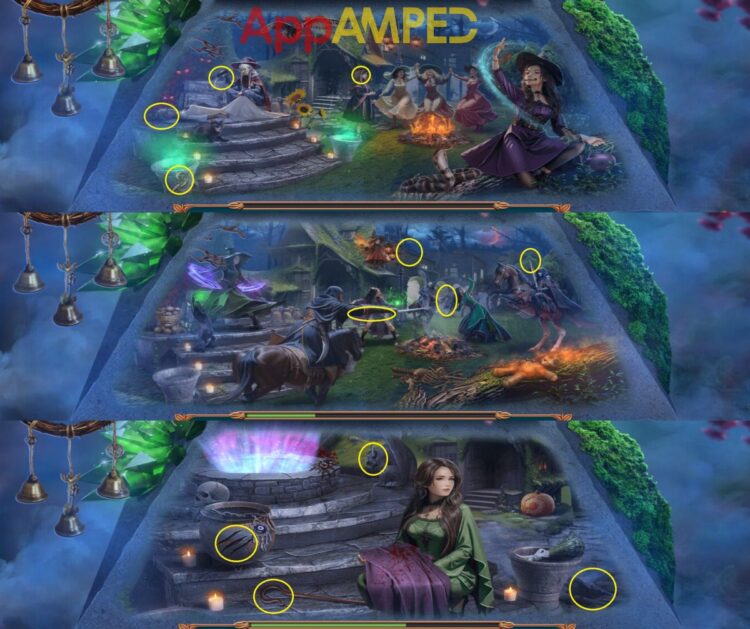
- Go to the altar again for another spot-the-differences game.
- Use the green crystal to switch between the two pictures and find the differences.
- Take the fishing net and use it in the water to grab the last ritual stone (3/3)
- Take all three to where you got the ritual knife and go to meet Rachel.
- She’ll charm you, and you might not have much choice but to Panic.
Task – Find Albert
- As Albert’s girlfriend, you need to use the phone to track him down.
- Take the ring from inside the phone case.
- On the red wall to the left there are some weapons, take the gun and the magnet.
- You can read more about witches and what can they do.
- Get a closer look at the gun and notice you need to find some bullets for it.
- Check out the window and use the magnet to open it and get the pliers, the paper, and the dagger badge.
- Behind the man (Albert’s father) there’s a box where the dagger badge will fit just fine.
- You’ll find a letter inside and wires for the computer.
- Go to the computer, put the phone here and add the wires to track him down.
- Choose a path that will prevent your location tracker from hitting the moving chips.
- 1st Path: The best path is 2, and you need to tap the play button when the horizontal chip is above the 2 button.
- 2nd Path: Choose the 2 again and start it when the chips are in this position.
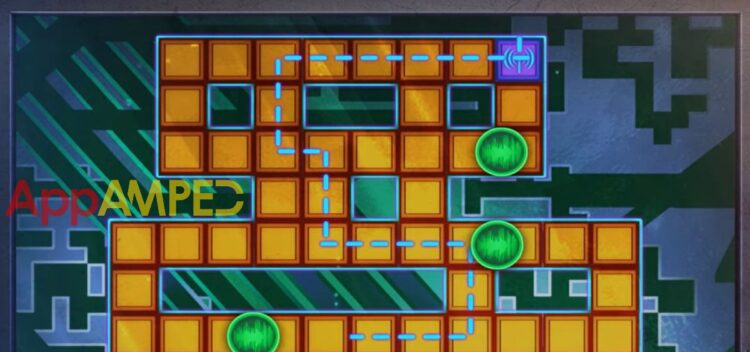
- 3rd Path: Pick 3rd route and only start it when the chips are positioned like this:
Task – Save Albert’s life
- Find all the objects shown below.
- Show him the ring you have from him.
- Now you need to look for the Water of life.
- Check the statue on the left and take the clay shard.
- Look at the column on the left, take the golden nugget, and read the note about fairies.
- Go to the fountain and get some water in the clay shard to give to Albert.
- Tell Albert he’ll have another chance.
- He’ll give you a fancy key.
Task – Learn about Rachel’s plan
- Insert the key into the wall where Albert is standing and enter the room.
- In front of the first archway to the left, there’s a pile of rubble where you’ll find a metronome and rubber bullets.
- On the right around the glowing gold, you’ll find the fairy.
- Use the clay shard to move the dirt and get the piece of stone.
- Take this to the third archway on the left and click on the pieces that form each tile in the corner.
- You’ll find a trigger inside.
- Put the rubber bullets and the trigger on the pistol.
- Look at the ceiling and shoot the red button to drop the elevator.
- Switch the lever to be able to climb up the ladders.
- Bottom right lever – bottom left lever – top right lever – bottom left ever – top left lever.
- Bottom left lever – top left lever – bottom right lever – top right lever – bottom right lever
- (From left to right) 3rd lever – 2nd lever – 1st lever – 4th lever
- The tunnel leads into Albert’s house.
- Check the closet behind the knight’s armor.
- Take the bolt and the moonstone.
- Look at the red fridge and use the magnet to open it.
- Play the game inside the fridge to find the objects needed.
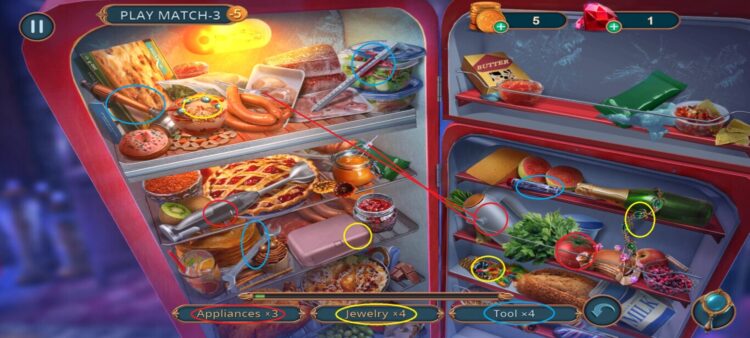
- Get the sticker with the vacuum off the refrigerator first.
- Then gather the rest to get the beet.
- Go to the closet, put the paper over the code, and scratch the beet over it to take it with you.
- Go to the toolbox in the bottom right corner and put that code over.
- Read the note and take the pliers.
- Use the map to go to the room with the computer.
- Use the pliers to get the halberd from the wall with the weapons.
- Go to the window and use the halberd to get the tongs there.
- Go to the room with the fairy and use the tongs to get the emerald from the left side rubble.
- Give it to the fairy and she’ll come with you.
- Go to the room where you met Rachel and ask the fairy to give get the ladder down from the column on the left.
- Take the note with the awakening spell from the top.
- Put the spell on the water of life fountain here and solve the puzzle.
- Tap on the drops in the right order to get into the vial at the same time.
- top left – middle left – top right – middle right – bottom right – bottom left
- Take the memory vial with you and give it to Albert at his home.
- He’ll give you a keychain and you can use it to pry open the closet.
- Take the pump and go to the toolbox.
- Nearby there is a valve you can use the pump on to inflate.
- Take the note from underneath to learn how to make antimagic shackles.
- Take the broom and go to the office.
- Look at the box under the painting on the right and use the broom to swipe off the shards.
- Take the other part of the pliers and put that together with the first half and the bolt to make the pincers.
- Go to where you found the emerald and use the pincers to break one of the stalagmite pieces.
- Now you’ll need to find all the threat sources.
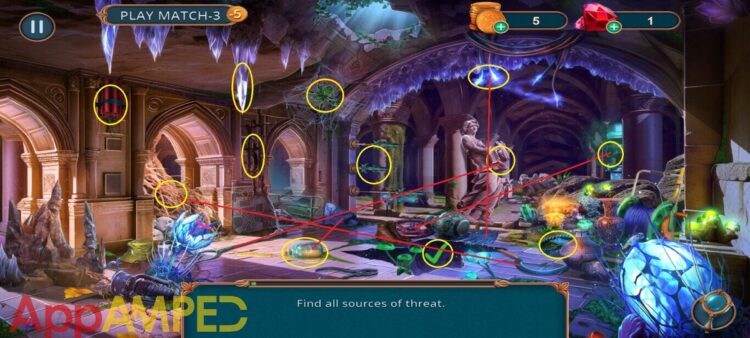
- Go to the third archway here.
- Put the stalagmite and the metronome to lift the rock and take the lamp.
- Go to the statue on the left at the life fountain and give her the lamp.
- Take the scroll to look at and find the red words within the pictures.
- 1st picture: witch hat and altar with red cloth in the back.
- 2nd picture: drawn white heart on the ground, light in the sky, and a hourglass on the left.
- You’ll find a heart broch that will go on the box you found at the top of the ladder on this column.
- There you’ll find the crystal flower.
- Go to Albert’s house and check the fridge again.
- Pair up the items to find the mortar and pestle.

- Take a closer look at the moonstone in your inventory and use the mortar and pestle to crush it.
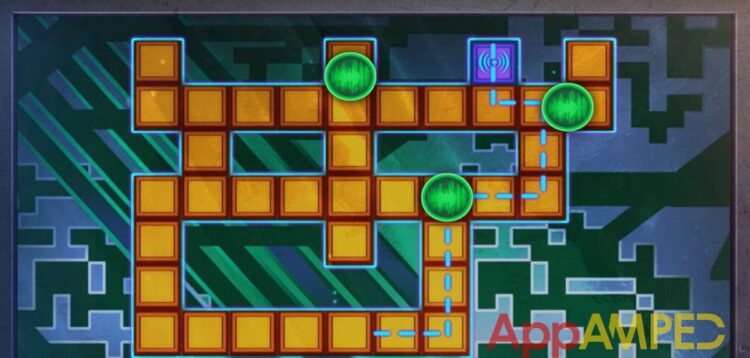
- Goto the oven and put the instructions for antimagic shackles near the hammer.
- Put the gold nuggets here, the crystal flower, and the moonstone dust too.
- The note will tell you how the hammer needs to be turned.
- So put the hammers in the right position, so when you check them with the play button they all point at the green light.
- Now you have the antimagic shackles to catch Rachel.
Now that you finished Episode 3 on Connected Hearts, you’re one step closer to finish up the story. Your next stop is Connected Hearts Episode 4, so I might be right back with a new walkthrough for you.

Aylin is a content creator and co-founder of App Amped. She was a huge Tomb Raider fan before moving on to more casual titles. She spent way too much time tending for her FarmVille farm as well as playing text-based browser games. Now she plays and writes about mobile games, creating in-depth walkthroughs and useful guides.