
Welcome to another Living Legends walkthrough, where you can find all the answers to the puzzles and mini-games you encounter in The Red Trace, a mysterious and dark story.
Living Legends: The Red Trace hides more than just puzzles – it holds the key to something far more sinister. Explore hidden object scenes, escape room challenges, and twisted mini-games as you uncover the truth.
The Red Trace Walkthrough
Read the note, take the amulet, and look at Ruby’s picture. Talk to Ruby and take the chest from her. Now look for a way to get inside.
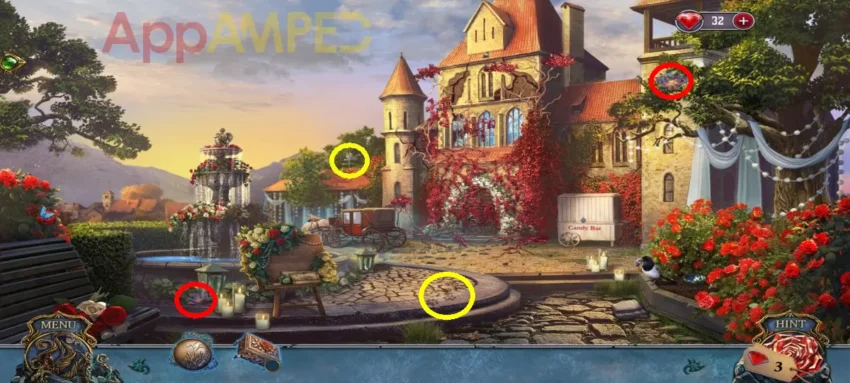
Note for collectibles: I circled 2 morphing objects and 2 flowers in this scene.
Open the chest to find a blue ribbon and a journal. Look through the journal and find the highlighted words in the pictures there. Take the magical recipe, the mirrors and the scissors from inside the chest.
Look at the sign in front of the fountain to find a map and a letter you can read. Use the scissors to get a crystal. Check out the bird on the right, then take the dirty bowl after the magpie leaves, and the rag.
Go to the magpie on top of the fountain and give it the crystal so it gives you the cupcake. Go to the Candy Bar and put the cupcake here to open it, then look inside. Read the newspaper and find all the items.
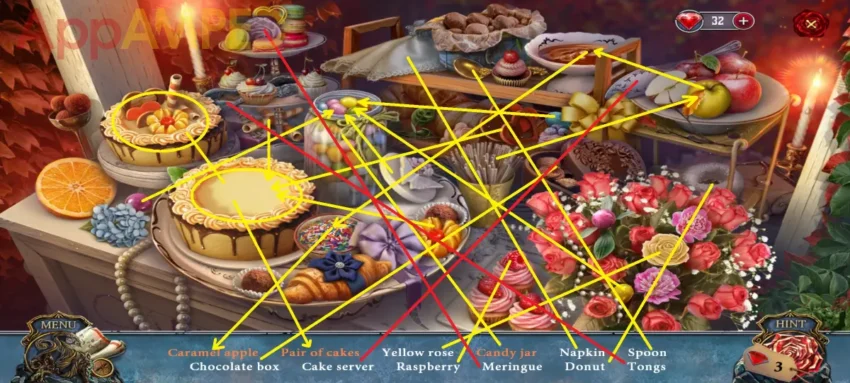
Take the cake serve and look at the red rose bushes again. Use it to dig in the dirt to find a statuette. Go to the door of the chapel and use the scissors to cut an ivy branch, then take the can.
Go to the fountain and fill the can with water. Look at the dirty bowl, then use the rag and water to clean the bowl. Open the magic recipe, then use the ivy, the bowl, and the statuette to make ivy powder.
Open the mirrors and use the ivy powder to make magic mirrors. Then go to the door, use them on the ivy there. Adjust the image of the wolf and go inside the Chapel.
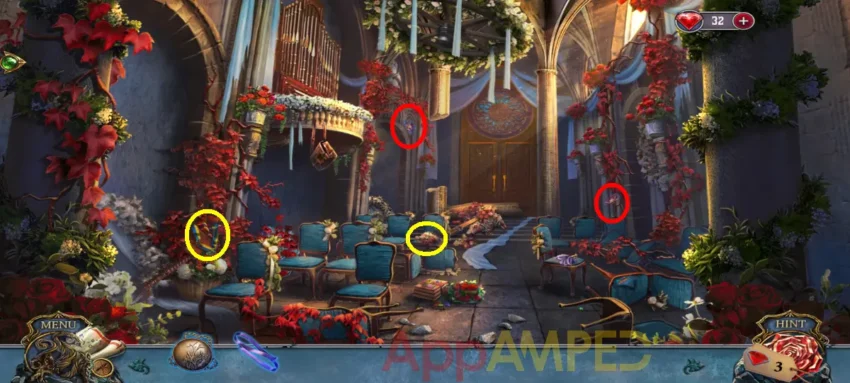
Note for collectibles: I circled 2 morphing objects and 2 flowers in this scene.
Check the rows of chairs on the right, take the broken fan and use the ribbon to fix it. Look at the fallen chair and rip the upholstery. Look at the books next to the flowers on the ground and use the fan to remove the glass shards, read the note on the flowers, then open the book a compass decoration (1/2),
Go to the double doors at the trapped boar. Take the amulet part on the wooden board and put the amulet over it to fix it. Take the wedding decoration over the boar and the keys.
Check out the bag hanging under the organ. Use the wedding decoration to get the bag down, then use the keys to open the bag. Move the tiles so the middle slots correspond to the keys.
Take the tweezers, the broken compass, read the note, then open the gift and use the upholstery to get the shard. Go back to the chairs on the right, use the tweezers to get the green compass decoration (2/2).
Now put the decorations on the compass to fix it and present it to the red amulet. Go to the boar, use the shard to free it, give the compass to the boar, and save the man by playing the mini-game.
Go to the chairs on the left, remove the roses, then take the cord and the drapery. Use the drapery to fix the pillar. Take the carriage. After the accident, take the umbrella, then find your way back up.
To be continued…

Aylin is a content creator and co-founder of App Amped. She was a huge Tomb Raider fan before moving on to more casual titles. She spent way too much time tending for her FarmVille farm as well as playing text-based browser games. Now she plays and writes about mobile games, creating in-depth walkthroughs and useful guides.